Thanks for diving into this third part in my “Finding Your Feet” series. In case you need a re-cap,
– Part One: Getting Started In Photography
– Part Two: Choosing Your Camera
This post is going to cover three crucial camera settings that you’ll need to know to start photographing effectively to meet your vision. Often referred to as the exposure triangle, these settings are ISO, Aperture, and Shutter Speed. At first glance, they appear quite technical but once I took the time to read about them and understand them they actually became almost second nature to me – just like breathing or blinking. These three settings relate to one another very much in an almost symbiotic circle – what happens to one impacts the other in some fashion.
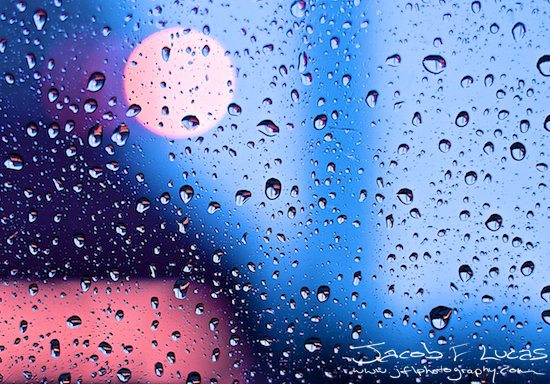
ISO 200, f/2, 1/250th of a second
When you take a photograph, you’re essentially allowing a select amount of light to pass onto your camera’s sensor for a given amount of time. These three settings control this, and how it’s interpreted through your lens and by your camera sensor. When it comes down to it, it’s all about exposure to light. You can vary ISO, Aperture or Shutter Speed up and down by distinct amounts to adjust for changes in light. These amounts are often referred to as “stops”. Think of this as some kind of relative measure of how much light is passing through your lens onto your camera’s sensor. Adjusting one of these settings up by one stop means you’re allowing twice as much light in your image. Adjusting two of these settings up by one stop means you’re allowing effectively four times as much light in your image. Same with the other direction; adjusting down allows half as much light in your image. Each setting adjustment is interchangeable.
We’ll discuss this a little more later, but first let’s begin by discussing these elements of exposure individually.
ISO
We touched on this in the last post in the series a little bit while discussing low-light performance. In the days of film cameras, ISO related to a particular attribute of the flim used to capture the image. In digital photography, the ISO rating is the virtual equivalent of this attribute. It’s also commonly referred to as “film speed”. ISO values start at 100 and increase linearly by double. Each increase in ISO by this magnitude is the equivalent of one measurement of light, or a stop of light. As the number increases, the camera becomes more sensitive to light, and the resultant image is brighter.
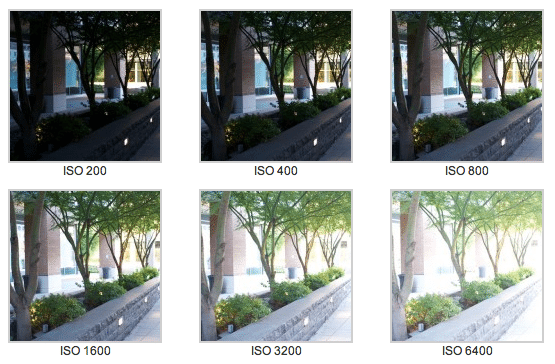
The darker your scene is, the higher ISO rating you need to allow for a correct exposure. Sounds great right? If your scene is so dark you need ISO 12800 that should be fine yeah? Not so. One artifact of high ISO values is noise. Noise is your camera “guessing” digitally what should be in those pixels. In film, this is usually where grain appears but in digital photography, the result is usually a conglomeration of unsightly off-colour pixels that ultimately detract from your final image. To remove this, we either need to use a lower ISO rating or noise reduction software.
Shutter Speed
When you take a photograph with a camera regardless of whether it is film or digital, there’s some mechanical process involved that raises a shutter to let light in for a select amount of time, and then closes it. This is usually measured in a fraction of a second, such as 1/125. This says the shutter is open and allowing light to pass through your cameras lens onto your image sensor for one-hundred-and-twenty-fifth of a second, or 0.008 seconds. Shutter speeds allowed by SLR cameras can be set anywhere between 1/8000 seconds (really fast!) or 30 seconds (really slow). Similar to ISO, each time you double or halve your shutter speed, you change the amount of light by one stop.

This setting is one that allows you to get visually creative. Recently I had the pleasure to photograph two of my good friends expecting their first child while they were around 6 months pregnant. At one point in ths shoot I positioned her in front of the sun, composed, and shot at a very fast shutter speed. This turned the image from being a portrait of specifically her into a portrait of general maternity – such a fast shutter speed blacked out the subject leaving a silhouette – removing all visible data that it was indeed, my friend in the picture. By drastically increasing the shutter speed, the subject is no longer my friend but instead pregnancy or maternity. You can also choose to “over-expose” by allowing in selectively more light into your lens or “under-expose” by allowing in selectively less light into your lens to achieve other effects too – they all play into your vision.
Aperture
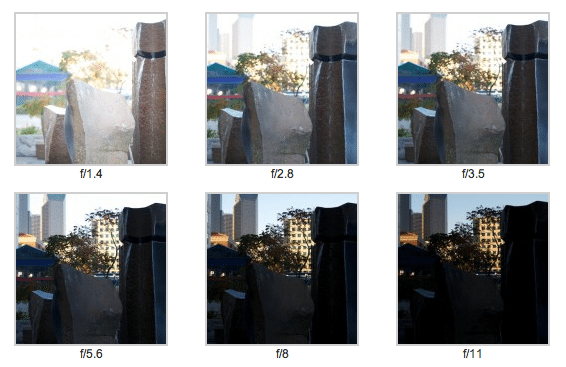
The best and most simple explanation of Aperture I can give is that it a setting that mirrors the job of the pupil in your eye. It’s job is to let in more or less light. In a darker environment, the pupil of your eye opens wider to allow you to see more around you. In bright light, the pupil contracts to let less light in. The expansion & contraction stops when it’s either as far open or closed as it can get or when your eye is viewing a correctly exposed scene. The value of aperture is expressed as a fraction of your focal length. For example, f/2.8, or f/11. A full stop increase or decrease in aperture is not double or half, but by a factor of √2. What this is telling you is that aperture blades are closing from the edge of your lens to form a small opening. The diameter of this small opening is your focal length divided by the aperture value. This value is often referred to as “the f stop”. It’s an odd concept to grasp because as the number increases your image gets darker and darker. This is because the hole inside your lens is decreasing in size – remember it’s your focal length divided by that number. As you increase how much you divide by, your value (or the diameter of the hole allowing light through the lens) gets smaller.
Smaller aperture values are often referred to as “wider apertures”. Larger values are often referred to as “narrower apertures”.
Aperture also controls your depth of field. Depth of Field, or DOF, is a portion of a photograph that appears in focus with respect to the other areas of the scene which appear blurry or out of focus. An image with everything in focus is said to have a wide depth of field which is achieved by narrow aperture values (f/11, f/16 or higher). An image with a select portion of the scene in focus is said to have a narrow depth of field which is in turn achieved by wide aperture values (f/4, f/2.8, or lower). DOF is also determined by how far you are away from your subject and the focal length of your lens. It’s a tricky beast to tame and like all other creative processes takes lots of practice.
In any sense of things, your camera is doing its best to mirror the behaviour of your own eyes. Just as your pupil’s expand and contract to allow light in so too does your camera’s aperture value.
Putting It All Together
Now we know the ins & outs of what settings account for a photograph’s exposurem it’s time to get to know them. We need to know implicitly how to adjust these settings on the fly to adapt to changes in the light on your scene. The good news is you’re not completely on your own. Your camera’s viewfinder has within it a meter to tell you based on your current settings how far over or under exposed you are. Change your settings around and get that meter to read zero. Zero is home. Zero means you’re correctly exposed based on the current light and settings in your camera.
Some examples…. let’s say that for a given scene a correct exposure is at ISO 200, f/11, 1/250th. To make this a stop brighter, we either increase ISO by double, open up the aperture by a stop, or slow down the shutter speed by half. Same for darker but in the opposite way for each setting. As I said earlier, these settings are interchangeable. If you need a narrower aperture only (i.e. to include more detail in your scene) and want to keep the same exposure, we’d need to adjust more than one setting to account for the narrower aperture, or smaller opening in the lens. For ISO 200, f/11, 1/250th, if we narrow the aperture to f/22, that’s two stops narrower (f/16 and then f/22). Since this makes our scene darker if we don’t adjust any other settings, we can either adjust ISO or shutter alone by 2 stops, or 1 stop for each. An equivalent exposure is ISO 400, f/22, 1/125th. Another equivalent exposure is ISO 800, f/22, 1/250th. Another is ISO 200, f/22, 1/60. Each will produce the same overall exposure to account for the need for a narrower aperture.
Doesn’t make sense? No worries – it will. With a little practice!
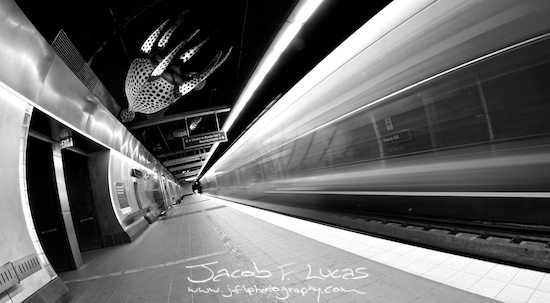
ISO 100, f/18, 3.0 seconds exposure
Take It To The Streets
This is where it all really comes together. It’s time to get out and exercise your camera. The first step is put your camera into manual mode and leave it there. You won’t learn the ins & outs of these settings through automatic modes. You just won’t. This needs to be second nature to you. Head out with whatever settings your camera has set, and take a picture. See what happens as you adjust ISO, shutter speed and aperture… and understand why. Each setting feeds off the others.
I’m going to end this post with one little tip to help all this really sink in. Find a blindfold, and blindfold yourself with your camera in hand. Raise your camera to your eye as if you were about to take a photograph. Try to adjust your cameras ISO without looking (your blindfold is keeping you honest here!) with your camera at your eye. Now try aperture. Now try shutter speed. Try them in different combinations. Figure out what adjusting each of these settings will do to your image. Know where your cameras buttons are and what they do. Know how to adjust ISO, aperture, and shutter speed without looking for the buttons. This will help you later on when you have your camera ready to shoot and you don’t miss that one special moment by pulling the camera away from your eye to find that one setting to adjust.
Got it? Great! Now we’re ready to shoot!
<< PREVIOUS: Choosing Your Camera
–
![]()
Photo Credit: Jacob F. Lucas
Originally from Hobart, Australia, I’m a photographer currently living in Seattle, Washington. I enjoy photographing everything native to the pacific northwest and the surrounding areas.
My passion for photography has grown over many years. In early 2001 I was given my first digital camera by my parents. It was a modest device, but it did spark something within me that led me to where I am today. Something about capturing the world in front of me in a single frame gripped me. Then I moved to Seattle and it has led me down to photographic path I’m on (and loving!) today.
My images are an insight into the world as it’s seen through my eyes. In the end, what I’m mostly trying to capture is not just people or places… It’s the feeling. It’s what drives us. I have a keen interest in many post-processing techniques but HDR holds a special place in my photographer “tool bag” to help convey my story.
What do I enjoy photographing? Everything! I love it all, from portrait & landscapes to urban architecture and everywhere in between. The camera has come a long way since the days of yesteryear, but even if they were not comprised of the technology they are today, the reason they inspire me would endure: to show the people of this world just how truly amazing the planet we live in is. For me, it is all about capturing those incredible places & moments.
Company: jflphotography
Phone: 206-414-9505
Website: http://www.jflphotography.com
Twitter: @jflphotography
Facebook: http://www.facebook.com/jflphotography
Here’s how you can share your tips, techniques and tutorials on CurrentPhotographer.com
*The Current Photographer website contains links to our affiliate partners. Purchasing products and services through these links helps support our efforts to bring you the quality information you love and there’s no additional cost to you.
Great post, as usual. If you do want to make your photo brighter by doing one of the 3 things you mentioned, is there one that’s more preferred than another? Like I’m guessing it’s preferable to not raise your ISO too much because of the noise factor.
Thanks Michelle! It all depends on your situation – each setting will affect your image differently. As you said, higher ISO will brighten your image but introduce more noise. A slower shutter speed will brighten your image, but it may slow it down so much you introduce camera shake (not an issue if you’re using a tripod). A wider aperture will brighten your image but also narrow your depth of field.
Each has their own impact but in terms of the preferred method, there isn’t one really. You need to assess for the situation you’re shooting in. Sometimes you don’t have a choice and are forced to adjust one setting because of low light, lack of tripod, etc.
Sometimes, you need a wide depth of field so you can’t change your aperture. Shutter speed may be the way to go there but if it slows down your shutter speed so much that you’re image is blurry, you may need to increase your ISO. Each camera behaves differently at higher ISO – you should know what ISO setting is safe to shoot up to and not go beyond that setting. For example, my D60 can’t really shoot above ISO 1600 without much noise but my D700 can go to ISO 6400 before I start to see the same noise in my images.
The takeaway is experimentation. Try them all! Develop the feel to know when to change what setting and what that setting does to your images. Hope this helps!
RT @TrevorCurrent: Finding Your Feet: The Special Three. Learn all about the exposure triangle. https://currentphotographer.com/finding-y… #photog #togs #p …
RT @TrevorCurrent: Finding Your Feet: The Special Three. Learn all about the exposure triangle. https://currentphotographer.com/finding-y… #photog #togs #p …
RT @TrevorCurrent: Finding Your Feet: The Special Three. Learn all about the exposure triangle. https://currentphotographer.com/finding-y… #photog #togs #p …
RT @TrevorCurrent: Finding Your Feet: The Special Three. Learn all about the exposure triangle. https://currentphotographer.com/finding-y… #photog #togs #p …
RT @TrevorCurrent: Finding Your Feet: The Special Three. Learn all about the exposure triangle. https://currentphotographer.com/finding-y… #photog #togs #p …
RT @TrevorCurrent: Finding Your Feet: The Special Three. Learn all about the exposure triangle. https://currentphotographer.com/finding-y… #photog #togs #p …