Over the past few months I have read a number of online articles giving advice on how to achieve a ‘proper’ or ‘correct’ white balance, some of them from reputable sources. They go on to explain how to get a so called ‘proper’ white balance by the use of things like a grey or white card which should be set at the start of a shoot by using the preset white balance function on your camera. The trouble is that this advice by itself can be a little misleading and they should really qualify their posts by stating, ‘This is how to set a neutral white balance for use in certain shooting situations ‘. A neutral white balance will render white objects white, eliminating colour casts from various light sources, such as a table lamp for example. These situations will include things such as product photography, portraiture, record nature photography etc., and the way to achieve this is simply to place a grey card in front of your subject and select the preset white balance option on your camera, it will then prompt you to take a shot to measure the colour temperature of the light thus setting a neutral white balance.
For scenic and pictorial nature photography it is not always necessary to set your white balance in this way. We can use our white balance for more artistic purposes.
What we can do as scenic photographers is to learn to use the various white balance settings in a more creative manor, which will help to bring added mood to your pictures. The various options may include Daylight, Cloudy, Shade, Tungsten and Fluorescent which are set at various colour temperatures ranging from yellow through to blue. (On a side note there is also a green though magenta shift referred to as ‘tint’, and can be found in various RAW conversion software programs. Any noticeable casts in these colours can be altered here.) There will also be an Auto white balance option and on some high end models there will also be an option to set a specific colour temperature, measured in Kelvin. While the Auto option can be great in some situations, its main purpose is to automatically adjust and remove what it thinks to be a colour cast. For us as landscape photographers the Auto WB can be a pain and I would recommend that you don’t bother with it. The camera doesn’t know the sun is casting a lovely golden light across the landscape, instead it sees the yellow as a problem and tries to remove it by adding more blue.
I like to think of the white balance settings like coloured filters, much like the ones I used to use on my film cameras.
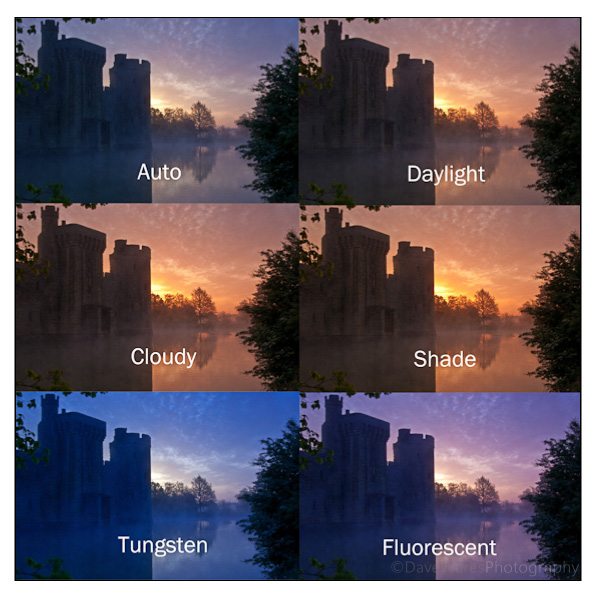 Look at the top two pictures above: The colour that morning was most accurately represented by the Daylight WB setting. As you can see the Auto WB has all but killed the warm light.
When I was using film and I wanted to give added warmth to a scene I would use a warming filter such as an 81C (pale orange) or an 85(amber). On the digital camera we can get the same effect by setting our white balance to either Cloudy or Shade. We can also go the opposite way and try to cool the scene, perhaps giving a more ethereal feel by using something like an 82A filter (pale blue). On the digital camera we can use the Tungsten or Fluorescent settings to achieve a similar effect.
So as you can see, the way you set your white balance depends very much on the situation you are in and the artistic interpretation you may wish to present. When you’re next out and about try taking shots of the same scene cycling through the white balance settings and see how they effect the mood of the picture. If you can, always shoot RAW files as you will easily be able to make corrections or slight adjustments come post capture, with programs such as Lightroom and Adobe camera RAW having the same white balance options as found on your camera. This is not an excuse for laziness though as you should always aim to get the pictures as good as you can at the time of shooting.
Thanks for stopping by.
*The Current Photographer website contains links to our affiliate partners. Purchasing products and services through these links helps support our efforts to bring you the quality information you love and there’s no additional cost to you.
Based on the south coast of England UK, I love to photograph landscapes and nature. In addition to this, over the past two to three years I’ve become fascinated with Urban Exploration and dereliction.
I’ve always had a passion for creating art, studying art and design during my school years and spending much of my time watercolour painting. After a brief love affair with playing rock guitar, photography was to be the next step in my creative life and I haven’t stopped since.
My photography has always been a continuous journey, constantly trying to gather as much information as I can to help push my photography to new levels and explore new avenues of creativity.
I love sharing the things I have learned and over the past few years
I have been an active committee member of a local camera club, giving occasional tutorials on photo skills and basic Photoshop techniques. I am also the proud winner of ‘The Portman cup’ for ‘Best Image of 2010′ at the Sussex Photographic federation’s Projected Digital Image competition.