Shutter speed might be less complicated than aperture, but the effects of this setting can play a big role in your photographs. The shutter is your cameras barrier to the world. When the shutter is open, the world is flowing onto your camera sensor, or film. Knowing how long to let this detail past your shutter is what makes shutter speed an intricate part of the exposure triangle.
Before we dive into this article, I will only be talking about shutter speed. There are more nuances to this mechanic that play a role in choosing a shutter speed. For now though, we will look at what shutter speed does, and why you would play with this aspect of photography. I also want to note that I use light and detail as interchangeable terms.
There are two main reasons many people will want to play with shutter speeds. The first is to portray motion in a still image, while the second is to control the flow of light. Let’s dive into each of these setups and look at their use and why you might consider one shutter speed over another.
Starting off, the control of motion is quite possibly the most widely used trick for shutter speed manipulation. Shutter speeds come in measurements of time. For example, you might see a photos metadata listing a shutter speed of 1/125. This means the photo was captured at 125th of a second. Shutter speeds can range from hours, to fractions of a second as quickly as 1/8000th of a second.
Let’s dive into a few examples of when controlling motion will become the key element to your photography, and we will start with fast shutter speeds. Fast shutter speeds are really dependent on what it is that you are looking to capture. Let’s say you want to capture a bee on a flower, but you know your presence is going to scare the bee off. You have mere seconds to capture this bee before it is gone. Setting a shutter speed as fast as something like 1/500th of a second might be your best option to catch that bee before it takes off, or becomes blurry in your photos.
Another example, and one more commonly used, is stopping a water droplet as it hits a body of water. You know these images in forms like: a strawberry falling into a bowl of cream, raindrops hitting a body of water, and a coffee droplet hitting a steaming cup of coffee. These images are all made possible thanks to faster shutter speeds stopping that brief moment of action. Capturing something like a strawberry hitting a bowl of cream is greatly benefits from shutter speeds of 1/1000th of a second, or faster.
Example photo:
Here we see an example of the upper end of slow shutter speed, yet fast enough to almost capture this hit:
 Shutter: 1/125
Aperture: f/4.8
ISO: 400
Slower shutter speeds go miles to conveying motion, most often found in blur. Say you wanted to photograph a conductor directing a symphony, and part of this photo was to convey the motion of the conductor’s hands as he worked his magic over the symphony. Setting a shutter speed of half a second or longer will do the trick.
Another example is in the form of all those landscape photos with bodies of water like lakes, ponds, and rivers in them. Ever notice how the water in many of these images will have a nice milky, or satiny, type look to them? This accomplishment happens by slowing down the shutter to allow more blur, and motion, to happen while the camera is capturing all that detail.
Example photo:
Blur = motion in a still image.
 Shutter: 4 sec
Aperture: f/16
ISO: 800
Time to look at the reverse side to shutter speed, or the control of light flow. Just as a fast shutter speed can stop a water droplet on a dime; it can also be used to restrict light. Slower shutter speeds work on the reverse side by allowing the camera sensor to soak in light, sometime referred to as detail, for longer periods of time. Let’s look at two examples for controlling the flow of light.
Faster shutter speeds are more necessary for bright lighting conditions. Say you are going to take a photo of the sun setting over the mountains. You want to position the sun in the frame, thus flooding the camera with bright light. To keep this photo from becoming over exposed, or washed out, setting a faster shutter speed of something like 1/500th of second might be necessary to keep the photo properly exposed.
Example photo:
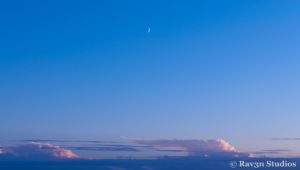
As this was shot directly into the sun, using a fast shutter speed become necessary.
 Shutter: 1/2000
Aperture: f/11
ISO: 100
Slower shutter speeds are most often used during nighttime photography. Photos like cars leaving light trails, or stars streaking through the sky are accomplished with slower shutter speeds. So, maybe you like all those light trails that cars leave in photographs. Set your camera up with a shutter speed of something in the neighborhood of five to ten seconds and enjoy all the car streaks in your photos.
Example photo:
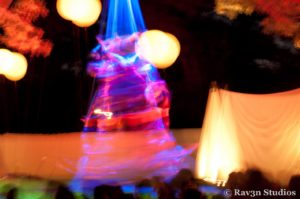
While not a good slow shutter speed, you can see how slowing things down at dusk becomes ever more important.
 Shutter: 1/90
Aperture: f/8
ISO: 200
Now, there is a bit of caution to keep in mind when you shoot slow shutter speeds. No matter how good the vibration reduction is on your lens, nothing can correct a wobbly hand while the shutter is open for, say, a second or longer. If you plan to shoot with shutter speeds even 1/45th of a second, or longer, get a good tripod. The shakes are a slow shutter speeds kryptonite. Another good tip to reduce camera shake at these slower speeds, get a remote, or use the camera’s self-timer so your hand does not accidentally shake the camera when the shutter opens.
The best way to see how shutter speed works is to test it out in the field. Set your camera to the shutter priority setting (usually denoted by some sort of S on the settings dial), and shoot many photos at various shutter speeds. Do not worry about other settings, as the camera will handle those for you. If you do not have a program to break down the data on each photo, take a notebook and make notes of your settings. Most importantly, have fun, and let the creativity be your director.
Example photo:
Slow shutter speed plus a bit of hand movement for just a bit of fun!
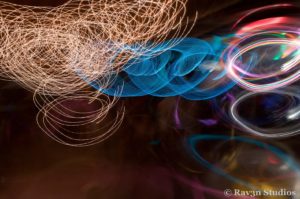 Shutter: 1 sec
Aperture: f/6.7
ISO: 800
*The Current Photographer website contains links to our affiliate partners. Purchasing products and services through these links helps support our efforts to bring you the quality information you love and there’s no additional cost to you.
This is where you would expect me to tell you about my life, how awesome I am, or why I am so superior to other people in this line of business. I would enjoy telling you how I have wrestled grizzly bears 10 feet tall. Maybe you would like hearing how I have taken on Velociraptors in my days as a young man. Even better is the story how I have traveled to the furthest reaches of space to stop catastrophic alien invasions. The problem will be that you might not believe my awesome stories.
I will keep these awesome stories for the campfire though. I’m just a man, taking pictures, trying to make a living. I ditched my education in computers in favor of pursuing my passion for photography. I enjoy a good cold beer on a warm day. I have a fondness of the outdoors.. I have enjoyed years capturing life’s unscripted moments. Hopefully, I can enjoy many more years of slacking off without fear of those grizzlies taking me out before my time.
My Philosophy is to capture those non-scripted moments. To capture the little details that this world really has to offer. From weddings to insects, I enjoy capturing the life, the details, and the moments that come and go in a flash.
Could you post something on obtaining sharp, crisp images? I’m working with a 5d mkii, 50mm 1.4 and a 24-70 2.8…my viewfinder is showing that my selected focal point is on the eye and when i look at the image on my computer…its another feature of the person just slightly in another direction that’s in focus…what am i doing wrong? (i’ve even had both lenses and camera sent back for refocusing and nothing wrong was found with all equipment)
Thanks in advance,
Stacey
RT @TrevorCurrent: Photography 101: Shutter Speed Fun. Learn how shutter speed can capture motion and control light. http://cpurl.net/9I …
RT @TrevorCurrent: Photography 101: Shutter Speed Fun. Learn how shutter speed can capture motion and control light. http://cpurl.net/9I …
RT @TrevorCurrent: Photography 101: Shutter Speed Fun. Learn how shutter speed can capture motion and control light. http://cpurl.net/9I …
RT @TrevorCurrent: Photography 101: Shutter Speed Fun. Learn how shutter speed can capture motion and control light. http://cpurl.net/9I …