Using a fast shutter speed will freeze motion in its tracks, and using a slow shutter speed with moving objects will spread the image over time. This creates a sense of motion. There are many methods to achieve this motion blur, such as panning on a moving object, shooting from a moving platform (train, car etc), using the zoom feature while the shutter is open, moving the camera on a still subject, or keeping the camera fixed while the subject is moving. Here we will focus on the latter.

The Concept
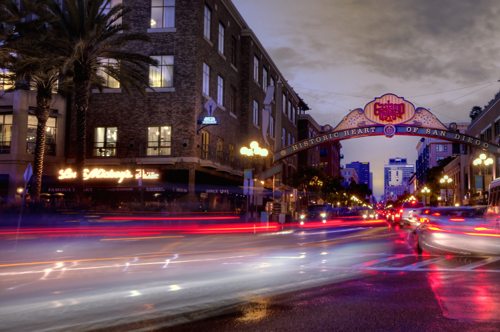
Keeping the camera still while using a slow shutter speed will generate a blurring of the moving objects giving a sense of speed. Slowing the shutter even further may exaggerate this and tend towards the abstract. Blur is nice, but keep in mind the basics of composition for all the objects that are not in motion, such as buildings, street signs with the Rule of Thirds in mind. Remember, you are trying to convey a storey and not just execute a technique. Imagine the lights as a river and compose the flow as if it were a landscape photograph. Look for low angles, and perhaps use a wide angle lens to exaggerate the motion as the subjects pass through the frame.
I have found that traffic is a great place to start and especially in an Urban environment. Shooting just after sunset provides just the right balance between ambient light and the ability to catch the oncoming or receding lights. When it gets darker, lights become highly saturated and non-moving objects a bit more difficult to expose properly.
If you have time, check out the traffic patterns before it gets dark and take a couple of test shots to check your composition. Also, try to get as close to the traffic as possible by looking for traffic islands or other vantage points. This will save some frustration later once you want to execute your shot. Look for some other vantage points as well, so you can quickly relocate if you are not satisfied with your first results.
The Set Up
You will need to have a camera that allows control over Aperture and Shutter speeds, or even better a DSLR that you can set to Manual. A good sturdy tripod will help to avoid any unintentional camera movement when the shutter is open to keep the non-moving objects crisp. You can also weight down the tripod with you camera bag hanging it from the center hook to further stabilize it. Using a remote shutter release helps as you will not even have to touch the camera, but if you don’t have one, use a self timer on your camera after you have composed and see the shot emerging.
Some DSLRs allow a “Live View” from the back LCD display. This allows you to have a bigger view, but more importantly, locks up the mirror for less shake when you trigger the shutter. If you have a lens hood, use it to avoid unwanted light intrusion.
The Camera Settings
How slow is too slow? It depends on the light and the speed of the subjects. Try a shutter speed of between 3 and 10 seconds and start with an aperture settings of f8 to f16. If you like the blur but it is too dark, open your aperture and take another shot. If the exposure is right, but not much blur, slow down the shutter and compensate with a smaller aperture. I always shoot in RAW, so I can make some adjustments later with my post processing software. Keep your ISO settings low (100) to avoid noise. Also look at the scene and try to judge the temperature of the light. Is it mostly incandescent, neon, sodium vapor and try a few test shots to adjust your White Balance. Often it can be a mix, so some experimentation might be in order.
My Examples

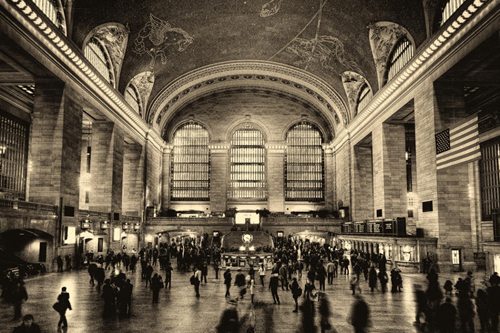
During a recent trip to NYC, I wanted to create a vintage postcard look to the hustle and bustle of Grand Central Station. I wasn’t carrying a tripod, so I sat the camera on the balcony and held it down with two hands while Kathleen, Wife and Photographer, released the shutter with the remote release. Sometimes you don’t need to haul all sorts of gear to stabilize your camera, just a bit of creativity. My Nikon D90 was set for ISO 100, f22, 2s and Incandescent WB. The Vintage look came in post processing with Adobe Lightroom.

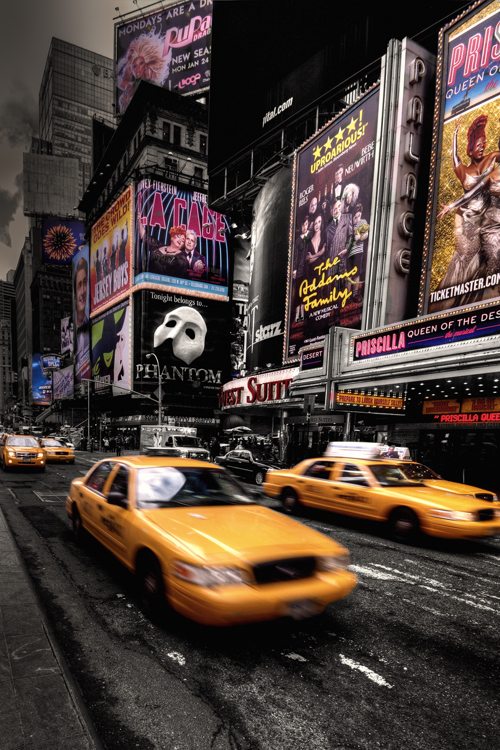
This image was also without a tripod. I found a sturdy traffic sign that I used to stabilize my camera and fired the shutter without any remotes. I took a number of shots with varying shutter speeds until I got what I was after, the zooming Yellow Cabs. Here I had to have some anticipation to judge the ebb and flow of traffic.

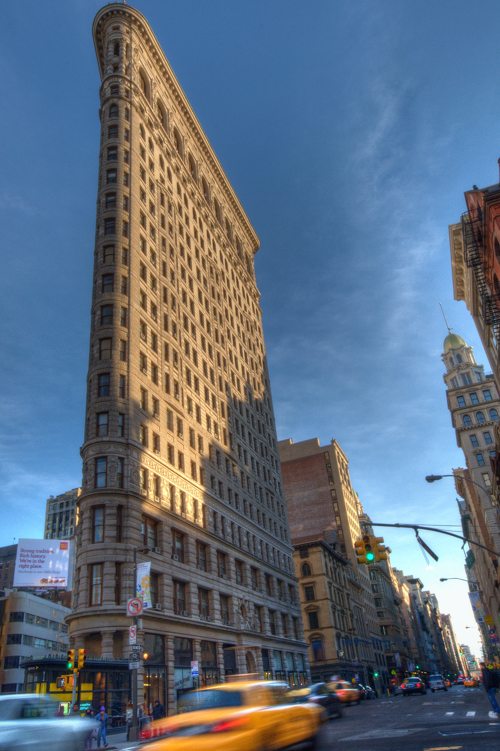
The Flatiron Building in NYC is just Iconic. There was a convenient traffic island where I could set up a Gorilla Pod instead of a nice tripod. These are small, flexible contraptions that allow you to anchor your camera to almost anything. This shot was taken after securing the camera to a trash can. Once again, careful observation allowed me to get my Yellow Cab zooming through the frame.
Take your Time
If your first attempts give you a dark shot with vague bright lights do not be discouraged if it isn’t what you expected. Look at your camera settings and make adjustments and try again until your vision is captured. Photography is all about learning and making your gear capture the image in your mind and the story you want to convey. And most of all, enjoy the journey.
I would like to thank Trevor Current for inviting me to craft this article. His website is a source for all things Photographic.
Erik Kerstenbeck is the Co-Owner of Kerstenbeck Photographic Art, a small outfit operated from San Diego, California. Erik is an Electrical Engineer by trade but has been self studying photography for 30+ years starting with an old Brownie Box Camera given to him by his Dad.
Erik thrives in all aspects of Light, Composition, Technical aspects of equipment and Post Processing Techniques. His newest interest is High Dynamic Range Photography, and Infrared Imaging. He and Kathleen (Wife, Photographer and Partner) travel extensively creating unique Landscape and Urban images, as well as Event, Environmental and Studio Sessions. But most of all they both have a great passion for the art of Photography and have fun on the roads of discovery!

Company: Kerstenbeck Photographic Art
Phone: 858-603-3412
Email: contact@kerstenbeck.com
Website: http://www.kerstenbeck.com
Blog: http://kerstenbeckphotoart.wordpress.com/
Twitter: @ErikKerstenbeck
Facebook: http://www.facebook.com/kerstenbeckphotographicart
Photo Credit: © Erik Kerstenbeck
Here’s how you can share your tips, techniques and tutorials on CurrentPhotographer.com
–
*The Current Photographer website contains links to our affiliate partners. Purchasing products and services through these links helps support our efforts to bring you the quality information you love and there’s no additional cost to you.
Hi
Many thanks to Trevor for encouraging me to write this article. It really helped me to focus (no pun intended) on Motion Blur and how one can execute it!
Regards, Erik
Good article Erik, and some great photos to go with it! Thanks for sharing.
Thank you all for all the kind coments!
Happy Shooting, Erik