Archive for Make Better Photographs

Back To The Beginning – Behind My Eyes

Technology is amazing! Just in the 9 short years I’ve been involved with photography, digital cameras have advanced a great deal. At that time, Canon and Nikon were the big dogs and the 5D Mark II had just come out with HD video capability – it changed the way we looked at our cameras from that point forward. Now, if a pro rated camera doesn’t have 4K video, external mic connections and 30+ megapixel resolution, people scoff at it!

So you might ask me why with all the digital advancements, why would I be intent on going back to the beginning? Back when the camera was merely a light capturing box with no mechanical or electronic parts? Just look at the images in this article and you might understand, although some of you may still wonder it afterwards.

The images displayed here were taken with a new pinhole camera. That does sound like an oxymoron doesn’t it, a new pinhole camera. Pinhole cameras were some of the first created and are of the simplest camera technologies. A lens about the size of pinhole with a door over it, encased on a light-tight box with film film behind the lens. That’s pretty much it! The lens may be small, but it’s very wide and has a crazy depth of field – nearly everything in the field of view is in focus. Exposures are really long, there’s lens distortion and dark vignetting – many photographers didn’t like these qualities in an image long ago, mainly because people don’t look so good in them, thus the continued innovation in the technology. But for a guy like me, who loves those characteristics in landscape images, these cameras are right up my alley!

What Triggered The Pinhole

Since getting back into film over the last year, one thing that kept escaping me was the ability to take long exposures, especially with my medium format camera (Pentax 645). It’s capable, but I do not have a remote release for it and the only lens I have is a 75mm f/2.8, which equals out to about a 50mm for 35mm cameras. Wider lenses were going to cost a few hundred dollars, so I never really looked into anything much.

Thankfully, the film photography community is awesome at sharing awesome pics AND communicating details about them. Several folks were sharing these incredibly moody, long exposure images and low and behold, they were taken using a pinhole camera. Doing my own research on the net, it was apparent that there were a number of options for custom built, brand new pinhole cameras on the market. Companies like Zero Image and Ondu make handcrafted wooden pinhole cameras, and there are many custom built options out there as well – you can pretty much make a pinhole camera out of anything that can be made light leak tight!

The camera most recommended in my Twitter circles was the RealitySoSubtle 6X6 manufactured by James Guerin of Au Premier Plan in France. There are several versions of the RealitySoSubtle and they are all made of high quality material on CNC machines. They’re solid, too! Once Santa came around last year, I asked for one and he delivered!

Taking Pictures

To give you a better understanding of how to operate this particular pinhole camera, I’ve put together a short video – take a second and check it out.

As you can see, the Pinhole Assist App is a huge asset here. Based on the first roll results, at least to my eye, it’s spot on accurate too! The app comes preloaded with numerous types of pinhole cameras and standard production films, and it lets you build combo presets so that if you use common cameras and stocks, you can switch between them easily!

Even with the site lines on the camera, there’s still quite a bit of unknown in the composition, especially the first time through. For instance, the difference between the bottom and top pin was unknown to me, so I just guessed at it. Good news is, it was obvious in the images which was used. Take the image above from Pin Oak Lodge. There’s a lot more sky and very little foreground in front of the trees – obviously the top pin. In the image below, the limb is very prominent in the foreground, meaning that this image was taken using the bottom pin. Based on these results and my typical likes in taking pictures, I’ll likely use more of the bottom pin than the top one.

Who’s It For?

The nature of this camera makes it very much a niche tool. For someone like me who loves moody, long exposed, black and white images, this is a natural fit in my bag. However, as wide as the lenses are, as well as the heavy vignette and distortion, it’s likely not a camera for portraits or anything moving, unless you’re wanting to show the movement, although, it’s hard for me to put limits on people’s creativity!

It’s also not for the impatient. Even though there is no menu system, settings, focus or any other knobs or switches, the set up should be one of determination and intent, especially being that there are only 12 shots per roll of 120 film.

Good news for any photographer, the camera (this one anyway) is so small and handy that it can fit in just about any open space in your bag, as long as there’s room for film and a tripod! There are many other designs, however, that are rather large and much more bulky to carry around.

More than anything, it’s fun and anyone who wants to add more fun to their photography experience could use this camera! 12 shots on the first roll went quickly for me and I’m already seeing many more compositions to grab, even right around the house!

What’s Next?

As the video above showed, the camera is locked, loaded and ready for some more exercise! If the next rolls show the kind of improvements I’m expecting from the lessons learned in the first roll, I’ll likely get rid of my Pentax 645 and use my pinhole as my exclusive medium format film camera. The Pentax is a fantastic camera, but it’s huge and I can’t easily pack it on trips due to it’s weight and how much space it takes up. With this camera and my Minolta 35mm, I could literally carry both cameras and film with me on any trip I make!

The next roll will include even more fine tuning of understanding just how much can fit in the frame of these wide lenses and maybe yield a better knowledge of how the top and bottom pins differ! As with any tool, practice helps to perfect the process and images!

One thing’s for sure, this classic, but new, pinhole camera looks to be just the ticket for producing the images that are waiting right behind my eyes!

 

In A Different Light – Behind My Eyes

Over the years of taking landscape photographs, it had grown on me that only the light just before sunrise and just after sunset were worth taking pictures in. Well, that and daylight where the clouds were plentiful enough to knock the harshness of the sun’s light down to a manageable level. A recent trip to Colorado convinced me that the high contrast light is not only acceptable, but even preferred for some images, especially when coming into the frame from the side, or, side light if you will. The mountains have a way of changing people don’t they? Let’s take a look.

Chimney Rock, Ridgway, CO

If you’ve ever seen the 1969 classic movie True Grit, you might recognize the mountain in the image above, Chimney Rock, as it was where one of the pivotal scenes in the movie was filmed. It’s part of the Cimarron Mountain Range just outside of Ridgway, CO. Just before sunset, we had some awesome cloud cover that was really mixing up the light coming from the sun at camera right. In this frame, the sun was behind one of the clouds, and, even though there is some contrast in the bright and dark sides of the mountain, it’s still pretty evenly lit and flat.  You can see from the tree tops in Deb’s Meadow below that the sun’s rays were still out, just not on the mountain at this time. Most of the time, this is a preferred light for me as it allows latitude in processing and the contrast level is pretty neutral and adjustable.

In this image, the sun is starting to light up the mountain face, but is still subdued. Definitely better than the first image, but there’s limited coverage across the entire face and the light on the trees has now lessoned. In the image below, the sun’s light has really illuminated the mountain’s face and the trees below it. The contrast in the light now also makes the shadows a bit darker, creating more definition and detail, as well as just making the image more moody and interesting. The edited, completed image is just below as well.

Fully edited image in Abode Lightroom Classic CC

So what have we learned? Contrast from the sun’s light can be our friend! Canon Explorer of Light Rick Sammon has a saying, “Light illuminates and shadows define.” This is especially the case for side lit compositions with texture. If the sun was located directly above the mountain, the light and contrast would be totally different, with much of the details in the face and back of the mountain being washed out because the shadows are no longer defining these areas. So both quality and direction of light is terribly important, especially with textures and detail. Let’s look at another example, this one from my home town of Lexington, TN.

Beech Lake, Lexington, TN

What drew me to this spot were the still colorful leaves on this sycamore tree and the bright orange grass surrounding it. Before sunrise, the lighting was flat – there was nice color on the horizon, but not anywhere around this tree and grass. After shooting in the mountains, my thoughts has changed enough to say, “Once the sun gets up above the trees to the east, it would illuminate the colors in the tree and grass and give more definition to the scene through contrast.” So I decided to wait on the light. This image was taken right after the sun made its first appearance, lighting only the far side of the lake. As you can see, it helped me to see, for the first time, the beautiful warm tones on the opposite side of the lake, but drew my eyes away from my subjects, which were still very flat.

About twenty minutes later, the light was starting to hit the sycamore tree and better define it and the colorful leaves. However, the grass in the foreground was still flat and dark as the light had not reached it. The image still looks awkward because of the lighting.

After a total of about 40 minutes, the sun had made its way all the way around to the grass. The contrast now seen in the tree and the grass have increased the definition and detail of both and allowed them to be front and center in the image. The light on the opposite bank has evened out, or lessoned in some areas, making a more secondary part of the image, along with the blue sky and water. The finished, edited image is below.

Up until this colorado trip, I’d stop shooting once the sun was above the trees, and when shooting directly into the sunlight, it likely will stay that way. However, if the sun can be used as a side light to better define and detail a composition, my shooting time will definitely be extended further into the morning, as they were in these situations. It may take some patience – I mean, it’s hard to control sunlight. And, in some cases, it may not work out. Most of our outings in Colorado did not produce these type of results due to clouds continually blocking out the sun and keeping the light from hitting the mountain peaks. We waited and waited, but it never worked with us. Fortunately, mountains tend to be photogenic, with or without direct sunlight (evidence below). It’s never too late to learn new tricks in producing the images that are right behind your eyes!

Mt. Sneffels off of County Rd 7 in Ridgway, CO


New Analog – Behind My Eyes

In a previous post, Film Is Not Dead – Behind My Eyes, it was noted that the film industry showed hints of coming alive. This notion has continued as two new crowd funding sites have been created to start production on both new films stocks, Silberra B&W Photographic Film, and a new analog camera, the Reflex.

Image courtesy of Silberra

Silberra has been in the analog film industry since 2009, supplying chemicals, papers and film stocks. Their Indiegogo fund raising site is devoted to building resources for mass production of 3 new 35mm black and white film stocks and new photographic papers. At a time when companies like Fujifilm are still announcing the discontinuing of film stocks, it’s really exciting to see new developments in this area. As of November 11, 2017, this campaign has 20% of it’s $115,000 goal with two weeks left to go, so it’s looking bleak that they will reach their 100% goal. With that said, Silberra has communicated that they will continue with development and production of these films even if they do not reach their 100% goal. See the quote below from their Nov. 11 project update:

“We’re going to start mass market manufacturing of Silberra film anyway. We do have Silberra chemicals manufacturing, and we’ve just entered the final stage to produce Silberra RC Photographic Paper with variable contrast. Indiegogo campaign can help us to make all the things a lot faster and easier for Silberra film, that’s why it was launched and that’s why it does matter how much funds we will be able to acquire through the campaign.”

There are only limited reviews available for the new film, but communications I’ve seen were very positive and the images published using the new stocks look great! The film development includes a panchromatic series that is derived from old Agfa stocks, a brand new orthochromatic emulsion series and and isochromatic series still in development.

Image courtesy of Silberra

The Reflex camera, even though analog, is a bit of a different story. The reason being is that they are putting out the first newly developed analog SLR 35mm camera in over 25 years! They’re doing it with some new twists as well, including interchangeable film backs AND lens mounts! There’s even stretch goals to add Bluetooth capability, so there’s also some modern updates in the works. This is a totally new development – new company and new product – so not much history to build off of, but that did not stop the Kickstarter campaign from surpassing it’s 100% goal of $131,898 with more than 3 weeks remaining in the fundraising! Sounds like it’s touching a nerve of interest out there! Here’s a quote from their Kickstarter site:

“Reflex is a modern update of the timeless manual SLR 35mm film camera. Distinctive in its modular design, it combines contemporary mechanical and electrical engineering with the classic design of an analogue camera, making it the first newly designed manual SLR system in over 25 years.”

A Plea

OK, so with that said, I’d like to make a plea to you, the film people. Even if you don’t have a specific interest in either of these products or companies – maybe you’re an instant film person, or prefer something other than 35mm film – doesn’t matter. I encourage you to back both of these companies and help them reach their goals. Obviously, Silberra could use the help a bit more than Reflex, but you can still contribute to both. Why? Because it’s good for the film industry in general. New companies and new products breath life into the market. It may never get the big guys, like Fujifilm, to bring back products, but it may help these upstart companies find their niche and develop more new products for an industry that we love, and one that needs all the new life it can get! It also breeds competition and innovation into the market, which it could also use.

So the film industry is still alive and showing a bit more of it lately! Good news for all of us! The other good news is that you can help! Give it go! Who knows, these products may be exactly the tools you need to make the images that are right behind your eyes!

6 Tips for Mastering Macro Photography: by Shane Haumpton

Macro photography is a fun and rewarding niche that allows you to showcase the mesmerizing, otherworldly beauty of your subject by highlighting the minute details that are normally not visible to the naked eye. It also allows you to tell a unique story and connect with your audience through your images.

Whether you’re practicing to improve your craft or just learning how to get started, here are some of the best tips for mastering macro photography:

Choose the right macro lens

Even if you already have a macro lens in your kit, it’s important to make sure that you have the right one for your needs. Macro lenses are not the same across the board—there are certain nuances that differentiate macro lenses from each other, such as focal length, magnification, and focusing distance. There are a few more, but these are the three most important factors to consider when choosing a macro lens.

The right macro lens for you will largely depend on the subjects you plan to photograph. If your primary subjects are flowers, blades of grass, drops of water, and other inanimate objects, you can choose a shorter focal length of at least 45mm. If you plan on shooting skittish subjects such as insects or small animals, you need a macro lens with a focal length of at least 90mm.

Maximize the use of stabilization devices

Just as it is with other popular photography niches, camera stability is also important in macro photography. Photographers commonly use tripods to keep their cameras steady, which also enables them to use slower shutter speeds. In effect, having a slower shutter speed allows the use of smaller apertures that are perfect for bringing out more detail in your macro shots.

Other unorthodox but commonly used tools for keeping cameras or subjects in place include clothespins and clamps. Even a piece of cardboard can help keep your device in place and minimize the impact of the wind while you frame your subject. By all means, be creative with your camera, subject, and even backdrop support to improve your shot and achieve your desired output.

Learn to focus properly and accurately

It goes without saying that losing focus on your subject, despite having a well-composed frame or good depth of field, can ruin an otherwise beautiful shot. Focusing on different parts of the frame or subject can yield interesting changes in perspective, but you’ll still want to have the star of your image in sharp and clear view at all times.

One technique you can use in keeping the focus of your camera while shooting in macro is to set your camera in manual focus and then set your macro lens and focus ring at 1:1.

Afterwards, you can then slowly move the camera forwards or backwards while using a tripod or your stability device of choice until you find that “sweet spot” where your subject or a specific area of the frame is in sharp focus.

Be particular with your depth of field

Depth of field is crucial when taking macro pictures. If you’re a professional or an aspiring photographer, you’ve probably already noticed that sudden changes in depth of field can greatly affect the outcome of your shot. To avoid inconsistencies, you’ll need to use the correct settings.

One way to achieve the right depth of field is to set your camera on a surface parallel to your subject. This way, your sensor will be perpendicular to the object you are shooting and you can optimize your depth of field.

If you’re using a 1:1 macro lens setting, it is recommended that you set it to shutter speeds of 1/200 or faster to ensure sharp images, then use an aperture of f/22. However, many shooting conditions often require you to sacrifice either your shutter speed or aperture. If you have a choice, go steady with a still subject or tripod for your camera and shoot with slower shutter speeds. This way, you can use apertures of f/16 to f/22, where you can have a sharp subject and a good amount of background bokeh without underexposing your shot.

Experiment with various angles and lighting

Proper perspective and lighting play an important role in bringing out the beauty of your photographic subjects, so don’t be afraid to experiment. You can always use additional lighting, such as external flashes, ambient lights, sunlight, or makeshift light sources like lamps and flashlights, and even filters, to expose your subjects to your liking. Or, you can use reflectors to make harsh or direct lighting bounce and create a more diffused, soft lighting for your subject.

At the same time, Instead of capturing a macro photo that looks just like your favorite close up shot from a magazine, look for a new angle and make the shot your own. Simply tilting your camera, placing your subject off center, or changing your perspective can instantly make your macro photography stand out among the rest.

Be mindful of the composition

It is a common misconception that you do not have to bother with a subject’s surroundings in macro photography, since it involves the careful art of zooming in so close to a particular subject that the background is barely visible. In reality, you still do—especially if you want to capture a good photo with a more meaningful composition.

Photographers in general need to consider how their subjects and backgrounds work with each other in the frame. As a macro photographer, you also have to be mindful of how colors and textures play into the mix, especially when you’re zooming in to bring out details of a particular object or living thing.

While certain parts of the background will most likely be blurred in most of your close up shots, the photo will visually look and feel a lot better for your viewers when you are careful with your entire composition and the elements in the frame are in sync with each other.

Adding these tips to your existing knowledge about this niche will further improve your photography skills and quality of your photos, as well as allow you to market yourself as a more versatile photographer.


Shane Haumpton is a beginner in terms of writing, self-confessed coffee addict and shutterbug, and manages to do all these while enjoying life as a nomad. She is interested in writing on a variety of topics, ranging from lifestyle, photography, travel, and arts and crafts to gadgets, social media, and internet safety.
Twitter: @shane_haumpton

Here’s how you can share your tips, techniques and tutorials on CurrentPhotographer.com


Motion Blur Photography: by Erik Kerstenbeck

Using a fast shutter speed will freeze motion in its tracks, and using a slow shutter speed with moving objects will spread the image over time. This creates a sense of motion.  There are many methods to achieve this motion blur, such as panning on a moving object, shooting from a moving platform (train, car etc), using the zoom feature while the shutter is open, moving the camera on a still subject, or keeping the camera fixed while the subject is moving. Here we will focus on the latter.

The Concept

Keeping the camera still while using a slow shutter speed will generate a blurring of the moving objects giving a sense of speed. Slowing the shutter even further may exaggerate this and tend towards the abstract. Blur is nice, but keep in mind the basics of composition for all the objects that are not in motion, such as buildings, street signs with the Rule of Thirds in mind. Remember, you are trying to convey a storey and not just execute a technique.  Imagine the lights as a river and compose the flow as if it were a landscape photograph. Look for low angles, and perhaps use a wide angle lens to exaggerate the motion as the subjects pass through the frame.

I have found that traffic is a great place to start and especially in an Urban environment. Shooting just after sunset provides just the right balance between ambient light and the ability to catch the oncoming or receding lights. When it gets darker, lights become highly saturated and non-moving objects a bit more difficult to expose properly.

If you have time, check out the traffic patterns before it gets dark and take a couple of test shots to check your composition. Also, try to get as close to the traffic as possible by looking for traffic islands or other vantage points. This will save some frustration later once you want to execute your shot. Look for some other vantage points as well, so you can quickly relocate if you are not satisfied with your first results.

The Set Up

You will need to have a camera that allows control over Aperture and Shutter speeds, or even better a DSLR that you can set to Manual. A good sturdy tripod will help to avoid any unintentional camera movement when the shutter is open to keep the non-moving objects crisp. You can also weight down the tripod with you camera bag hanging it from the center hook to further stabilize it. Using a remote shutter release helps as you will not even have to touch the camera, but if you don’t have one, use a self timer on your camera after you have composed and see the shot emerging.

Some DSLRs allow a “Live View” from the back LCD display. This allows you to have a bigger view, but more importantly, locks up the mirror for less shake when you trigger the shutter. If you have a lens hood, use it to avoid unwanted light intrusion.

The Camera Settings

How slow is too slow? It depends on the light and the speed of the subjects. Try a shutter speed of between 3 and 10 seconds and start with an aperture settings of f8 to f16. If you like the blur but it is too dark, open your aperture and take another shot. If the exposure is right, but not much blur, slow down the shutter and compensate with a smaller aperture. I always shoot in RAW, so I can make some adjustments later with my post processing software. Keep your ISO settings low (100) to avoid noise. Also look at the scene and try to judge the temperature of the light. Is it mostly incandescent, neon, sodium vapor and try a few test shots to adjust your White Balance. Often it can be a mix, so some experimentation might be in order.

My Examples

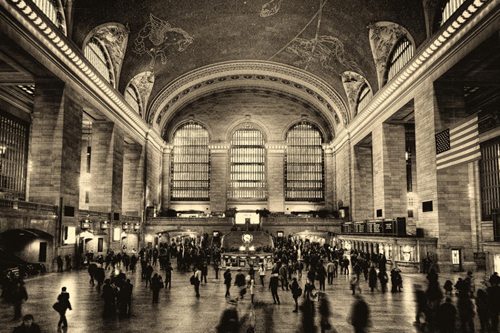
During a recent trip to NYC, I wanted to create a vintage postcard look to the hustle and bustle of Grand Central Station. I wasn’t carrying a tripod, so I sat the camera on the balcony and held it down with two hands while Kathleen, Wife and Photographer, released the shutter  with the remote release. Sometimes you don’t need to haul all sorts of gear to stabilize your camera, just a bit of creativity. My Nikon D90 was set for ISO 100, f22, 2s and Incandescent WB. The Vintage look came in post processing with Adobe Lightroom.

Times Square, NYC

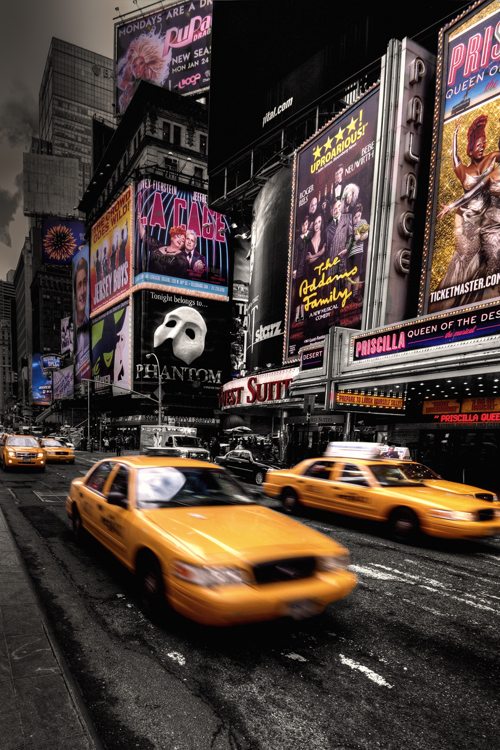
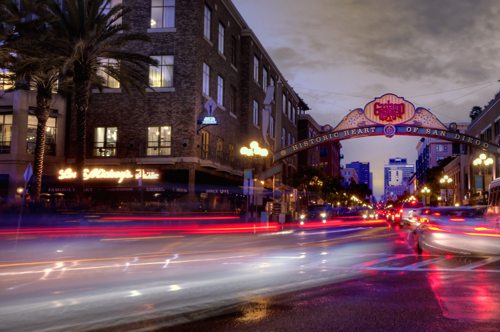
This image was also without a tripod. I found a sturdy traffic sign that I used to stabilize my camera and fired the shutter without any remotes. I took a number of shots with varying shutter speeds until I got what I was after, the zooming Yellow Cabs. Here I had to have some anticipation to judge the ebb and flow of traffic.

The Flatiron Building in NYC

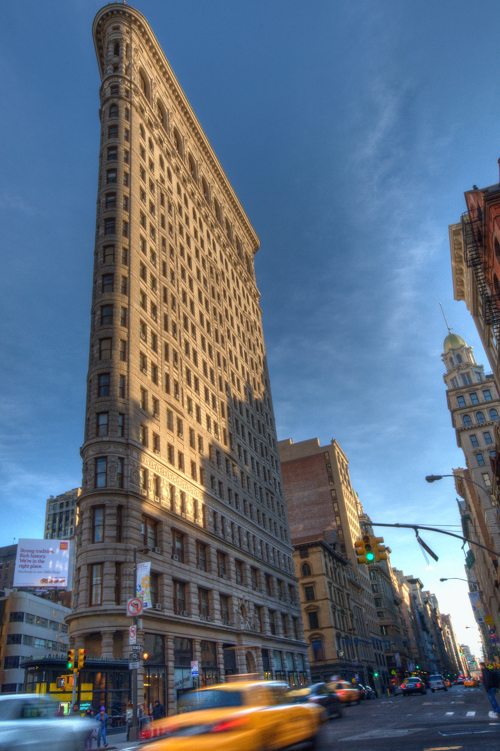
The Flatiron Building in NYC is just Iconic. There was a convenient traffic island where I could set up a Gorilla Pod instead of a nice tripod. These are small, flexible contraptions that allow you to anchor your camera to almost anything. This shot was taken after securing the camera to a trash can. Once again, careful observation allowed me to get my Yellow Cab zooming through the frame.

Take your Time

If your first attempts give you a dark shot with vague bright lights do not be discouraged if it isn’t what you expected. Look at your camera settings and make adjustments and try again until your vision is captured. Photography is all about learning and making your gear capture the image in your mind and the story you want to convey. And most of all, enjoy the journey.

I would like to thank Trevor Current for inviting me to craft this article. His website is a source for all things Photographic.


Erik Kerstenbeck is the Co-Owner of Kerstenbeck Photographic Art, a small outfit operated from San Diego, California. Erik is an Electrical Engineer by trade but has been self studying photography for 30+ years starting with an old Brownie Box Camera given to him by his Dad.

Erik thrives in all aspects of Light, Composition, Technical aspects of equipment and Post Processing Techniques. His newest interest is High Dynamic Range Photography, and Infrared Imaging. He and Kathleen (Wife, Photographer and Partner) travel extensively creating unique Landscape and Urban images, as well as Event, Environmental and Studio Sessions. But most of all they both have a great passion for the art of Photography and have fun on the roads of discovery!

Company: Kerstenbeck Photographic Art
Phone: 858-603-3412
Email:
contact@kerstenbeck.com
Website:
http://www.kerstenbeck.com
Blog: http://kerstenbeckphotoart.wordpress.com/
Twitter:
@ErikKerstenbeck
Facebook:
http://www.facebook.com/kerstenbeckphotographicart

Photo Credit: © Erik Kerstenbeck

Here’s how you can share your tips, techniques and tutorials on CurrentPhotographer.com

–

FILM REVIEW: AGFA Vista Plus 200 – Behind My Eyes

When it comes to film, I tend to lean towards two things: people and black and white – there’s no duplicating portraits taken with classic black and white film. With that said, I will still, on occasion, slap some color negative film in the camera just to try it out and see how it performs. Kodak Portra is one of the more popular color films for portraits and my experience has been pretty good with it, but it may have just met its match for my goto color portrait stock.

Agfa Vista Plus 200 is a relatively cheap, 200 speed color negative film – you can get a 36 exposure roll for under $5. It does not match up property-to-property with Portra, but it does work really well in certain areas that allow me to overlook its shortcomings. Let’s take a look.

Three rolls of the Agfa Vista Plus 200 were ordered and shot, two rolls were put through a Canon Elan 7 with a Canon 28-90mm kit lens. The other roll was used in a Canon AE-1 Program rigged with a Canon FD 70-210mm f4 lens. Both were shot at the recommended metered exposure in the camera and at the film’s recommended speed of 200 ISO – no pushing or pulling in development.

Even though all rolls were shot at the cameras’ suggested exposure settings, both produced different results, in general, overall exposure. The Canon Elan 7 + 28-90mm lens combo produced a slightly underexposed image, but also generated a more saturated image. The AE-1 Program + 70-210mm lens setup produced images with very good detail in the shadows and mid-tones, but tended to overexpose the highlights, especially in frames with a high contrast range.

This highlights one of the limitations of the film – dynamic range. There’s not a lot of wiggle room for exposure – you either overexpose highlights or you get deep blacks and high saturation – not much in between. Even though this seems like a big deal, the sharpness of the properly exposed areas, especially through the AE-1 Program setup, are very pleasing and the blown out highlights don’t seem to take away from the image. This is most certainly a personal observation and other photographers may not like this ‘limitation’. To each their own – the beauty of photography.

The image above is one where the highlights were mostly overexposed. These are two of my great nephews who hadn’t seen each other since they were in diapers up until they met at my house this past Labor Day! I loved that they were off on their own but the bright background, and even some of the light on their skin, was just too bright in the mid-day sun. The details, however, look good and for me, the image still works very well.

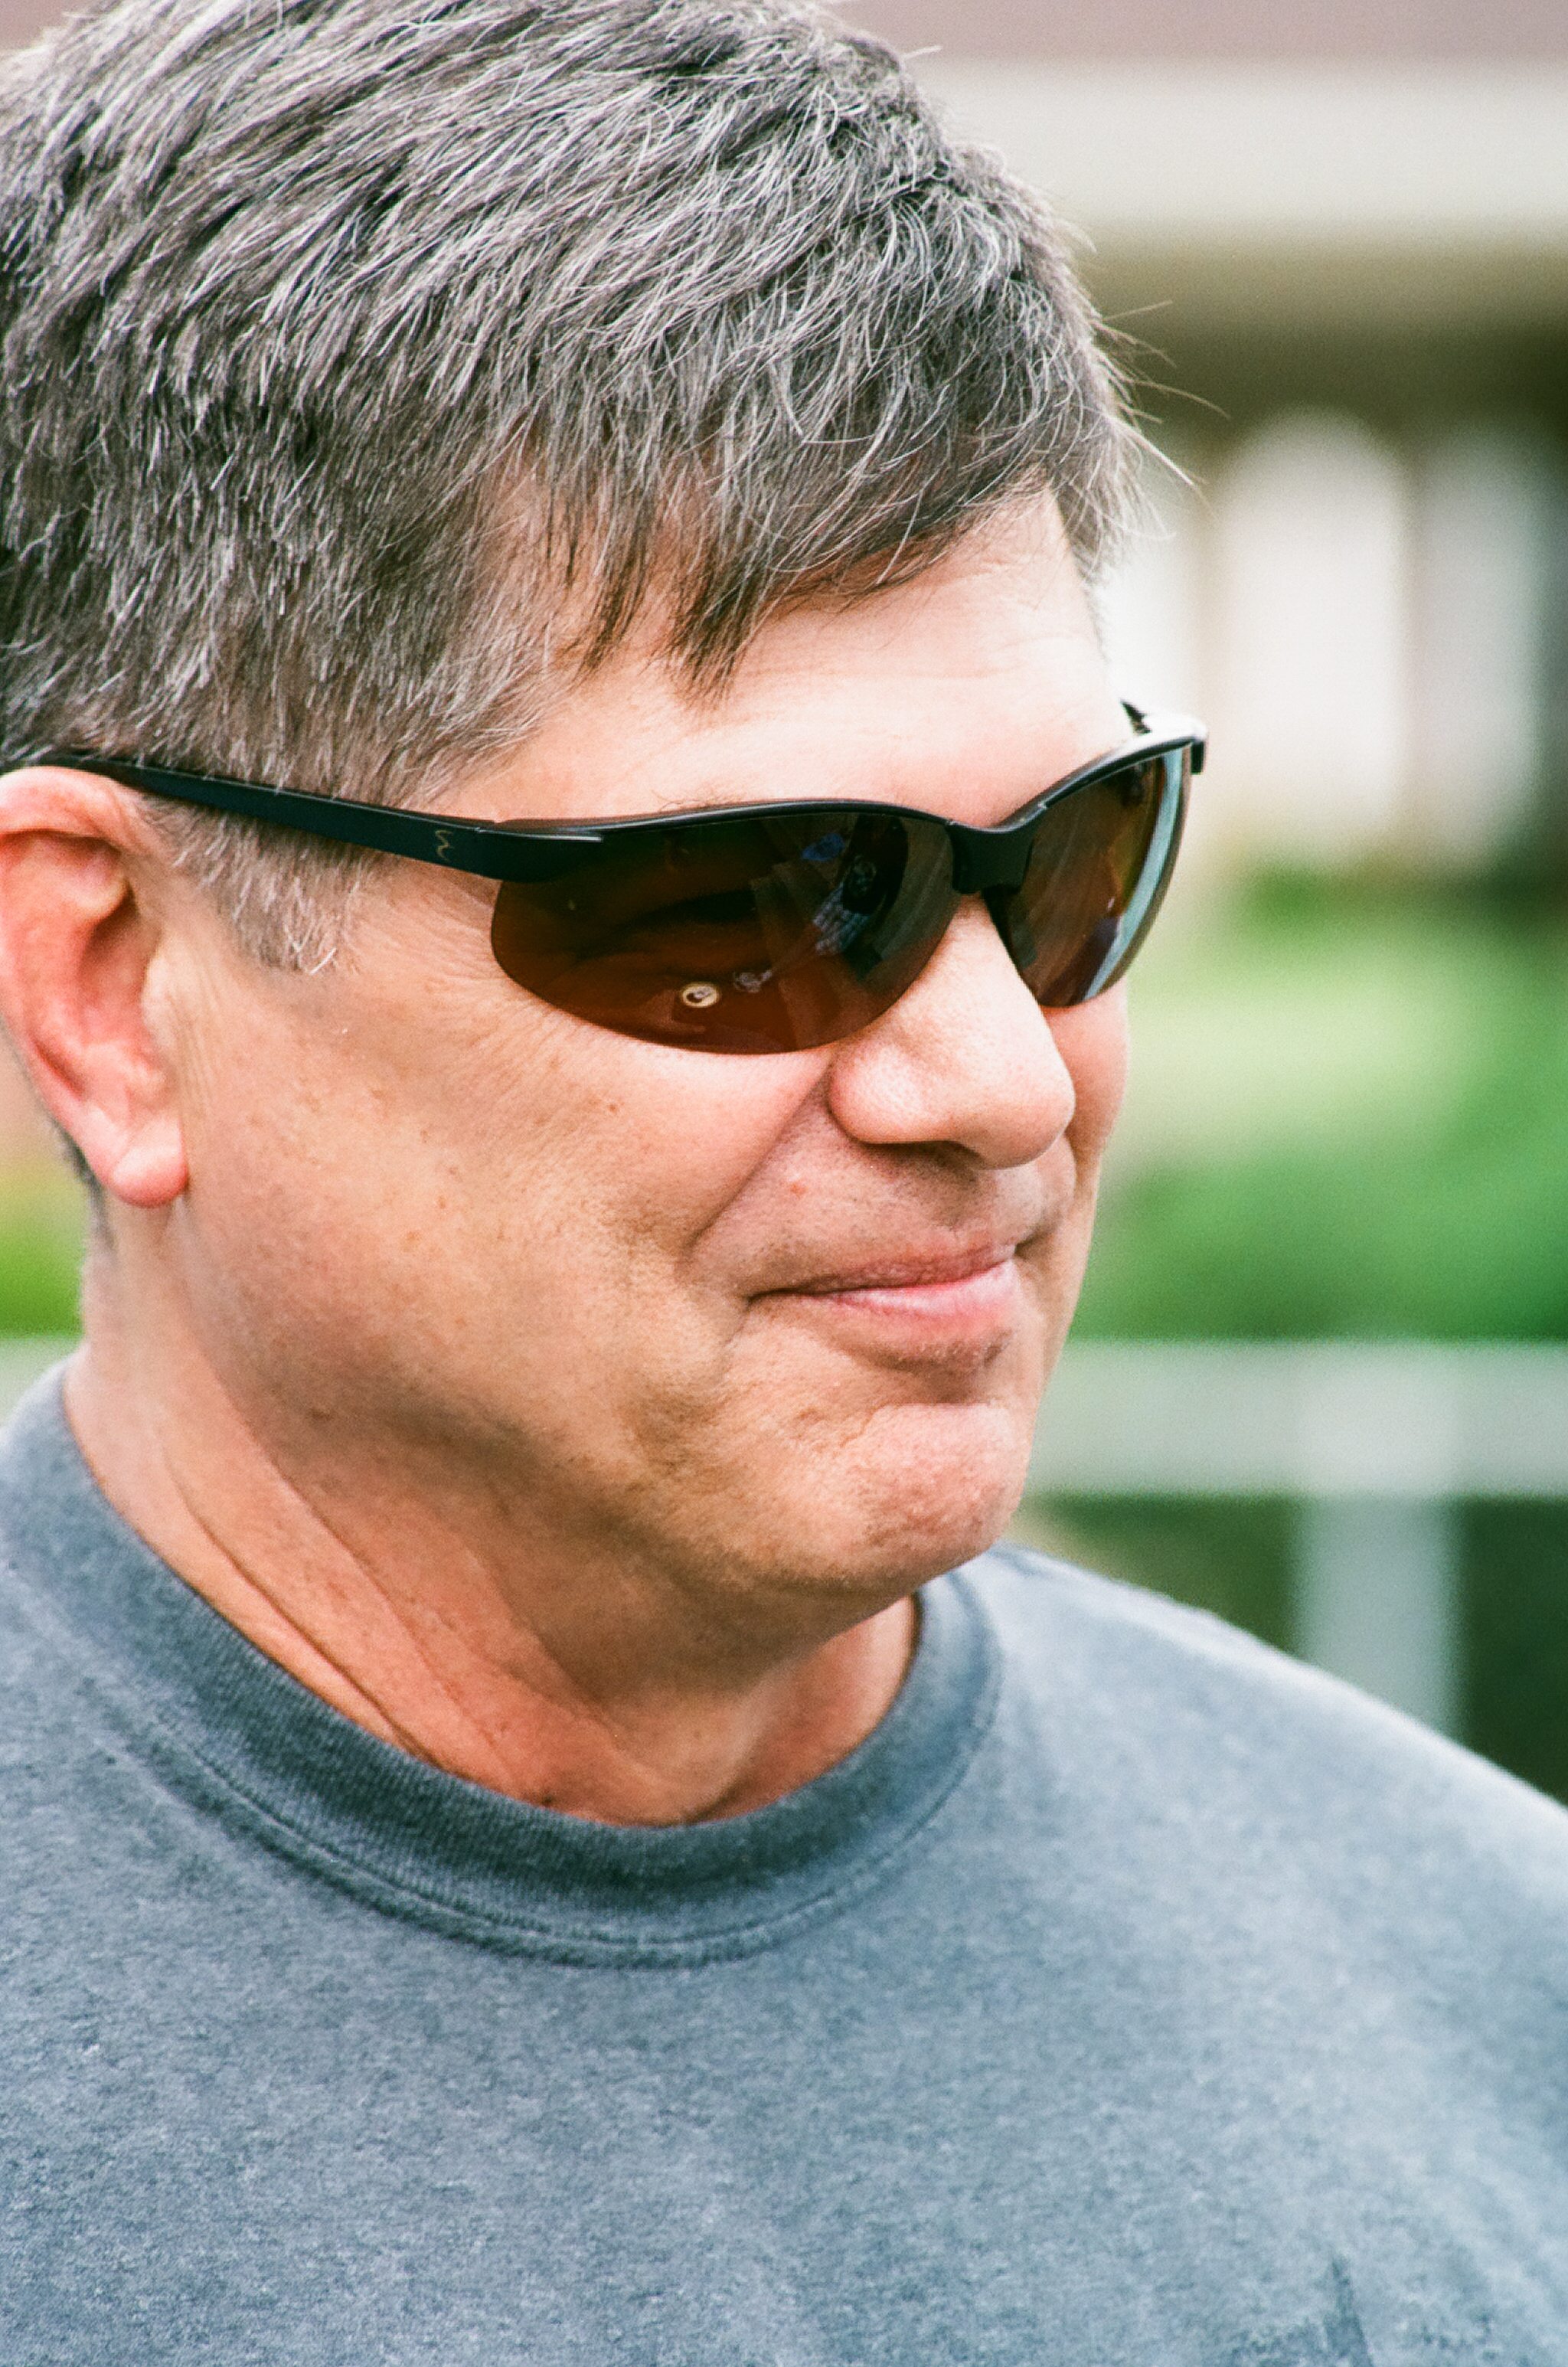
When the light evens out, like in the portrait of my brother below, the detail really shows out. So for mid-day sun, slightly underexposing may be the way to go, while exposing with the camera’s meter in overcast or even light situations works really well.

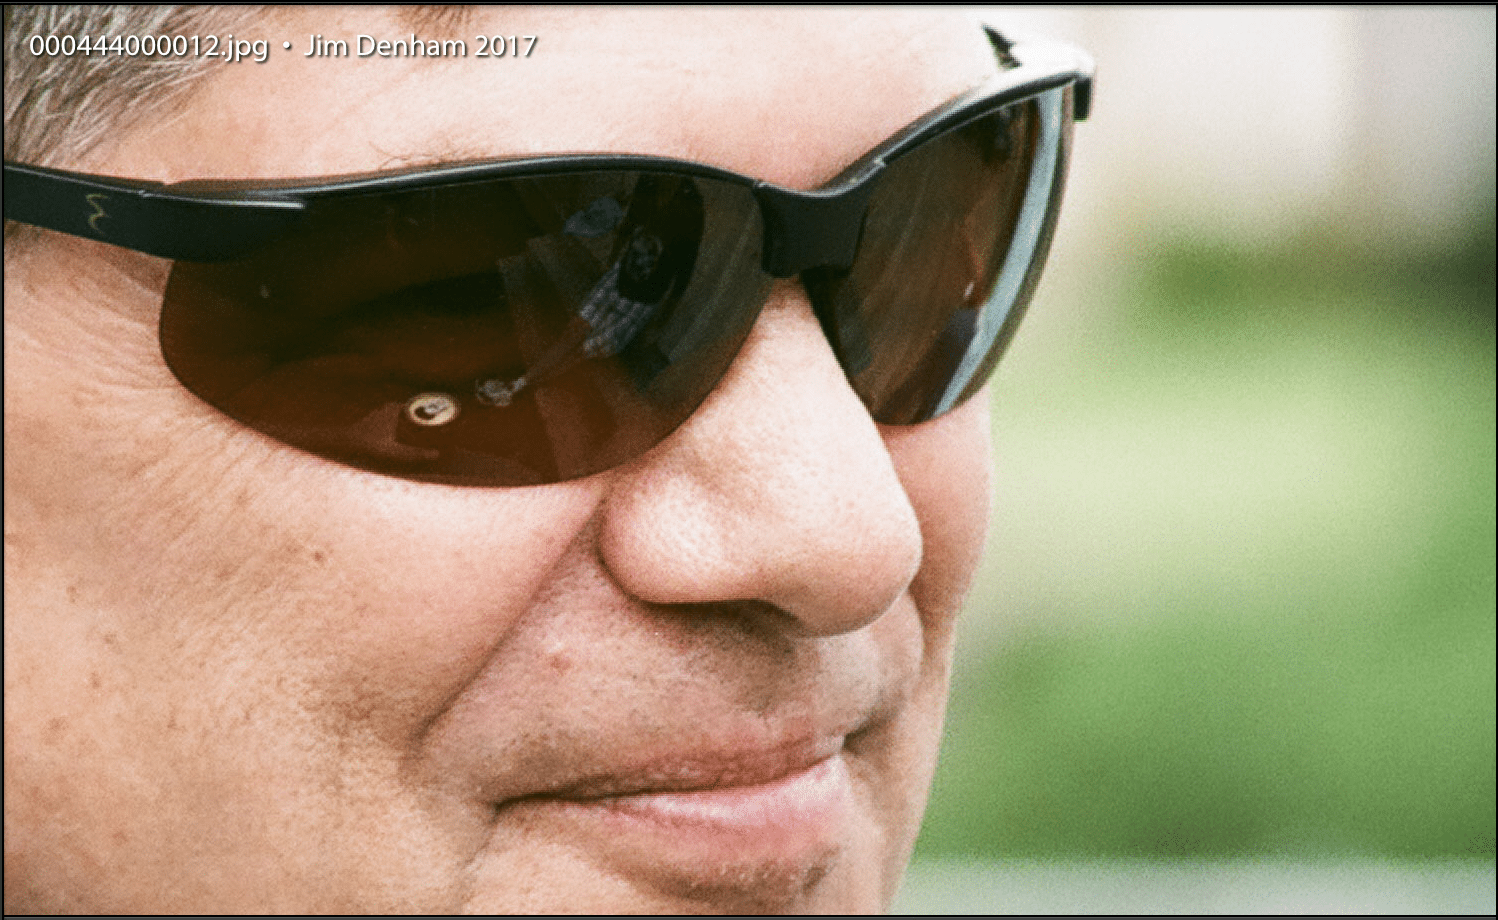
Being a relatively slow film having an ASA speed of 200, one would expect the grain to be pretty fine and not have a big impact on the image, which is the case. Below, the portrait of my brother is a 1:1 zoom in Lightroom of the same image. There is grain for sure, but it’s very smooth and holds little impact in the image. The detail is still so good that the pop can reflection in his sunglasses is easy to make out!

One of the best qualities of the film is the color. Take a look at the image below of my great-nephew Grayson. His skin tones look very nice while the orange of his clothes and the blue of the pool are quite saturated and vibrant! This is where the film stands out in my opinion. The colors, even when overexposed, still look beautiful and unique.

It’s not all perfect though. reds and greens tend to be a bit strong with this film, especially when underexposed. Below is a picture of my wife and oldest brother taken with the Canon Elan 7 – it was overcast and the image is slightly underexposed. The detail and overall colors are beautiful, but there’s a little red in my wife’s cheeks and the green in the trees behind is a bit strong.

The image above of my mother was taken with the AE-1 Program and you can clearly see a strong green tint in the ends of her hair and the background.

Even with the flaws, the main thing I like about this film is its uniqueness. The combination of color and details just works for me and makes for great color portraits. Kodak Portra is more predictable and the colors are definitely cleaner, but, for me, having a unique look to film is much more desirable than having a film that looks, normal, or digital.

Who Is It For?

The saturated colors, in my opinion, label this film as more of an artistic grade of film rather than a professional grade. If you’re a wedding or family portrait photographer, it may make more sense to stick with tried and true grades that yield predictable results with really good tonal range. Some of your customers may like the AGFA look, but my guess is, most will want the best exposure and expected results. It’s not fast enough for low light or high speed applications either.

However, this film would work well with casual and artistic portraiture and for those operating on a limited budget. The dynamic range can limit the film’s ability to take landscape images, but could be good in combination with ND filters to even out the range. Even more so, those photographers who just love to have fun taking pictures should enjoy this a great deal! Fun is allowed – I assure you! The finished images are beautiful, vibrant and sharp!

Conclusion

People and film – for me, they go together. Most of the time, that’s in classic black and white, but not 100%. When I do go to color, I want the images to be vibrant and unique and the AGFA Vista Plus 200 delivers both, along with detail and sharpness. It’s slow and a bit more saturated than most professional films, but I’m not shooting film professionally, so it works for me. That may not be the case for you, but if it is, this film can generate fantastic images at a fraction of the cost of professional grades. That means more images per dollar spent  – more images is good!

As much as I enjoy this film, it is like any other piece of kit in the bag, part of the toolbox you use to produce the images you envision. Don’t take my word for it – go out and shoot it! Shoot Portra, Fuji or anything else you can get your hands on! Compare the grain, the speed, vibrance, skin tones, etc. See which one suits your vision. Find the color film that works best to produce the images that are behind your eyes!