Author Archive for Guest

6 Tips for Mastering Macro Photography: by Shane Haumpton

Macro photography is a fun and rewarding niche that allows you to showcase the mesmerizing, otherworldly beauty of your subject by highlighting the minute details that are normally not visible to the naked eye. It also allows you to tell a unique story and connect with your audience through your images.

Whether you’re practicing to improve your craft or just learning how to get started, here are some of the best tips for mastering macro photography:

Choose the right macro lens

Even if you already have a macro lens in your kit, it’s important to make sure that you have the right one for your needs. Macro lenses are not the same across the board—there are certain nuances that differentiate macro lenses from each other, such as focal length, magnification, and focusing distance. There are a few more, but these are the three most important factors to consider when choosing a macro lens.

The right macro lens for you will largely depend on the subjects you plan to photograph. If your primary subjects are flowers, blades of grass, drops of water, and other inanimate objects, you can choose a shorter focal length of at least 45mm. If you plan on shooting skittish subjects such as insects or small animals, you need a macro lens with a focal length of at least 90mm.

Maximize the use of stabilization devices

Just as it is with other popular photography niches, camera stability is also important in macro photography. Photographers commonly use tripods to keep their cameras steady, which also enables them to use slower shutter speeds. In effect, having a slower shutter speed allows the use of smaller apertures that are perfect for bringing out more detail in your macro shots.

Other unorthodox but commonly used tools for keeping cameras or subjects in place include clothespins and clamps. Even a piece of cardboard can help keep your device in place and minimize the impact of the wind while you frame your subject. By all means, be creative with your camera, subject, and even backdrop support to improve your shot and achieve your desired output.

Learn to focus properly and accurately

It goes without saying that losing focus on your subject, despite having a well-composed frame or good depth of field, can ruin an otherwise beautiful shot. Focusing on different parts of the frame or subject can yield interesting changes in perspective, but you’ll still want to have the star of your image in sharp and clear view at all times.

One technique you can use in keeping the focus of your camera while shooting in macro is to set your camera in manual focus and then set your macro lens and focus ring at 1:1.

Afterwards, you can then slowly move the camera forwards or backwards while using a tripod or your stability device of choice until you find that “sweet spot” where your subject or a specific area of the frame is in sharp focus.

Be particular with your depth of field

Depth of field is crucial when taking macro pictures. If you’re a professional or an aspiring photographer, you’ve probably already noticed that sudden changes in depth of field can greatly affect the outcome of your shot. To avoid inconsistencies, you’ll need to use the correct settings.

One way to achieve the right depth of field is to set your camera on a surface parallel to your subject. This way, your sensor will be perpendicular to the object you are shooting and you can optimize your depth of field.

If you’re using a 1:1 macro lens setting, it is recommended that you set it to shutter speeds of 1/200 or faster to ensure sharp images, then use an aperture of f/22. However, many shooting conditions often require you to sacrifice either your shutter speed or aperture. If you have a choice, go steady with a still subject or tripod for your camera and shoot with slower shutter speeds. This way, you can use apertures of f/16 to f/22, where you can have a sharp subject and a good amount of background bokeh without underexposing your shot.

Experiment with various angles and lighting

Proper perspective and lighting play an important role in bringing out the beauty of your photographic subjects, so don’t be afraid to experiment. You can always use additional lighting, such as external flashes, ambient lights, sunlight, or makeshift light sources like lamps and flashlights, and even filters, to expose your subjects to your liking. Or, you can use reflectors to make harsh or direct lighting bounce and create a more diffused, soft lighting for your subject.

At the same time, Instead of capturing a macro photo that looks just like your favorite close up shot from a magazine, look for a new angle and make the shot your own. Simply tilting your camera, placing your subject off center, or changing your perspective can instantly make your macro photography stand out among the rest.

Be mindful of the composition

It is a common misconception that you do not have to bother with a subject’s surroundings in macro photography, since it involves the careful art of zooming in so close to a particular subject that the background is barely visible. In reality, you still do—especially if you want to capture a good photo with a more meaningful composition.

Photographers in general need to consider how their subjects and backgrounds work with each other in the frame. As a macro photographer, you also have to be mindful of how colors and textures play into the mix, especially when you’re zooming in to bring out details of a particular object or living thing.

While certain parts of the background will most likely be blurred in most of your close up shots, the photo will visually look and feel a lot better for your viewers when you are careful with your entire composition and the elements in the frame are in sync with each other.

Adding these tips to your existing knowledge about this niche will further improve your photography skills and quality of your photos, as well as allow you to market yourself as a more versatile photographer.


Shane Haumpton is a beginner in terms of writing, self-confessed coffee addict and shutterbug, and manages to do all these while enjoying life as a nomad. She is interested in writing on a variety of topics, ranging from lifestyle, photography, travel, and arts and crafts to gadgets, social media, and internet safety.

Twitter: @shane_haumpton

Here’s how you can share your tips, techniques and tutorials on CurrentPhotographer.com
 

Motion Blur Photography: by Erik Kerstenbeck

Using a fast shutter speed will freeze motion in its tracks, and using a slow shutter speed with moving objects will spread the image over time. This creates a sense of motion.  There are many methods to achieve this motion blur, such as panning on a moving object, shooting from a moving platform (train, car etc), using the zoom feature while the shutter is open, moving the camera on a still subject, or keeping the camera fixed while the subject is moving. Here we will focus on the latter.

The Concept

Keeping the camera still while using a slow shutter speed will generate a blurring of the moving objects giving a sense of speed. Slowing the shutter even further may exaggerate this and tend towards the abstract. Blur is nice, but keep in mind the basics of composition for all the objects that are not in motion, such as buildings, street signs with the Rule of Thirds in mind. Remember, you are trying to convey a storey and not just execute a technique.  Imagine the lights as a river and compose the flow as if it were a landscape photograph. Look for low angles, and perhaps use a wide angle lens to exaggerate the motion as the subjects pass through the frame.

I have found that traffic is a great place to start and especially in an Urban environment. Shooting just after sunset provides just the right balance between ambient light and the ability to catch the oncoming or receding lights. When it gets darker, lights become highly saturated and non-moving objects a bit more difficult to expose properly.

If you have time, check out the traffic patterns before it gets dark and take a couple of test shots to check your composition. Also, try to get as close to the traffic as possible by looking for traffic islands or other vantage points. This will save some frustration later once you want to execute your shot. Look for some other vantage points as well, so you can quickly relocate if you are not satisfied with your first results.

The Set Up

You will need to have a camera that allows control over Aperture and Shutter speeds, or even better a DSLR that you can set to Manual. A good sturdy tripod will help to avoid any unintentional camera movement when the shutter is open to keep the non-moving objects crisp. You can also weight down the tripod with you camera bag hanging it from the center hook to further stabilize it. Using a remote shutter release helps as you will not even have to touch the camera, but if you don’t have one, use a self timer on your camera after you have composed and see the shot emerging.

Some DSLRs allow a “Live View” from the back LCD display. This allows you to have a bigger view, but more importantly, locks up the mirror for less shake when you trigger the shutter. If you have a lens hood, use it to avoid unwanted light intrusion.

The Camera Settings

How slow is too slow? It depends on the light and the speed of the subjects. Try a shutter speed of between 3 and 10 seconds and start with an aperture settings of f8 to f16. If you like the blur but it is too dark, open your aperture and take another shot. If the exposure is right, but not much blur, slow down the shutter and compensate with a smaller aperture. I always shoot in RAW, so I can make some adjustments later with my post processing software. Keep your ISO settings low (100) to avoid noise. Also look at the scene and try to judge the temperature of the light. Is it mostly incandescent, neon, sodium vapor and try a few test shots to adjust your White Balance. Often it can be a mix, so some experimentation might be in order.

My Examples

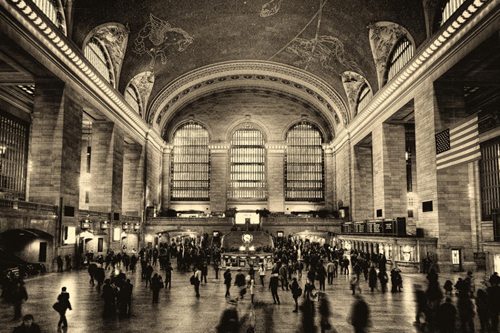
During a recent trip to NYC, I wanted to create a vintage postcard look to the hustle and bustle of Grand Central Station. I wasn’t carrying a tripod, so I sat the camera on the balcony and held it down with two hands while Kathleen, Wife and Photographer, released the shutter  with the remote release. Sometimes you don’t need to haul all sorts of gear to stabilize your camera, just a bit of creativity. My Nikon D90 was set for ISO 100, f22, 2s and Incandescent WB. The Vintage look came in post processing with Adobe Lightroom.

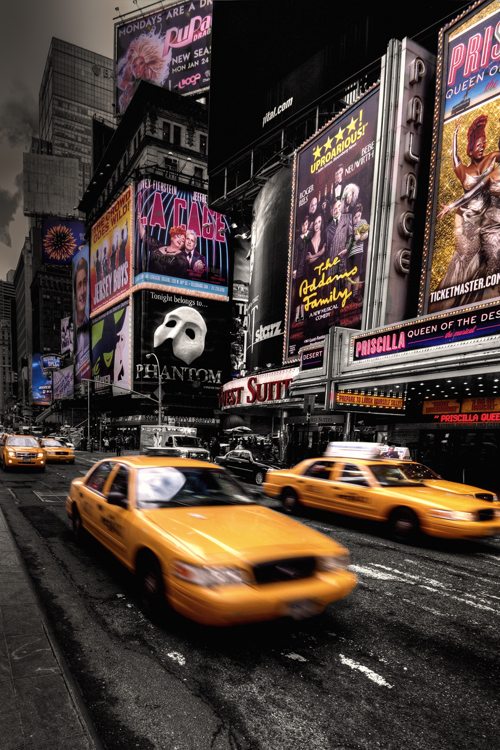
Times Square, NYC

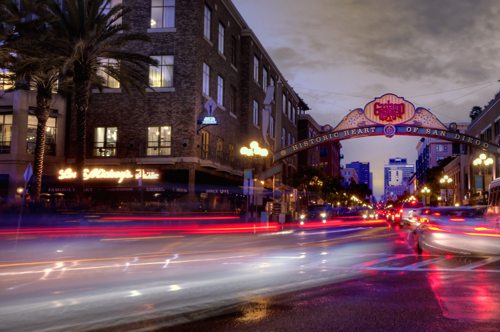
This image was also without a tripod. I found a sturdy traffic sign that I used to stabilize my camera and fired the shutter without any remotes. I took a number of shots with varying shutter speeds until I got what I was after, the zooming Yellow Cabs. Here I had to have some anticipation to judge the ebb and flow of traffic.

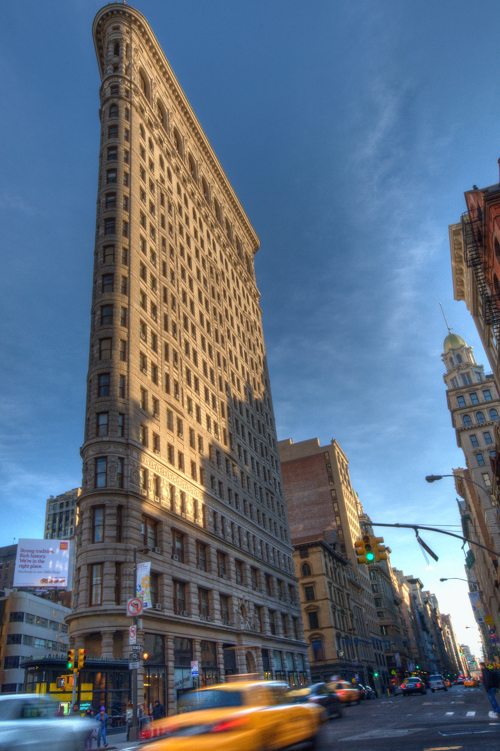
The Flatiron Building in NYC

The Flatiron Building in NYC is just Iconic. There was a convenient traffic island where I could set up a Gorilla Pod instead of a nice tripod. These are small, flexible contraptions that allow you to anchor your camera to almost anything. This shot was taken after securing the camera to a trash can. Once again, careful observation allowed me to get my Yellow Cab zooming through the frame.

Take your Time

If your first attempts give you a dark shot with vague bright lights do not be discouraged if it isn’t what you expected. Look at your camera settings and make adjustments and try again until your vision is captured. Photography is all about learning and making your gear capture the image in your mind and the story you want to convey. And most of all, enjoy the journey.

I would like to thank Trevor Current for inviting me to craft this article. His website is a source for all things Photographic.


Erik Kerstenbeck is the Co-Owner of Kerstenbeck Photographic Art, a small outfit operated from San Diego, California. Erik is an Electrical Engineer by trade but has been self studying photography for 30+ years starting with an old Brownie Box Camera given to him by his Dad.

Erik thrives in all aspects of Light, Composition, Technical aspects of equipment and Post Processing Techniques. His newest interest is High Dynamic Range Photography, and Infrared Imaging. He and Kathleen (Wife, Photographer and Partner) travel extensively creating unique Landscape and Urban images, as well as Event, Environmental and Studio Sessions. But most of all they both have a great passion for the art of Photography and have fun on the roads of discovery!

Company: Kerstenbeck Photographic Art
Phone: 858-603-3412
Email:
contact@kerstenbeck.com
Website:
http://www.kerstenbeck.com
Blog: http://kerstenbeckphotoart.wordpress.com/
Twitter:
@ErikKerstenbeck
Facebook:
http://www.facebook.com/kerstenbeckphotographicart

Photo Credit: © Erik Kerstenbeck

Here’s how you can share your tips, techniques and tutorials on CurrentPhotographer.com
–

A Pricing Strategy That Actually Works: by Chris Horner

Pricing has to be one of the most volatile topics – next to Nikon vs Canon – that photographers discuss. There are numerous schools of thought on this subject. A scan through any photography forum will show heated debate from every side imaginable. Even seasoned photographers can grapple with this question.

On the subject of pricing, I’m only passionate about one thing – if you truly produce quality work then you should be properly compensated. Period. Stop giving away your talent for free. That’s not going to help anyone, least of all yourself. So just stop it.

As I was going through various pricing scenarios, I read a piece by Rosh Sillars. He argued to sell photography to clients on a per image price. Think of it like working on straight commission. Your client only pays for the images that they want from your shoot. It was an intriguing thought. And it’s a thought that made a lot of sense.

Think of it from a clients point of view. What are they worried about? They’re worried about you not performing, having to pay for something they’re not happy with, and then having to explain to their boss/client why they chose you and all they now have is subpar work coupled with a lot of wasted time and money. Do that too many times and you’ll find yourself unemployable. Often too they may balk at many ‘fees’ that can get tacked on – sitting fees, setup fees, fees for showing up, fees for breathing etc. The fees can begin to look like a bank brochure. The end result is an unpleasant conversation where feelings get hurt.

Per image pricing removes all of that.

With per image pricing, the client selects what they want from the shoot. If you produce crappy work, the client doesn’t pay, and you learn an expensive lesson equivalent to a quick, swift kick in the head. Conversely, if you produce stellar work, you can find a lot of flexibility in what the claimed budget was. All of a sudden you’re actually making more than what you originally anticipated – without doing more work.

It’s an interesting scenario. I decided to try it out. What I found was interesting to say the least.

It sure cut down on the questions from prospective clients. My pricing structure is outlined in plain English on my website. There’s no confusion or surprises. Instead, the conversations have centered on more deeply understanding their needs. It’s a much more productive discussion and eliminates much of the negotiation.

Sometimes you are pleasantly surprised. More than once I’ve entered discussions with prospective clients who tell me what their budget is. No problem. When I come back with the proofs, that budget miraculously grows as they pick out even more shots than what they may have originally wanted. Even better, it’s their choice to do so. No arm twisting, no slick talking, no begging, no negotiating. I’ve had clients come back later when their budget allowed and purchased more from previous shoots. The images are already done – it’s as easy as filling out an invoice, collecting payment, and delivering the images. Simple.

You can make more on a per hour basis. To figure out your per hour rate, take the number of images you sold from the shoot, and divide by the entire amount of time you spent on the job. I’ve been repeatedly astonished at this number. As you get better and more efficient at working in your craft, the per hour rate that you end up making would make a top end lawyer blush. In fact, if I took the last few shoots that I did and reworked my website asking for that equivalent hourly rate, I’d probably never land another client again. Goodness knows if I went to my day job and asked for that rate I would be laughed out of the room and fired. But at the end of the day, what does the client care about? They really just want quality images at a fair price. If you deliver truly high quality work that truly wows your client, you’ve created value and justified your pricing. Everyone wins.

I screwed up a shoot before. That’s when I discovered I have no business shooting portraits. I collected no money upfront. I botched the job. The client wasn’t happy. Heck I wasn’t even happy with what I produced. When he asked what he owed, I said nothing. I said I was sorry and provided the name and number of a more qualified photographer. He was impressed with my professionalism and we parted ways on good terms with only a total of about 30 minutes of our lives wasted on the interaction.

Me? I’m a firm believer. I’ll never go back to doing it any other way. If you’re finding it hard to crack the code on your pricing, sit down and crunch the numbers. Test it on a few clients to gauge reaction. You too may be very pleasantly surprised at the results.


–

Chris HornerI am a freelance photographer based in Charlotte, NC that specializes in fine art prints and commercial photography. Much of my work is based on urban scenes.  I believe that each image needs to tell a story, to stand on its own, and that’s what I strive for with each click of my camera.

That goes not only for my art but for my commercial work as well. I enjoy working with businesses, helping them create images that excite their clients and promote their business in a professional manner. That work has been featured in projects commissioned by Ann Arbor Tortilla Company, 2NRCARZ, Fine Interior Finishes, and the Schmap Guide to Detroit.

Some of my more artistic images have received recognition in Smashing Magazine for a worldwide photo contest that they conducted, in both the 2010 and 2011 Comerica Bank corporate calendars, and have been honored several times as Photo of the Day in Light and Composition Magazine.

Photo/Video Credits: © Chris Horner


Here’s how you can share your tips, techniques and tutorials on CurrentPhotographer.com
 

Scenic Outlook – 3 Easy Ways to Not Look Like an Amateur

Amateur (noun) – a person inexperienced or unskilled in a particular activity

I think we can all agree that the definition of amateur doesn’t exactly have the nicest ring to it. A lot of photographers out there do fit this description, which is perfectly fine or everyone with a camera would be doing this for a living. The trick is not letting other people know it. There are difficult methods for your images to look like a pro’s but also very easy ways to NOT look like an amateur. I have seen countless photographs of beautiful sweeping landscapes and majestic sunsets only to be ruined by the simplest (read: careless) mistake. The three things I am about to cover are major pet peeves of mine that will instantly drop an image from the ranks of great to mediocre. My goal is to have you think the same thing by the end of this article. Remember, our work doesn’t have to stand up to the likes of Ansel Adams, but it does have to be better than that guy snapping away with a disposable camera. These tips are easy and you CAN do this.

Straight horizons

Number one. Numero uno. The be all end all. I can probably go on for days how crucially important this is but I will spare you the diatribe. Just repeat after me: I will make sure my horizons are straight. Very good, you are already on the non-amateur path. My advice is simple; take your time composing and framing your shot. There is a simple approach I take every single time I compose a landscape image to make sure my horizon is straight. Get this right in camera and you won’t have to straighten and crop part of your scene later. If you are using a DSLR, place it in live view mode once it is secured to your tripod and enable grid lines if they aren’t already. Take your time adjusting the angle of the camera until the lines show a perfectly straight horizon. Remain in or cancel out of live view and snap your shot.

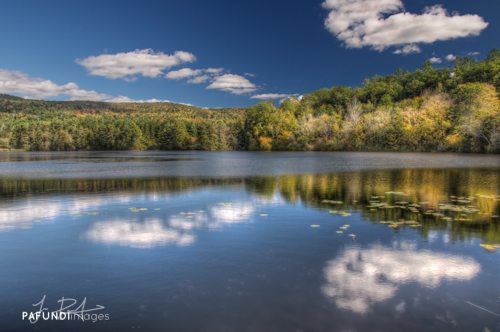
It was imperative that my horizon was straight for this image given that I was playing off of symmetrical reflections.

Dead center is dead boring

Being that we are already on the topic of straight horizons, lets keep the mojo going with another absolutely crucial non-amateurish tip: avoid centering your (now) perfectly straight horizon. Don’t get me wrong, there are times when a centered horizon will work, but for the most part that isn’t the case. When there is equal space above and below a horizon line, your eye wanders looking for a place to focus on in the frame. Our eyes are followers and need to be told visually where to go. As a general rule of thumb, if you want to emphasize a really dramatic sky, lower your horizon. If the foreground is the main point of interest and you are faced with a so-so sky, raise the horizon to the upper third portion of the frame.

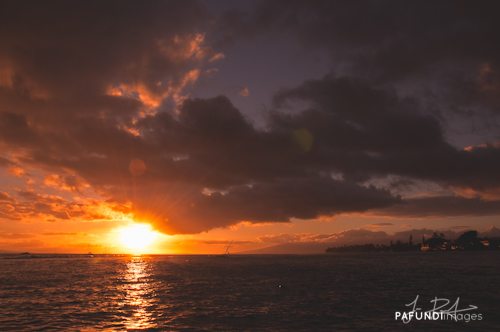
The only reason this image works and has any impact is because the sky is dominating the frame. Your eye is led by the reflection in the water, to the sun, then traverses around the dramatic sky.

Dust it off

Step 3 in the non-amateur program: dirty sensors. It happens to the best of us. Well, actually, it happens to all of us. Sensor dust is part of the game whenever you are changing lenses and for the most part, it’s unavoidable. Dust spots will be the most present in the under exposed areas of your image, but they are easily abolished. The first thing I do when processing a photograph is look for dust spots. Sometimes I will spend 5-10 minutes making sure I took care of every single one because to me, a single blemish can ruin a photograph. Inspect your shot from every viewing angle on your monitor. Some spots are only visible from the sides or straight on. Then use content aware fill or a healing brush to rid your image of those nasty specks.

In order to maintain all the detail in the sky and silhouette the distant boats, I under exposed this shot. With that, dust spots were present throughout.

Congratulations! You have now completed the 3 step program. With some simple care and attention to detail, you can avoid the amateur tag and start taking your work to the next level.


–

Jesse PafundiJesse Pafundi is a photographer hailing from Long Island, New York. A lover of all things photography, he enjoys traveling and capturing the world around him as much as possible. In addition to shooting landscapes, he has a major affection for New York City architecture and urban exploration. Whether it’s HDR, lens filters, or iPhoneography, he enjoys dabbling in and learning as many techniques as he can consume. Jesse believes strongly in the use of social media and blogging as a tool to further his knowledge and share his passion with anyone who wants to listen.

Photo Credit: © Jesse Pafundi

Here’s how you can share your tips, techniques and tutorials on CurrentPhotographer.com
 

Have Camera, Will Travel – How I Prepare for a Trip: by Andrea Gonzales

You may be wondering how I prepare for a photography trip. Or maybe you aren’t…But I’m going to share anyway. 😉

Most of my travel is to major cities in the US and Canada…this is both good and bad. Good because there is plenty of easily accessible information about major cities on the Internet. Bad because, well, there is nothing “hidden,” or “secret,” or “unknown,” about major cities with plenty of easily accessible information.

Once I have a destination booked, I settle in with a cup of coffee and go down my list of websites:

TripAdvisor
Yelp
Local Convention and Visitors Bureau
Flickr
Google Images

On TripAdvisor I enter the city of choice, then select “Things to Do.” I read through the most recent reviews and take note of anything that piques my interest. I also check out “Restaurants,” and take note of any unique or unusual places to eat.

On Yelp I cross-reference my restaurant suggestions from TripAdvisor. Occasionally restaurant reviews on Yelp will yield further recommendations for places to go or things to do. For example “Restaurant X is the perfect lunch spot after a morning at Museum Y.”

Now that I have a list of restaurants, museums, parks, and other things to do I Google the city’s convention and visitor’s bureau (CVB) or tourist site. Here I can find out about any events that are happening during my stay that may be of interest. Many CVB’s offer a discount pass for local attractions, so this is something I evaluate here as well. Most of these sites have a tab for “Media” or “Journalists.” On this page there are often story ideas, which may give some inspiration for less tourist-y, less well-known places to see or things to do. If available, I also check out “How to Get Around.”

If there are museums or other indoor locations on the list, I check their individual websites for hours of operation, admission and photography guidelines.

On a recent trip to Calgary I decided to visit the Glenbow Museum after learning that photography was permitted in virtually all of their permanent exhibits.

On the other hand, at the National Art Gallery of Canada in Ottawa photography is not permitted in the galleries but it is permitted in the common areas between the galleries.

When I was researching the National Art Gallery of Canada I noticed on their website that an exhibit of models, drawings and photographs from the architect who designed their building was beginning on the third day of my trip. I had originally planned to visit this location on the second day of my trip, but delayed so that I could see the architect’s exhibit. I had brought my camera to photograph the exterior and common areas and as I entered the architect’s exhibit I made a concerted effort to turn it off, put the lens cap on and sling the camera behind my back so I wouldn’t get in any trouble. A security guard actually stopped me and explained that for this particular exhibit I was not only welcome but encouraged to photograph. This was completely unexpected but a great surprise!

Finally, after I have my list of places I want to visit I head to Flickr and Google Images. I search for images of both the city itself and the individual locations I am interested in. This way I can be sure I get the “iconic” images and I can also begin to plan how I can make more unique images. I also sometimes search on iStock to see what kind of images may be saleable.

Once I have a pretty good idea of where I want to go, I save all of the relevant websites to a folder labeled with the name of the city. I also save information regarding public transportation (route maps, schedules, fares).


Andrea GonzalesGabriel Leigh Studios was established in 2009 as a photography studio specializing in travel and commercial stock photography.

Andrea Gonzales has been in love with photography and travel for as long as she can remember.  After several years of hard work she was able to leave the daily 9-5 grind in July 2010 and now travels as often as possible.

Gabriel Leigh StudiosCompany: Gabriel Leigh Studios
Website: http://www.gabrielleighstudios.com
Facebook:
 https://www.facebook.com/AndreaGonzalesPhotography/


Here’s how you can share your tips, techniques and tutorials on CurrentPhotographer.com

–

Basic Lighting Setup For Business Portraiture: by Daryl Brown

When acquiring a Business Portraiture client it’s always best to know before hand how the client will use the image. Meaning if the client will be using his/her image for web posting or high quality publication it’s best to light for deeper shadows. This is more or less for men especially as deep shadows can indicate Strength and Intelligence (not that women are equally the same) but non the less you’ll see more Business Portraiture for men photographed this way. Now I will say some women like that type of lighting scenario and will occasionally ask for it as in the following images


Now if the client is using the image for lets say newspaper paper pre-production or other venues where the image quality is lower, then you should aim to fill in the shadows. The last thing you want in that scenario is poor reproduction that will render darker areas without details. Even if the imagery will be used for general usage, fill in the shadows as a matter of course.

Business PortraitureBusiness Portraiture
The following are two setups that I use in my Business Portraiture session for both men and women.

business portrait for men

The above diagram is my typical setup for men and women who want deep shadows for the portraits. This is more for men so I suggest again knowing what your client wants well in advance so that you can prepare appropriately. The setup uses three lights, a key light, a hair/rim light and a background light. The gobo or black subtraction panel is optional but I like it to deepend the shadows depending on where you place the panel. Now you can use whatever light modifier you are most in tuned with. For most of my portraits I generally use a large softbox and occasionally I’ll use a medium soft box or an umbrella. The hair/rim light uses a 30 degree grid as well as the background light (play around and try some with the light off you may like the result).

Business PortraitBusiness Portraiture


Business Portraiture for women
This diagram is what I use for most of my Female Portraits and it also works well for Business Portraits. The setup is three lights; key, hair, background and three white or silver reflectors. Key light is primarily postioned directly in front 4 feet from the subject and about 4 feet above camera height. The reflectors are generally placed two feet from the subject on either side (you can place them closer or further depending on the look you are going for). The third relfector in front is placed chest high underneathe the subject’s chin to fill in those shadows (you can place the reflector closer or lower to the subjects chin depending on the final look). If you have the budget for it or have the space for it add a second light in place of the third reflector. The results will be just as beautiful, but be sure to meter the light one f-stop below your main/key light. The hair light is placed directly above and slightly behind the subject’s head about 6 feet and angled toward the camera and uses a 30 degree grid. The background light uses a 30 degree grid and is generally placed 2 feet behind the subject and aimed at the middle part of the background (white or studio gray) to give it a gradation. The results are always flattering and complimentary for women subjects.

Business PortraitureCasual Business Portrait

These two are just a handful of setups I use for my Business Portraiture. I encourage you to try the setups and practice the lighting schemes until you produce images you and your clients are happy with. In the end the client is who we want to be happy and return again and again and again.


Daryl BrownDaryl Brown is an award winning beauty, fashion, and portrait photographer located in Arlington, VA. Daryl’s career as a photographer has spanned nearly two decades from his start as a news videographer to his work today photographing all types of individuals…from radio and TV personalities to aspiring models to new borns.

Daryl has received the prestigious Edward R. Murrow award and an Emmy award for photojournalism in investigative news.

Daryl is known for his attention to detail from prep to post in all of the images he has produced. His work has appeared in Council Magazine, The Washington Post and an exhibit at Century 21.

Daryl Brown Photography Logo

Company: Daryl Brown Photography
Phone:
571-232-5349
Email: d.brown.photography@gmail.com
Twitter:
@darylbrownphoto
Facebook: https://www.facebook.com/darylbrownphoto/

Photo Credit: © Daryl Brown

Here’s how you can share your tips, techniques and tutorials on CurrentPhotographer.com

–