So, you finished reading ‘HDR Best Practices Guide – Part I: In The Field’, and went out for a shoot. You had all of your wits and your gear about you when you set up your tripod and fired off those lovely brackets. You’ve got the raw materials (fine, pun partially intended) and now it’s time to refine them into something truly beautiful.
My original intent for Part II of this HDR Best Practices Guide was to delve into the actual tone-mapping and post processing steps around HDR. But, I felt that I would totally be glossing over an extremely important part of the whole HDR photography lifecycle by ignoring Image Management. So, I decided to devote Part II of this Guide to this topic because a clean home is a happy home. Part III will nose dive into the goodness of Photomatix, Photoshop, and everything in between.
I could write a whole book on the importance of image management. Many people already have. Your images are your primary, precious resources. As such, they have to be properly cataloged and inventoried so that you know exactly what you are looking for, how to find it, and how to deal with it. Image Management is critical when you’re simply dealing with single images. Imagine what happens when you’re dealing with several brackets per HDR image. Here are some ‘Best Practices’ that I religiously follow to help prevent myself from losing sanity over my abyss of brackets.

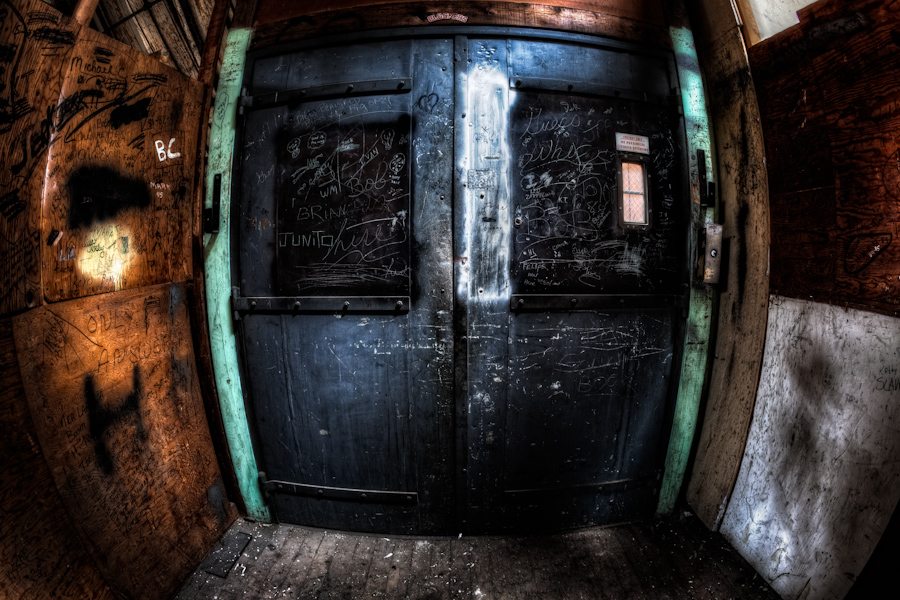
Canon EOS 5D Mark II, Canon EF 15mm f/2.8 Fisheye, 15mm, F 5.6, ISO 100, HDR, 9 Exposures – Click on image to enlarge
Best Practice #1: Create/Maintain/Live By Your Rules
Think of self-imposed rules and what they really are. Boil it down and they are sanity checks and benchmarks that, when adhered to, help foster a healthy and functional working environment. The creation of these rules must be accompanied with a commitment and resolve to stick to them. Get in the habit of ignoring them and you may as well not create them at all.
There are all sorts of rules that you can apply around Image Management and you can be as straightforward or as creative as you’d like around how you establish order over your ever-growing library of images. Your images need to reside in folders. The folder structure needs to indicate what resides within them. All of these can be contained within rules. Once you determine a set of rules that you feel comfortable with, stick to it. The longer that you do, the more ingrained it will become and that is when you know you’ve truly hit a groove.
Best Practice #2: Sense & Sensibility Around Folder n’ File Names
Whether you use Adobe Lightroom, Apple Aperture, or manually import your images, maintaining some logical folder structure and file naming convention will make identifying your images a snap.
In my case, I shoot very heavily throughout the year. I do not delete my brackets even after I have composed a final HDR image. Never. Ever. I use Adobe Lightroom as my library manager and import all of my images from my CF cards onto my hard drive with it.
One of the best parts of the Lightroom import function (as well as Aperture) is the ability to associated a filename convention to the images that are about to be imported into the library catalog. As each one of my images is imported in, Lightroom changes the name using the following string:
<CaptureDate>-<OriginalFileName>.dng
For example: 20100602-IMG_3425.dng
The images are placed into folders that are created by Lightroom as part of the import process (and are specified by you). Having a logical breakdown of your folder structure is a key to easy image location/identification.
As part of my import process, I created the following folder hierarchy and it works very well for me:
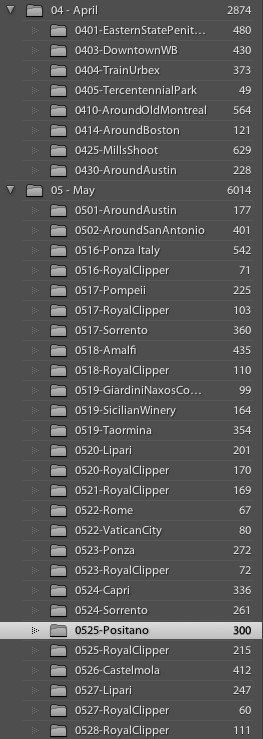
<Year (YYYY)> / <Quarter (Q#)> / <Month (Name)> / <Event (MMDD – EventName)>
For example: 2010 / Q2 / 06 – June / 0602-DryDocksShoot/
To further streamline my library management workflow, I create new Lightroom catalogs quarterly to prune down the total number of images (Note: the more images that you have in a single catalog, the slower the performance may get).
Best Practice #3: Tag It & Bag It
Keeping your images organized with a sensible folder structure and filename convention is a huge step towards organizational nirvana. But, there is still more that you can do to make searching for, and locating, specific images a breeze. Imagine if your image library contains tens of thousands of files. Sure, they are already broken down by date and by shoot. But, what if you simply don’t have the time to start drilling down into a folder from last year to find a shot that you think was taken in mid-April at the arboretum… or was it the zoo… or that nice park you visited? My point is that the more images you amass, the harder it may become to quickly and accurately find the set of images that you may now be ready to work on.
There is a way to search and filter down to a very precise level and that way is by using keywords. Keywords are exactly what you’d think they are. They are individual words or phrases that are associated to your images and can be searched and filtered on.
During my import process, I begin by specifying general keywords that apply to as many of those images as applicable. For instance, I will include the Country/State/City, a general description of the shoot, and any other indicators that can apply to images.
General Keyword Examples: Europe, Italy, Rome, Tourism
Notice that these keywords are pretty generic. That doesn’t worry me because they apply to the broadest group of images being imported. After the images are imported, I will begin my review process and get more specific with the keywords. Some keywords may apply to only a single image whereas other could apply to a larger group.
My recommendation is to get in the habit of applying custom keywords while you are playing the 2-Pass Game (more on that shortly). As you are sorting through your images, apply individualized keywords that you think define the scene. Pay attention to specific landmarks, qualities, people, colors, textures, signs, text, etc. It will truly help you pinpoint individual shots down the road with ease.
Specific Keyword Examples: Coliseum, Vendor, Old Man, Fedora, Ancient, Gladiator, Amphitheater, Imperial

Best Practice #4: Stack ‘Em Up
One of my favorite features in Lightroom is its ability to take a group of images and bunch them together under one. This is called Stacking. It makes my workflow SO much easier to visualize. Think about it: let’s say that you’re out in the field and you shoot two very similar series of brackets (say 9 a piece). When you go to look at them in Lightroom, you are initially presented with 18 images that look pretty darn close to each other. Wouldn’t it be so much easier to grab the first set of brackets, stack ‘em together and then do the same to the other set? Stacking makes it so much easier to visualize which bracket series you are about to work on. Trust me, if you aren’t utilizing Stacking, you should seriously consider starting.
HINT: When selecting the group of images that I wish to stack, I always click within the actual image thumbnail of the mid-range bracket to ‘super-select’ it (that is, a selection within a group of selections) before issuing the Stack command. This will ensure that my ‘super-selection’ is placed at the top of the stack. If you don’t do this, Lightroom will place the first image selected which is likely to be the darkest image in the bracket series and the one most difficult to see.
Best Practice #5: Play The 2-Pass Game
Ok, now that you have all of your brackets saved in a logical folder structure and they’re stacked up nice and neat, you can play the 2-Pass Game. Like your folder structure schema, how you go through here should be methodical. Build rules around this.
The 2-pass game is simple and fun (Right?!). Basically, you need to go through your images in two passes. The first pass is quick and it is where you will eliminate any image (or bracket series) that is just technically flawed or that you are 100% sure of that you don’t want. Scan through and hit the ‘X’ key to flag these images as rejected. When you’re done with your first pass, you can easily delete all rejected photos in one motion. This will remove all of that clutter.
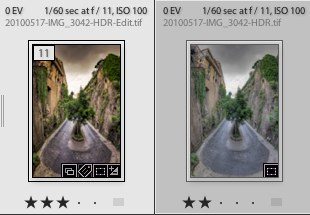
The second pass is more methodical. This is where you will go through and select the ‘Best’ and ‘Better’ images to process. In my case, I will apply a ‘1-Star’ Rating w/Blue for all ‘Best’ (read: strongest) images and a ‘1-star’ Rating w/Yellow for all ‘Better’ (read: will get to later) images.

Best Practice #6: Get Smart (Collections)
You’ve now gone through and really set some order in motion. You have a catalog filled with stacked images that are neatly named, in clear folders, and are labeled properly. Now, wouldn’t it be great to have a ‘live’ list of only your labeled ‘Best’ images and another of your labeled ‘Better’ images? Well, you can! Lightroom has a feature called ‘Smart Collections’, which are basically folders that are configured to display all images in your catalog that meet certain criteria.
So, in this example, I’d create a Smart Collection with a filter to only show images that have a ‘1-Star’ Rating and are marked Blue. I can then create a second Smart Collection with a filter for images with a ‘1-Star’ Rating and marked Yellow.
The awesome thing about Smart Collections is that you can be as specific as you’d like. You can create Smart Collections with all sorts of versatile and scalable filters. And as you mark images with your preset criteria, they will automatically be added in real-time to that respective Smart Collection.
Within my workflow, I also have a ‘2-Star’ Smart Collection that contains all ‘tone-mapped/not finalized’ HDR images as well as a ‘3-Star’ Smart Collection that contains all finalized HDR images.

Best Practice #7: Differentiate Filenames
Earlier in this section, I discussed the importance of creating a filename convention that works for you. Establishing criteria early on will help you maintain order in your expanding photo library. However, when editing your photos using techniques such as HDR, you should anticipate bringing your images from Lightroom (or Aperture) into other 3rd party applications. For instance, I use Photomatix by HDRSoft for all of my tone-mapping needs. When Photomatix is done tone-mapping, a whole new file is created and, as such, it requires a unique way of identifying it.
I achieve this in a two-step process. The first step is to assign it a unique name when I start the export out of Lightroom and into Photomatix. My naming convention is simply:
<Lightroom Filename>-HDR.dng
For Example: 20100602-IMG_3425-HDR.dng
In addition to the unique filename, I also take advantage of Lightroom’s Smart Collections and apply a 2-Star Rating, indicating that the file is tone-mapped but not fully processed. Now, I have a Smart Collection that contains every tone-mapped HDR image waiting for some final touch ups.
Depending on what you’re comfortable with, you may choose to finalize the look of your HDR image right in Lightroom. It certainly is more than capable, especially with the release of Lightroom 3. I prefer sending my HDR images into Photoshop for the heavy lifting. By doing so, when I am done working on the image in Photoshop and want to save it back into my Lightroom catalog, another file is created and, you guessed it, another naming convention is used. I can easily tell any image that has been put through Photoshop by using the following naming convention:
<Tone-Mapped Filename>-Edit.dng
For Example: 20100602-IMG_3425-HDR-Edit.dng
On top of that, I also apply a 3-Star Rating to the image, indicating that it is now in a final status and ready for dissemination.
Best Practice #8: Avoid The Evil Eye of Corruption
The worst thing next to missing an awesome shot is actually capturing the shot and then losing it due to data corruption/loss. It has happened to me, odds are it has happened to you, and it is totally heartbreaking. To avoid this pain, I strongly suggest that you implement at least one type of backup plan. There are so many options out there for just about every device and OS platform.
I have several backup plans. When I am in the field for more than a day, I always bring my Epson Multimedia Reader, allowing me to backup my CF cards on the fly. On my Mac Pro at home, I use Apple’s Time Machine solely to backup my system files and documents. I also use Dropbox to keep a copy of my important documents on ‘the cloud’.
For my actual image backup, I use an application called Chronosync. It does a great job of synchronizing my entire image library to my two external hard drives. On top of that, I also do nightly backups of my Lightroom Catalog folder. This will ensure that I won’t lose any of my in-app edits in the event of catalog corruption.
When shooting for HDR, you are likely taking more images than you would with traditional photography. It is a simple fact. As such, you are aiding in the exponential growth of your photo library. By ignoring the important necessity of maintaining order of all of these wonderful images, you run the risk of losing a potentially amazing image in the mix.
That is why it is critical to take the time now and audit yourself. Look at how you’re managing your images and ask whether there is a better, more effective way of doing it. I am not saying that my way is the best way, not by a long shot. But, I do know that I’ve been averaging between 10,000-12,000 images per quarter and I would be totally lost if I did not keep my image management under a tight leash. Please feel free to follow my guide to the letter or take it and make it your own. I welcome any questions or comments.
I would like to mention that if you are interested in licensing copies of either Photomatix or the OnOne Plugin Suite, go ahead and hover over the ‘Discounts’ tab on the lefthand side of my site. You can save 15% on your order by clicking on the links provided and using the coupon codes listed.
Cheers,
Brian
![]()

Photo Credit: Chris Halford
Brian Matiash is commercial architecture photographer, writer, and lover of all things social media. When he is not out photographing the ever-shifting trends of exterior and interior design, he is roaming around and exploring the city to capture the forgotten corners and loose ends that so often get overlooked. You can see daily offerings from these explorations on his blog.
Brian has spent the past several years learning and mastering the use of High Dynamic Range (HDR) imaging to provide his photos with a level of realism not normally captured with conventional photography. He is the author of recurring HDR columns on CurrentPhotographer.com and ProPhotoResource.com , where he shares tips, tricks, and techniques to gain the most out of HDR photography. He is also an editor of HDR Spotting , the leading gallery/resource dedicated to showcasing HDR images. Brian’s HDR images have been published in a variety of news and magazine publications, as well as displayed in various art galleries in Boston, MA and New York, NY.

Email: photos@brianmatiash.com
Webiste: http://brianmatiash.com/
Blog: http://brianmatiash.com/blog/
Twitter: http://twitter.com/brianmatiash
Facebook: http://www.facebook.com/brianmatiash
Here’s how you can share your tips, techniques and tutorials on CurrentPhotographer.com
–
*The Current Photographer website contains links to our affiliate partners. Purchasing products and services through these links helps support our efforts to bring you the quality information you love and there’s no additional cost to you.


Thank you for giving this tutorial on image management. I have been trying to get a good explanation on how best to use aperture. This was very helpful.
Hi
This is a great article. HDR for me is trying to replicate our eye’s natural view of light. I try not to go over the top with garrisgh treatments. this is a simple 3 shot, mirror up, live, viw, remote release, tripod shot, 10mm Nikkor, D90. Simple
http://tinyurl.com/32djmd5
RT @TrevorCurrent: Fixed the url: Do you like to create #HDR images? Here are some tips to help you manage your workflow. http://cpurl.n …