Allow me to introduce myself. I am known as an HDR photographer of cityscapes, landscapes, and urban exploration. About a year ago I decided to take photography very seriously. Some of the questions I had asked myself were, what did I want to photograph? What exactly were my intentions behind the camera? I thought Philadelphia would make a beautiful canvas to start my photography journey, and so it began. Most of the available time I had to shoot was during the evening, so I first set out with a tripod and cable release to capture non HDR long exposures after dark. I think any photographer beginning today with an interest in HDR can benefit from this structured workflow. Long exposures at night can teach you the discipline in which HDR photography revolves around.
One of the hardest things about shooting after dark, is being able to see thru your viewfinder. These conditions also make it difficult to focus your lens. It’s always best before composing your shot, to zoom in and focus on an area that has available light. I can’t tell you how many times I’ve composed first, to discover that I can’t lock in my focus point. Once you have locked in your focus point, turn off autofocus. You don’t want your camera to refocus before the shutter opens.
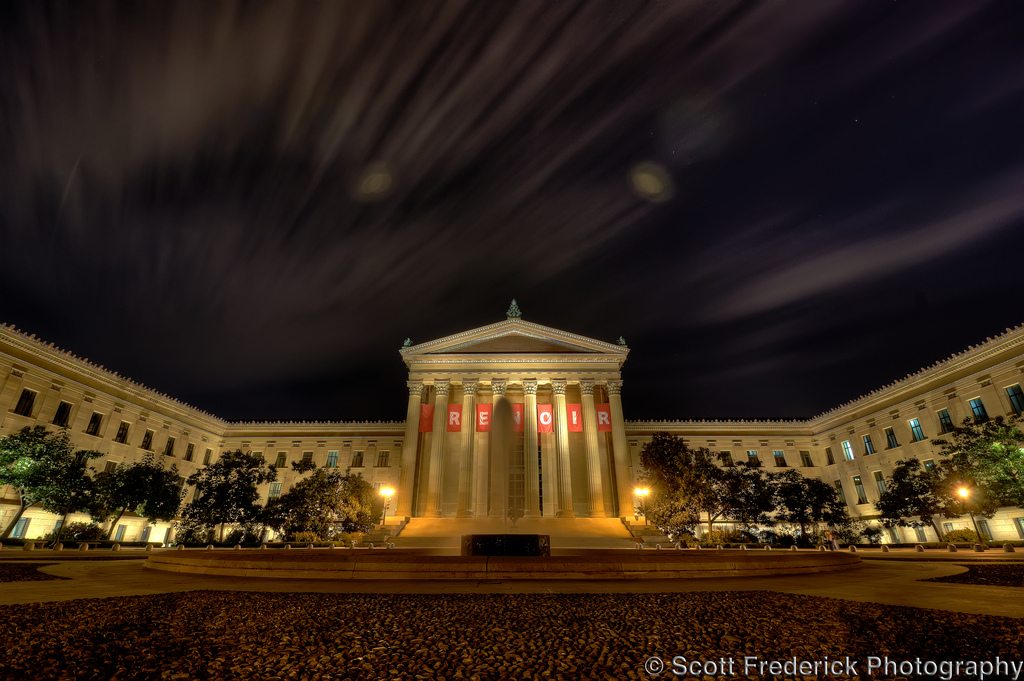
I always shoot RAW, ISO 100 in manual mode. Depending on my aperture settings, I find exposures reaching 30 seconds or more. I like to set my Nikon 10-24 DX lens to F/16 at night. This allows a nice star pattern for any available sources of light. This effect will vary depending on which lens I’m using, as each one has a certain f/stop setting to achieve this. Bulb mode is one of my favorites, it allows me to keep the shutter open as long as I want. I’ve done exposures as long as 6 minutes. This can be a very rewarding result, after walking around in circles waiting for the exposure to complete. Before attempting exposures longer than 30 seconds, I will always do a test shot to check the focus and composition. There is nothing worse than waiting for a 6 minute exposure to complete, only to decide you need to make changes and attempt again.
When your ready to start editing your nighttime long exposures whether HDR or not, it doesn’t take many adjustments to make them shine. Some slight adjustmenst to levels and curves will give you depth, while a little bit of noise reduction will help smooth out your image. Don’t forget to add a little sharpening and maybe desaturate the color and boost the vibrancy a notch or two.
Some things to keep in mind, while shooting at night in the city. First of all, it’s always best to shoot with a friend. I always carry a flashlight, extra batteries for my camera and some mace. Luckily I haven’t had to use it, yet!
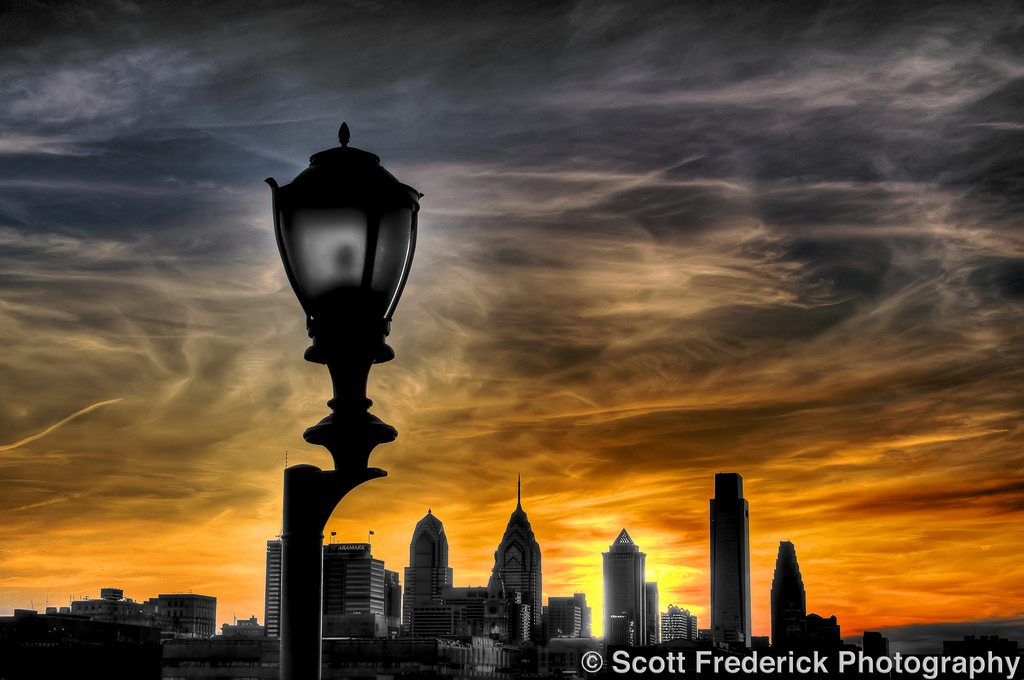
Also try to get out during the sunset. The change of light can really add some nice variance to your shoots. Also remember the suns position at different times of the year. It can really make or break your shots. One of the best opportunities is a late day thunderstorm that clears for sunset. Nothing is better than aggressive clouds breaking away to the deepest colors on the horizon. Most of all experiment and have fun, that’s what it’s all about.
In the coming weeks I will be focusing on landscapes, as well as cityscapes. I’m leaving for a trip to Eleuthera, Bahamas in two weeks. Stay tuned!
Thank you for supporting my work.
*The Current Photographer website contains links to our affiliate partners. Purchasing products and services through these links helps support our efforts to bring you the quality information you love and there’s no additional cost to you.
Scott Frederick is known for his photography of land, city and urban exploration. His styles vary from HDR to fine art black and white including minimalism. When not using his DSLR, he likes to use the iPhone Hipstamatic app for fun. He is an avid blogger and social networker, who strives to inspire everyone to see the world through photography. He’s been awarded Editor’s Pick at HDRSpotting.com and continues to educate himself and others on new tools and techniques. Feel free to ask him any questions you may have about photography.
Scott Frederick has helped me understand how to really take a great looking photo…. I usually jot down his info in a little notebook and use it as a bible for most situations!!!! His work speaks for itself!
Hey Kevin,
Thanks for your comment buddy. I really appreciate it. 🙂
Scott Frederick Does an Amazing job & I agree that is Work
does speaks for itself.
And he know’s what he is talking about & puts his Heart & soul into all his Photo’s as you can see
Keep up the Good Work Scott You should be very Proud
Thanks Adele, I really appreciate your comment!
Great post Scott – your work truly drives city scape HDR photography.
Thanks Max, I haven’t forgotten about you. 🙂 Please touch base with me in mid November when I get back from vacation. Thanks buddy!
Wonderful article and great pictures, Scott. Thank-you for the tips about night-time photography, a subject of great fascination for me. Your pictures are inspiring and I am happy for your contribution assignment!
Thank you so very much April. I really appreciate your comment. I’m glad I could help and inspire you along the way. Please let me know if you have any questions. 🙂
RT @TrevorCurrent: Cityscapes: After Dark. Tips for shooting nighttime scenes. https://currentphotographer.com/cityscape… #photog #togs #photography
RT @TrevorCurrent: Cityscapes: After Dark. Tips for shooting nighttime scenes. https://currentphotographer.com/cityscape… #photog #togs #photography
RT @TrevorCurrent: Cityscapes: After Dark. Tips for shooting nighttime scenes. https://currentphotographer.com/cityscape… #photog #togs #photography
RT @TrevorCurrent: Cityscapes: After Dark. Tips for shooting nighttime scenes. https://currentphotographer.com/cityscape… #photog #togs #photography
RT @TrevorCurrent: Cityscapes: After Dark. Tips for shooting nighttime scenes. https://currentphotographer.com/cityscape… #photog #togs #photography
Scott you do such an Amazing Job with your photography
& Explain everything in such Detail That all can Understand
what you are doing & sure Not everyone knows what all goes into what you are doing
Thanks for all your Beautiful work
RT @TrevorCurrent: Cityscapes: After Dark. Tips for shooting nighttime scenes. https://currentphotographer.com/cityscape… #photog #togs #photography
RT @TrevorCurrent: Cityscapes: After Dark. Tips for shooting nighttime scenes. https://currentphotographer.com/cityscape… #photog #togs #photography
hey scott
could u please tell me which hdr program u use or recommend. i use photomatix but i heard the nik hdr pro is better? also do u recommend any PS filters? i use topaz adjust right not, im a student so i cannot really afford all that much as far as purchasing expensive programs bc i just psent 1000.00 for adobe’s special edition production sweet which i needed for my classes.
im asking bc i am having issues when processing photos with skies..either they come with too much gray…or have too much noise and i pretty much use the same settings uve noted in ur tutorials already, so im not sure if its my under exposed image or my over exposed shot.. i usually process for separate exposures at a time and i never shoot higher than 200 iso, but my skies always seem really grainy and noisy. and i also use a cpl filter when i shoot outside.
any advice would be great appreciated.
thank u for ur time
kind regards
dawn
Hi Dawn,
I’ve been using Photomatix Pro 4 since I started HDR about 14 months ago. I do hear and see good things happening from Nik’s HDR Efex Pro. I’m not sure that switching software would provide you better results, just different. I think your running into a noise problem because of the some of the adjustments in photomatix are being pushed too far one way or the other. I’d be curious to see a screen shot of what your setting in photomatix looks like.
I can tell you this… Noise is skies will be there no matter what! Are you using a noise reduction plug-in? If not I recommend Noiseware Pro. I tend to only apply noise reduction to the sky leaving the rest of the scene alone.
Another way to reduce the noise is to take more exposures at 1EV steps. If your using the standard 3 exposures at 2EV your going to run into more problems when working with skies. I recommend using 5-7 exposures for landscape work.
I also use Filters in Photoshop. I’m using the onOne PerfectPhoto Suite 5.5 and currently utilizing the PhotoTools plug-in most of the time. I highly recommend at least picking up PhotoTools from onOne Software. There is a free 30 day trial and you can use the code “ScottFrederickPhoto” for a nice discount off your purchase.
http://www.ononesoftware.com/products/suite/
What type of filters do you use outside? I usually only use UV filter and a ND 3.0. I don’t use a Circular Polarizer much unless there is a lot of water around. Reason being is my 10-24mm lens creates an undesirable gradient in the sky. Looks awful!
Also can you clarify what you mean by “process for separate exposures at a time”?
I just started an HDR Series and Part 1- Setup will be followed by Part 2 image management. I strongly suggest looking out for Part 3, HDR tone-mapping and hopefully that will give you a better result in Photomatix.
In the meantime try grabbing some brackets at 1EV steps and I have a tutorial on how to take 9 exposures using a 3AEB system. Just discard the brackets you don’t need and you’ll have all the information to produce a better looking sky in your HDRs
https://currentphotographer.com/how-to-auto-bracket-9-exposures-on-a-3-aeb-system-by-scott-frederick/