So you’ve just walked in the door and put your bag down, now what? How do you get your files ready for HDR? I will describe how I import my brackets into (the best file management program ever) Aperture 3. 🙂
Step #1: Import
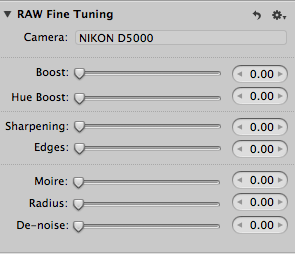
– Fire up Aperture 3. Under the “Adjustments” tab you’ll find “RAW Fine Tuning”. You’ll want to move all 7 sliders to “0” zero and create an hdr preset. (clicking on the gear icon will show the save preset option. More on why this is necessary later)
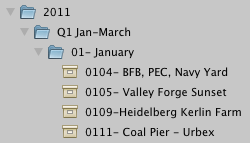
– Under the “Library” tab create a new “Folder” with the Year and another inside that folder with the Month.
– The “Import” tab should pop up and it will look something like this.
– “Destination” should be the folder for the current month the files were captured that you’ve just created. “Project Name” should include the date and short description of the shoot.
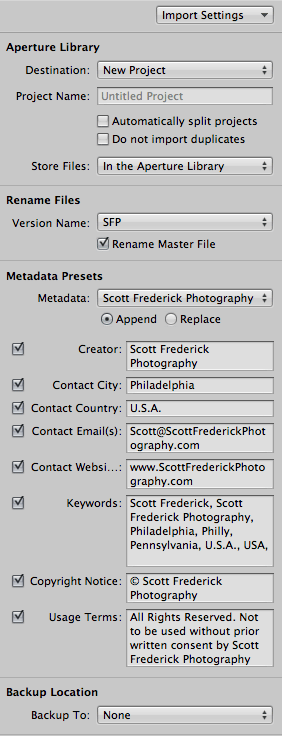
– Under “Rename Files” click the check box “Rename Master File” and the drop down menu has an Preset edit function. Click the + to add a new preset and include “Image Date” and “Master File Name”.
– “Metadata Presets” allows you to add your own contact and copyright information to every image you import into Aperture. Once you set these parameters you’ll be set for each time you import more images. You should also enter in keywords that match all the files you are importing.
Step #2: Preparing RAW Files For Export
– After I’m done importing I select my brackets for each shot and create “Stacks” in Aperture to help organize them.
– Now is a good time to create “Smart Folders” to help organize the shots your extremely excited about and the ones you’re just plain happy with. For this I provide a 1-Star rating for each type but differentiate them by color. For example you could choose 1-Star Yellow for shots you like and 1-Star Green for shots that your really excited to edit.
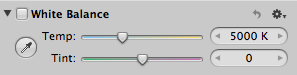
– “White Balance” is very important and if you shoot in Auto WB mode you’ll want to make sure all of your brackets have the same WB settings.
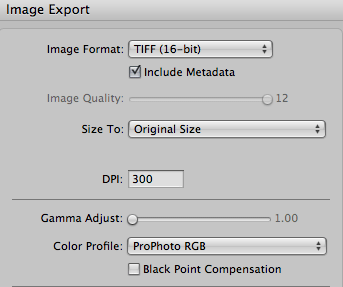
– Before “Exporting” your RAW files you’ll want to make sure Aperture is set to export at the desired file type, size and quality. For this I made an “Image Export Preset”. To find this you’ll click on “Aperture” in the tool bar then “Presets” and “Image Export”. I like to set my export function as 16bit Tiff, Original Size, ProPhoto RGB colorspace and 300 dpi. I also name this preset “Photoshop” as this tells me the image is saved at it’s highest quality after RAW conversion.
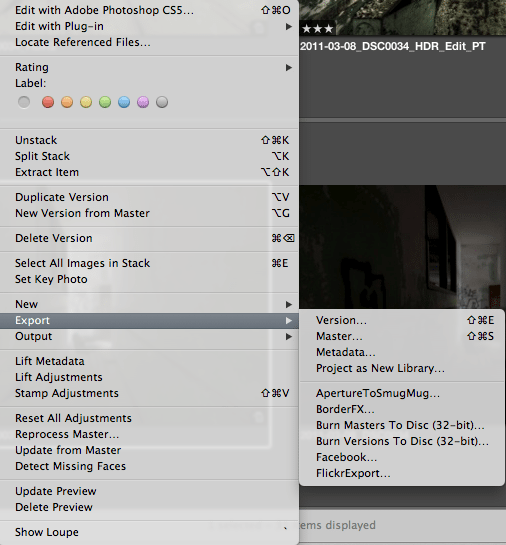
– Now your ready to select the brackets you wish to tone-map and export them from Aperture 3 to your computers “Desktop”. After selecting all of the brackets “Right Click” on the files and choose “Export” then choose “Version”.
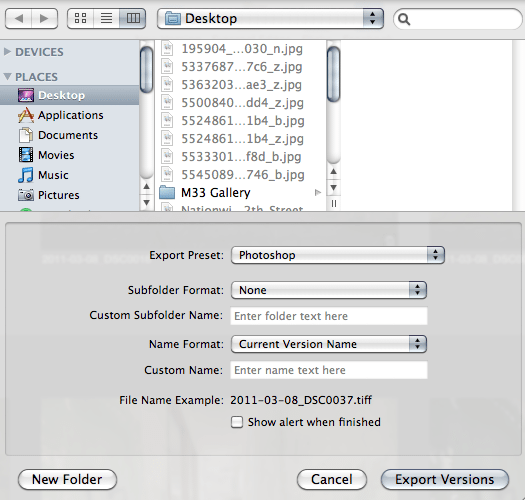
– Now you can select the “Desktop” as the destination of your brackets and choose “Photoshop” as your “Export Preset” (If you named your export preset something else, that’s fine. Select it.) Now you can click “Export Versions”. All of your RAW brackets are now being exported to the “Desktop” as 16bit Tiff, original size, 300dpi, ProPhoto RGB files and are ready to import into Photomatix Pro 4.
I hope some of you are able to better understand the workflow needed to improve your HDR habits. By now you should have a better understanding on how to setup your camera and bracket. You should also be more familiar with image management. I’m an Aperture 3 user, but I’m certain a lot of the things I showed you could be carried over to other programs like Lightroom as well. Stay tuned for Part 3: Tone-mapping. I will explain how to get your files from the desktop and into Photomatix and which settings you should work around.
*The Current Photographer website contains links to our affiliate partners. Purchasing products and services through these links helps support our efforts to bring you the quality information you love and there’s no additional cost to you.
Scott Frederick is known for his photography of land, city and urban exploration. His styles vary from HDR to fine art black and white including minimalism. When not using his DSLR, he likes to use the iPhone Hipstamatic app for fun. He is an avid blogger and social networker, who strives to inspire everyone to see the world through photography. He’s been awarded Editor’s Pick at HDRSpotting.com and continues to educate himself and others on new tools and techniques. Feel free to ask him any questions you may have about photography.
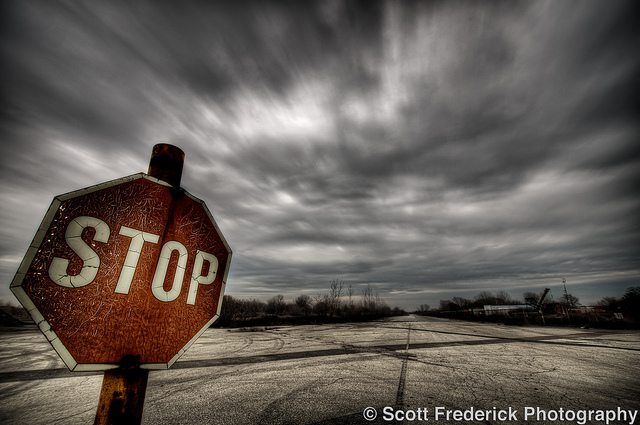
Well done Scott! LOVE LOVE the RED!
Africa should produce some awesome HDRs for me! Cant wait for you to share your thoughts when I return. Hoping to see the Masai. Doubt it though, the village I am going to work in is very small and remote. Ill still get some good photos. Would love to hear which you think would make some good single shot HDRs. 🙂 Im off in three days!
Really love the red in this sign! 🙂