Archive for Landscapes

HDR Series – Getting Started, Part 3: Tone-Mapping

Welcome to Part 3 of the HDR Series – Getting Started! This time you are going to learn about the settings in a HDR Tone-Mapping software I use called Photomatix Pro 4. Before you get to the adjustments window you will be prompted with this window first.
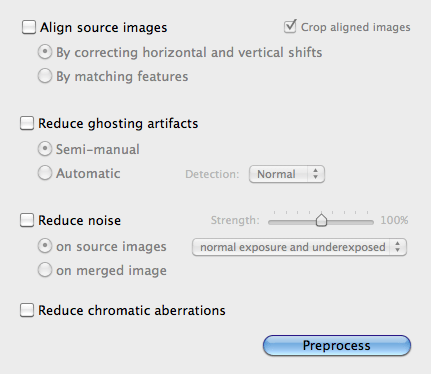
Align Source Images: I always keep this box unchecked unless I was using brackets shot by hand (which I never do). If you did shoot your brackets by hand you will want to make sure that “By correcting horizontal and vertical shifts” is selected and that the “Crop aligned images” are Unchecked. (This will save you aggravation later if you have to use layer masking in Photoshop) Read More→

HDR Series – Getting Started, Part 2: Image Management in Aperture 3

So you’ve just walked in the door and put your bag down, now what? How do you get your files ready for HDR? I will describe how I import my brackets into (the best file management program ever) Aperture 3. 🙂

Step #1: Import

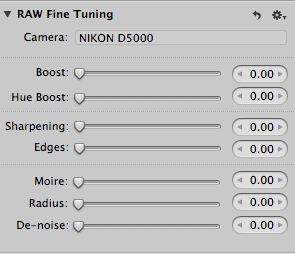
– Fire up Aperture 3. Under the “Adjustments” tab you’ll find “RAW Fine Tuning”. You’ll want to move all 7 sliders to “0” zero and create an hdr preset. (clicking on the gear icon will show the save preset option. More on why this is necessary later)

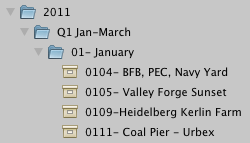
– Under the “Library” tab create a new “Folder” with the Year and another inside that folder with the Month.

– The “Import” tab should pop up and it will look something like this. Read More→

HDR Series – Getting Started, Part 1: Setup

I would like to introduce you to an HDR series, that will hopefully open new doors to help improve your HDR workflow.  I’ve been shooting HDR for a little over 14 months. Maybe not a very long time but after pushing sliders around in Photomatix I wasn’t quite satisfied. Eventually I reached that ah-ha moment when introduced to new techniques, so I hope with this series to help you achieve your very own ah-ha moment. Be sure to look for Part 2: Image Management in Aperture 3 and Part 3: HDR Tone-Mapping!

Step #1: Setting up your camera

– Your DSLR should have Auto-Exposure Bracketing (AEB) but if not you can still shoot your brackets by hand.

– I always shoot HDR in RAW (Full Resolution) with my camera in “Manual” mode.  You can use “Aperture Priority” mode, but if your bracketing manually like I do then you’ll want to use “Manual” mode.

– Set White Balance to AUTO (unless you have a grey card or color passport)

– If your camera has “Exposure Delay Mode” and your shooting on a tripod then use it!  (You can find this setting in your camera’s menu area)

– Set your “EV Steps For Exposure Control” to “1/2 Steps” instead of 1/3 steps. (Also found in your camera’s menu area)

– Now your set up to bracket for HDR, but you’ll will need to decide on how many brackets you need for your scene. Read More→