Archive for Make Better Photographs – Page 27

360º Product Photography: by Michael Leather

As a photographer my preferred line of work is in the studio, taking shots of people and products. My aim is to always create images that need a minimal amount of post production. This not only saves me time but I feel it forces me to be a better photographer. If I take my time composing a shot with consideration to how it’s going to end up looking on my screen or in print then hopefully it will come out right with minimal post production work. It’s not easy to do this and far too often I hear people say ‘ah that will do, I can Photoshop it out’. True, with the right skill set on Photoshop there is very little that is not possible these days. But does that make you a better photographer, no it makes you a better illustrator or image retoucher or essentially a lazy photographer!
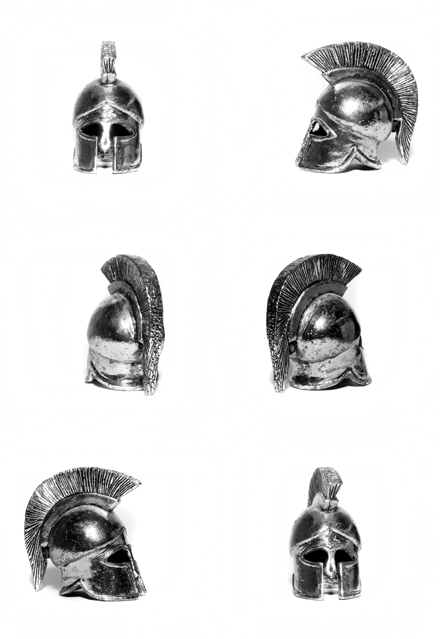
If you can get an image spot on with minimal editing why would you not choose that path? Unless you are more of a photo retoucher and enjoy editing image after image why do it? Well an answer to this question may lye in the economic climate of todays world. Businesses are having to become very clever in their marketing strategies and to keep on to of the game they need something fresh and new. Good photographers are no different; constantly on the look out for new ideas, new challenges and finding a niche or edge over the competition.

So you’re a product photographer and your client is looking for something different or fresh for their website, why not offer 360º Product Photography? Read More→

A Simple Experiment In Digital Pinhole Photography

Picnic Table

I was inspired recently to return to my photographic roots. Lacking immediate access to an old oatmeal container, photo paper, and a traditional darkroom, I decided to create my very own pinhole camera mockup. While this guy has an awesome tutorial, I wanted something that was both cheap and fast. I decided to tape a piece of aluminum foil over the front of my Canon 5D Mark II, poke a tiny hole in the near-middle, and go outside and start snapping photos. On a side note, if pinhole is something you’re interested in, I have a bunch of pinhole photos here on Flickr. Read More→

Tying The Knot: The Fantastic Four Superhero Lenses For Weddings

One of my favorite pub debates with the boys is the classic “if you could have one superpower, what would it be?”. I’ve also tried this on first dates but the conversation never lasts very long (and nor do the dates for some reason…).

However, after hours of exhaustive analysis and comparisons, what always seems clear is that it’s better to have one kick-ass superpower than multiple skills. After all, who really likes Superman right?! And a collection of superheroes each with unique skills, such as the Fantastic Four, is pretty much invincible!

Anyway, back to wedding photography and it’s a similar story with lens selection. I outlined in a previous post how wedding photography requires knowledge of a number of photographic genres e.g. portrait, macro, landscape. Well, for each of those genres there are specific types of lenses which will help you to get the best results, and at a deeper level there are then usually choices between primes and telephotos. That’s a massive discussion point in itself, but for now it’s important to remember that shooting a wedding is not the same as shooting in a studio. I LOVE super fast prime lenses but I need to be practical about how many lenses I can carry around so I don’t turn up to a wedding looking like a lost safari photographer!

My current solution is a set of 4 lenses comprising two primes and two telephotos. It took me about a year of intense research, trial and deliberation to assemble this Fantastic Four as I wanted to ensure that any lens I invested (a not insignificant amount of $$) in would have a specific mission and deliver a particular type of shot that complements my documentary style of storytelling. I’m also keen to avoid lens “stuffocation” i.e. having so many lenses that you can’t make up your mind which one to use!

I’m not going to get into any technical jargon in this post because that’s not why you’re here. Rather my aim is to give you a feel for what my lenses accomplish and the types of shots you can get with them, so that hopefully you can make more informed decisions about your own lens selection. Read More→

Photographing A Vintage Power Station, Pinhole Style

Vintage Power Station (1 of 24) Vintage Power Station (2 of 24) Vintage Power Station (3 of 24) Vintage Power Station (4 of 24) Vintage Power Station (5 of 24) Vintage Power Station (6 of 24) Vintage Power Station (7 of 24) Vintage Power Station (8 of 24) Vintage Power Station (9 of 24) Vintage Power Station (10 of 24) Vintage Power Station (11 of 24) Vintage Power Station (12 of 24) Vintage Power Station (13 of 24) Vintage Power Station (14 of 24) Vintage Power Station (15 of 24) Vintage Power Station (16 of 24) Vintage Power Station (17 of 24) Vintage Power Station (18 of 24) Vintage Power Station (19 of 24) Vintage Power Station (20 of 24) Vintage Power Station (21 of 24) Vintage Power Station (22 of 24) Vintage Power Station (23 of 24) Vintage Power Station (24 of 24)

In the old days, very few buildings had electrical service, and those that did had relatively low power requirements. Today, we rely on abundant supplies of power as almost everything we own is powered using electricity. Power plants have grown much larger in response to these ever-increasing energy demands. I was fortunate enough to come across this still standing vintage power station, which was in relatively good condition, considering the age of the facility and its years of abandonment and disuse. Not only was this photo shoot an inspiration, but also a lesson in History and how much things have changed since the turn of the century. Read More→

Scenic Outlook – Intro to Lens Filters

As a landscape photographer, I love using lens filters. There are certain benefits you gain in effectively using filters that simply cannot be reproduced in Photoshop. Learning the ins and outs of proper filter use is an art form in and of itself and takes a lot of practice. What I would like to do today is introduce a few of my favorite lens filters, why I use them, and what they can specifically do for your landscape images. I will follow this post up in the future about the technical aspects of filter shooting so you can take this knowledge out to the field with you and create some beautiful images.

Circular Polarizer – A well know but seemingly under appreciated lens filter. Many people dismiss the usefulness of polarizers because of the amazing image editing tools available nowadays but there are a few reasons why I still like using one. Polarizers are most known for deepening blue skies and cutting out glare in water. Yes, skies can be further saturated during post processing, but CP’s also retain contrast in clouds and prevent them from being over exposed, hugely beneficial. Eliminating glare in water can often times be more aesthetically pleasing, but there is another use that can sometimes come in handy: dismissing reflections and glare in windows and glass.

Read More→

Photography 101: The Rule of Thirds

The rule of thirds may come across as a simple rule, yet it can make a very powerful image. While a lot of photography rules have changed as technology improved, this rule has managed to stand the test of time. Let’s look at this rule and how you can use it to your advantage.

Before I dive into a few of my photos and how I utilize the rule of thirds, a small description is necessary. The idea behind this concept is that you break your scene into threes. An example would be shooting a beach scene. You place the sand in the foreground at the bottom third of the image, the water in the middle third, and the sky in the top third. This rule also applies to the vertical orientation in which you split the scene into thirds in a left to right fashion. Now, let’s look at a few images that utilize this rule.

There are a few ways I framed this image with the rule of thirds in mind. First, I kept the bridge and the vanishing point of the railroad tracks in the lower third of the frame. I also framed the shot so each side of the bridge appears in the lower left and right quadrants of the shot.

Next was framing the trees. While the trees do sneak into the middle portion of the image, I kept the bulk of them on the left and right thirds of the shot. I also tried to keep the trees contained to the bottom two thirds of the frame to allow for some negative space on the top of the shot. This decision ultimately creates a “T” for the fog to fill in, and directs the eyes into the image.

screen-shot-2011-03-25-at-2-35-47-pm

Read More→