Archive for Photo App

Create Cartoon-Like Effects with Halftone for iPhone and iPad

There are lots of photo effects apps out there, but very few that are really different and unique. Halftone is one such app that lets you create cartoon-like effects from your photos. When you first open the app it displays clear instructions. There are two menu items at the top of the page. The Settings icon in the upper left corner allows you to select dot size, dot strength, dot gain and many other settings. At the bottom of the screen you may view more information about the app and watch a video about the app. At the upper right hand corner is the export button.

Now for the fun part! Just start at the bottom left corner and click the camera icon. Now you may take a photo or choose one from your camera roll. At this point the photo comes up with the most recent settings. Click the paper icon to choose your background paper from 27 choices. Click the next icon to select your layout from the 9 available. Click on the text boxes to change your text. Click on the text balloon icon to bring in a new text balloon, select a style, and type in your text. The rubber stamp tool lets you add graphics. Just click on the tool and a graphic will appear. Click on that graphic and it will allow you to select from 28 graphics. You may also select the color on some of them. Finally, the text icon allows you to change font size and style. Read More→

Droidography – PRO Paint

Welcome back to another installment of Droidography. I think there will never be a shortage of apps for me to review and its getting harder to narrow it down. This week I will be reviewing a photo app called
PRO Paint and seeing if its is worth its Salt.

Once you launch PRO Paint, you are given 4 options. They are: Take a Pic, Use Existing Pic, Blank Canvas, or Upgrade to PRO Zoom Camera 5x. Also from the opening screen you can access preferences by using the phones menu button. Lets visit the preferences area first and see what we have there.

In the preferences menu, you have three areas of settings: Picture Settings, App Settings, and Contact the Developer.  Picture settings obviously adjusts the picture settings such as image resolution, jpeg quality, and lets you toggle the autofocus on or off by default. The app settings area is slightly more lengthly, but not overly so. In a nutshell your app setting menu lets you turn on or off to your liking different buttons to take pics, whether you show a preview of the image or not, where the image saves, etc. Lastly in the preferences menu you can choose to contact the Developer via his website, email, Twitter, or Facebook.

Once you have chosen your preferred settings, you can use the back button to return to the main menu where we are once again faced with the four choices mentioned above. Lets take a pic and see how that works first. Once we touch that menu option we are brought to a camera screen which gives us several options including filters (sepia, mono, negative, green-tint, etc), exposure settings, flash settings, AF, and finally a video setting. So lots of options here. After you choose whatever options you would like then you can save the photo, delete, picwiz (more about that shortly), edit, or share it. If you save the photo it saves the photo in your gallery and you still are in the camera screen and if you delete obviously it gets rid of your photo. Read More→

Droidography – Photoaf

Both the fortunate and unfortunate thing about smart phones (esp. Droids) is there are tons and tons of apps out there. So far as photography goes, I have not found an app that does everything (yet!)

This week I am going to tell you about and review the features of an app called Photoaf. It strictly does one thing…makes panoramas. I have been looking for a good panorama app since I moved from my Envy3 over a year ago to the Droid.  As the Envy3 has a built in panorama feature.

Once you install and launch the app, the menu is pretty simple and the app is very easy to use. The menu and controls are rather straight forward which is always a good plan. Making the panorama takes a bit of practice but it turns out pretty good, more on that later.

When launching the app you are presented with a menu with 6 main buttons and two smaller buttons for “help” and “about”. Lets go through the function of these buttons.

The first button starting from the top left says “Create Panorama”. If you click this button a new window pops up and asks you to give a file name to your panorama. A default one is generated and you can use it or erase that and create your own. Once you have come up with a name for your file, the camera window will launch which is very similar to your default camera on the Droid, with some helpful additions. Read More→

Cool Retro Effects with TtV Camera Basic

Okay! I can’t help it. If it’s an iPhone app that will let me do some type of vintage effect or make retro-cool pics, I just can’t resist. Such is the case for the TtV Camera Basic app by Taplayer. It’s not that this app is all that unique. It is, in fact, about as predicable as an episode of Bones (the TV show, which my wife loves and I love to make fun of). But sometimes predictable is cool. Ever heard of Old Faithful… Read More→

Droidography – Retro Camera Plus

Retro Camera PlusHello again readers! This week we are going to talk about an app called Retro Camera Plus. I downloaded it as a free app from Amazon, but now it will cost you $2.99. Lets see if the features are worth the price.

First off, once you install and open the app, you will notice an intro screen. You may click anywhere on the screen to start taking pics. In the lower left hand corner you can click on a photo icon which will take you to your Retro Camera Plus Gallery. In the lower right hand corner you will see an icon that will allow you to switch to different types of cameras (more on that later). Lastly, you have a shutter button which allows you to set a self timer of 5, 10, or 20 seconds. Its located just right of camera lens in the app itself.

Once you touch anywhere on the screen to begin taking photos, you may also notice a bubble level which is handy to get those nice and level shots. If you click on the camera type it will bring up a gallery of cameras to choose from. Cameras include: The Barbel, Little Orange Box, Xolaroid 2000, Pinhole Camera, etc. You can learn more about each camera by pressing about this camera below and to the left of it or to use it to take a photo by click use this camera. Once you have selected your camera to use, you also may notice just to the left of the lens a status window saying “ready to shoot” or “busy.” Right below that you will have the option to shoot in colour (color for us Americans) or Black + White.

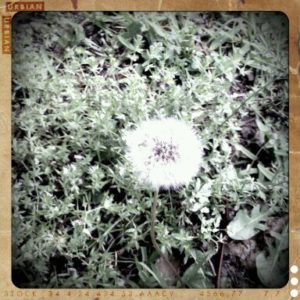
One thing you will notice is that some cameras will take longer to process the photo than others. For example, The Barbel, took several seconds to process. However, the result is a really cool effect as shown below of a dandelion in my yard, which are currently in great abundance. I’ve included a few more that I took with some other “cameras” in the app.

The Barbel

Read More→

Droidography – Pocketbooth

I am really showing my age here, but I can remember as a kid visiting the local mall and seeing the photobooth. Malls these days are only good for one thing, refuge from Zombie Attacks, but I digress. That being said, I have no idea if photobooth’s are still in such abundance. Fortunately, their is a really neat app available called Pocketbooth. Lets talk about it and it’s features.

Once you install and launch the application, you will see a photo window in the center of your screen. In the upper right hand corner you will see an icon of a hammer and a wrench. Clicking on this icon will bring you to the application settings (more on that later). Located below the photo window there is a start button which activates the photo process. Lastly, in the bottom right hand corner of the screen is a button labeled “photo strips” which is where all your pocketbooth filmstrips reside. Also from this section you can share your photos in the standard ways through facebook, email, twitter, etc.

Now, lets take a look at the settings section of the application. Once you open the settings you will notice six different areas to manipulate. The first one is strip size which is either 3 or 4 shots per strip. Secondly, you can click on photo effect which gives you a choice of Color, Black and White (B&W), Sepia, or Antique. Third, you can choose your paper stock of matte or glossy. Fourth, you can choose a border color of black or white. Fifth, chose your time between shots on the strip. Choices range from 1 to 5 seconds. Lastly, the flash setting lets you turn your flash on, off, or you can choose auto. All of these give you a little flexibility in your photo strips. My wife was happy to help me take a few example shots and I will share those next.

Antique Setting

Read More→