Archive for Lighting – Page 3

Canon Speedlite 320EX and 270EX II

Canon LogoCanon Speedlite 320EXPRESS SUMMARY – The new Canon Speedlite 320EX is designed to provide DSLR users with a lightweight and versatile external flash solution. Along with the new Speedlite 320EX regular flash functions, it includes a built-in LED continuous light option that is capable of providing full-time illumination for short distances when shooting video on a DSLR or PowerShot digital camera. Ideally paired with the new EOS Rebel T3i, the new Speedlite 320EX enables bounce flash shooting with six positions including ceiling bounce for vertical shooting, and rear-wall bounce. The Speedlite 320EX also includes a new remote firing function and can remote fire any EOS DSLR camera that has a built-in wireless remote control function or Integrated Speedlite Transmitter such as the new Rebel T3i, EOS 60D, or EOS 7D DSLRs. The new Speedlite 320EX provides photographers with all the great lighting options Speedlites are known for with the added capability to shoot HD video with a full-time LED light option.

Read More→

One Light Wonder for Children Portraits: by Daryl Brown

Photographing children can be challenging let alone getting them to sit still for the session. So for me as I’m sure many other portrait photographers, I keep the process simple. I use one large soft box with a strobe and I let the kids be kids. To me thats the true image most parents want unless they are trying to get model agency representation. When I have a child portrait session, I do my best to not have things around that would distract them and I also tidy up the cords and other miscellaneous gear to avoid accidents because we all know kids are adventurous. Its always good to know ahead of time exactly what the clients want as far as background and or location. Most of my clients so far just wanted either a white, dark gray or sometimes black background. That seems to be the standard so my advice  is to keep a roll of each around and present them with options, they’ll appreciate that more. Once you know what type of image the client wants thats where my simple one light setup can come in handy. Read More→

Tools for Your Photography Business – Location Portrait Photographers

This is the fifth in our series looking at essential tools for your photography business. We’re going to be looking at some of the essential tools you’ll need to acquire in at least the first year (if not the first month) of your business.

Other articles in this series –

Part 1 – Software and Online Presence

Part 2 – Financials

Part 3 – Wedding Photographers

Part 4  – Studio Portrait Photographers
–

Part 5 – Location Portrait Photographers

Location portrait photography surprisingly isn’t about shooting on amazing locations…… it does help having them…..but if you’re a portrait photographer then your main emphasis should always be your subject.

In the same breath, location portraiture isn’t about having an abundance of gear. We’ve all heard the term ‘All the gear no idea’ , this really rings true for many photographers who think they need the latest gadget or lens to produce good work.

The best work is sometimes about simplicity. If you’re new to the business or are looking to expand into location portraiture then simplicity is a good place to start.

There was actually a wedding reception going on the background whilst we were shooting this picture.

Read More→

Tools for Your Photography Business – Wedding Photographers

This is the third in our series looking at essential tools for your photography business. We’re going to be looking at some of the essential tools you’ll need to acquire in at least the first year (if not the first month) of your business.

Other articles in this series –

Part 1 – Software and Online Presence

Part 2 – Financials

Part 3 wedding photographers

There’s no standard kit bag for wedding photographers and generally it’s something that you’ll want to add to over time (unless you have a ton of spare cash lying around).

I’ve shot over 50 weddings with a D70, a SB-800 and a 1GB CF card….. it’s not something I’d recommend so my suggestions here are the bare minimum I’d be happy taking with me today.

First rule – Whatever equipment you have – MAKE SURE YOU HAVE A BACKUP

What is important is buying what you can afford. It’s better to have two lesser camera bodies than one bad boy you had to remortgage your house for.

The hardest thing to accept in the beginning is that the a camera body you just brought that costs more than your first car is probably not going to last as long.

Someone once told me that the easiest way to tell the difference between a professional photographer and an amateur is not what kit they use but how much tape they have holding it all together.


Read More→

The Water Logged Alien Bee Zombie Lights: by Ryan Armbrust

A few days ago, I set off to snap a senior portrait session at a football field. The guy I was shooting is a football player, so it seemed like a fantastic idea. We had keys and permission to use the field. I packed up my trusty Alien Bee 800’s as well as a battery pack to power them, some grids and the rest of my camera gear and headed to the field. When we arrived, I quickly found the shot I wanted. I would place him in front of the score board right at sunset. I set my lights up and popped off a couple test shots. I wanted to get everything in place so I would not be rushed at sunset. I wanted that nice cobalt blue sky that last about 10 minutes. After everything was set up, we headed to the other end zone to grab some natural light shots.

AS SOON AS WE GOT TO THE OTHER END OF THE FIELD, THE SPRINKLERS CAME ON!

Read More→

How To Alter Colors During a Photo Shoot: by Guy Van Hooveld

My experience with corporate shoots is that sometimes, the environment is not exactly like the customer has described it, or does not really provides the kind of colors or light allowing to deliver the message you need. That is the reason why I use equipment to modify the look of a specific scene during the photo shoot. Some coloring is of course always possible in post production, but I am not a Photoshop freak, and I prefer to get the results right the first time, and to minimize post production.

First Example

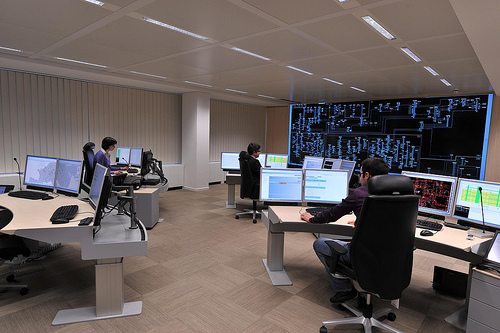
This example was a shooting session in a control center. A few pictures were expected for a press file, showing the “hi-tech” look of the dispatching center. When I arrived on location, I was impressed by the “clean” aspect of the room, a bit like a hospital. I decided to use color filters on strobes to give a more dramatic aspect to the pictures. After some tests I decided to go for dark blue, to give a “night” impression.

Let’s just follow the different steps:

Just for information, the used equipment was:

  • Nikon D3 camera with 24-70 2.8 lens on a tripod with hydrostatic head
  • Radio controlled shutter
  • Radio controlled strobes
  • 600Ws Strobes with color filter and barn doors, with digital energy selection
  • Lightmeter to determine exposure

A first picture to show the environment as it was

Read More→