Archive for Tips – Page 4

Shooting A Beautiful Bridal Portrait Session

We’ve all seen it. We walk into a studio or a wedding show and we see the most beautiful bridal portrait in a setting you have never seen in a pose you never thought to use. The bride looks so wistful and full of hope. So beautiful and elegant. You stare at the photo just wondering what they are thinking. That is a great photo. It is what you want to achieve with your own photography. You want people to stand in awe of your work, wondering, day dreaming, envious. So how can you create that one of a kind photo in your own work?

Well to be honest, you either have it or you don’t. Simple as that. Creativity cannot be taught but it can be molded, honed, skillfully polished to help you create wondrous beauty. Many of us are naturally gifted in that we can see an image in something that no one else can and thus make it a masterpiece. Others take time to develop that skill. To be able to think on our own and develop the intuition needed to create wonder. While I cannot teach you how to be great I can give you some pointers on how to start the process. How do you create a beautiful photo for a bride? You give her what she wants. Read More→

Photography 101: Three Tips For Sharper Images

I received a question via a comment asking about how to get sharper images. I want to address that question now with a few tips that you can easily do without breaking the bank. Let us get on with the show!

1. Get stabilized
One easy way to get sharper images is to remove the human element from the camera. What I mean is you need to stop holding the camera. Camera shake can quickly kill sharpness, even with the best lens stabilization/vibration reduction systems. This is where so many photographers swear by good tripods. However, what do you do if you do not like having to lug a tripod everywhere you go?

I am one of those in hand, natural light shooters. I do not mind using a tripod; it is just not my preferred method of capturing images. I use my environment as my tripod. Find a flat rock, use a board, or even rest your camera on a rail. What you want to do is get as stable as you possibly can, while keeping yourself and gear safe. I will not recommend resting your camera on a rail, setting the self-timer, and running off. That is just asking for broken gear. What I will do is rest the camera body on a rail, while I hold it to take the photo. This removes my body sway, breathing, and some of my arm shake from the equation.

Another way to remove yourself is to use a remote. If your camera does not have a remote, use the self-timer. This setup is only enhanced when using a good tripod. You can get your camera into position, dial in your settings, and then trigger the shutter without ever having to hold the camera. Read More→

How to Network Without Being a Slimeball: by Chris Horner

We know deep down we need to do it, even though it can make our stomach turn just thinking about it. Sometimes we get the impression of the plaid coat used car salesman fast talker running around with a megaphone, shouting about themselves to everyone they see.

Even in this digital-Twitter-Facebook saturated world, in-person networking can be some of the most productive that you can do. I’ve been to a thousand of these events for various positions that I’ve held, and I’m here to tell you that, done correctly, it’s not a waste of time. In this article, I’m going to give you some tips to make your time at these events productive and maybe, just maybe even enjoyable.

If you’re nervous in new settings and meeting new people, you are not alone. In fact I’d bet 85% of the other people at the event feel the same way you do. Secondly, remember that they are people living in the same environment that you live in. They have the same struggles, the same fears, and the same hopes you do. And most importantly, they’re there to do the same thing that you’re there to do.

BEFORE YOU START NETWORKING

Think carefully about your goals for networking. Are you looking to connect straight to new clients, or are you looking to gain referrals from other businesses? A mixture of both perhaps? Whichever way you’re looking to go, you’ll need to take a long-range view here. Successful networking is about consistency; it’s not just a one-shot deal. Wherever you decide to land, the more involved you are and the more you are seen the more successful you’ll be. Read More→

What Abandoned Places Can Teach You About Photography

Taking photos of abandoned places can teach you an enormous number of specialized skills that are generally not taught in a traditional classroom setting. This article will highlight the most important skills you can achieve simply by photographing abandoned places and buildings, which can help enhance the quality of other types of photography.

I must again emphasize that safety and legality are foremost, and neither should be overlooked simply for photographic pursuits. More about legal and safety considerations can be found in this post.

Framing

Abandoned Industrial Mine (8)

If you think that framing is something that happens when a photo is hung on a wall, you are mistaken. When a photographer takes a picture, special consideration must be given to how that picture will be viewed even if it were held in someones hand, for example. This above shot was taken with the chain link fence out of focus with the doors and windows in perfect focus. The fence wire gives the feeling of abandonment and desolation. Read More→

HDR…Fact or Fiction…A Physicist’s View: by Georgia McCabe

Every day I find numerous articles and testimonials about the possibilities inherent in the exciting field of  HDR photography. Some even claim that you aren’t a true practitioner of HDR art if you don’t shoot multiple exposures.

So, what’s the real deal with HDR photography? I sat  down with Scott Brownstein, to sort through everything.

Scott is a well known photo market and digital technology consultant and pioneer. His clients include large retail and professional photo labs, equipment and consumable manufacturers and software and digital service providers. During his 23 years at Kodak, he was responsible for many advanced digital products including dye sublimation printing, “Create-A-Print” consumer operated kiosks and finally the Kodak PhotoCD system.

In addition, he was also the founder and Chief Technology Officer of FujiFilm e-Systems where he was responsible for the conception and development of advanced digital solutions for the professional and retail markets alike. While at Fuji he was also the creative force behind 1 hour web to retail printing at more than 1000 Ritz camera stores and 1 hour web to retail printing at over 3500 WalMart and Sam’s Club locations. Scott was one of the founders and first presidents of the Digital Imaging Marketing Association (DIMA), a member of board of trustees for its parent Photo Marketing Association and sits on the Board of Directors of PhotoChannel Networks Inc.

He holds 18 U.S. patents ranging from innovative film camera systems to dye-sublimation printing to CD-R. Scott was awarded a BS degree in Physics from the University of Maryland and numerous industry awards and honors, including Germany’s Edward Rhein Prize for Technical Achievement, for the creation of the PhotoCD system. Read More→

Easy Do-It-Yourself Holga Effects

In a previous post, I discussed the joys of taking photos using a Holga Camera.  For those of us who have already crossed into the digital divide, there are still ways of making your digital photos appear as if they were taken with a real Holga camera.  While there are countless actions available for Photoshop that will give our photos that ‘holga look’ automatically, the real test of ones ability is to be able to perform these post-production edits ourselves.  One of the main benefits of doing editing manually is that each image will have it’s own unique edits, just like a real Holga camera, instead of a macro, where every image gets the same cookie-cutter treatment.

This tutorial will show you how to render Holga-like effects that are unique to each individual image using free software.

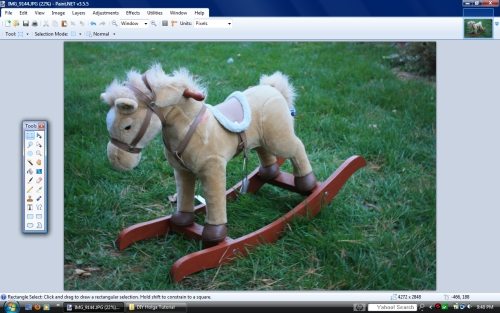
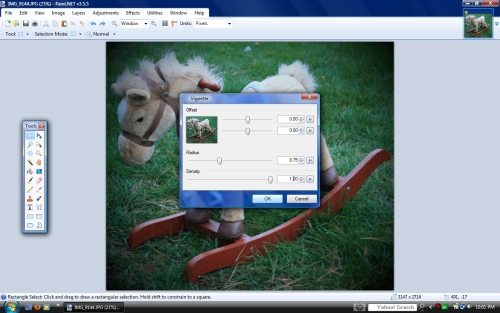
What You Need – You will need to download a copy of Paint.net, which is available for free.  In case you aren’t familiar with Paint.net, it is a free [very basic] clone of Photoshop.  We’ll start with this plain snapshot of a toy rocking horse.  Feel free to download this image if you wish, but please DO NOT post this image, or your final image on the internet (if you used the above photo).  Images you create using this method using photos you took should be posted online, and I encourage you to do so!

Step 1 – We will open the rocking horse photo with Paint.net.  Throughout this tutorial, the images shown are smaller than actual size to save layout space.  Click the images for a larger view (opens in a new window).

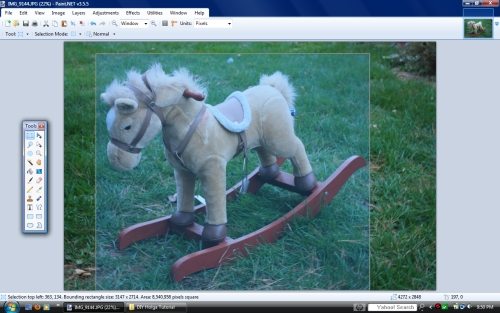
Step 2 – Now that we have the file open with Paint.net, we will first need to crop it as squarely as possible.  To create an exact square crop, hold down the shift key.  I have cropped this image somewhat (i.e. not exactly) squarely, which is more representative of a true image taken with a holga camera.

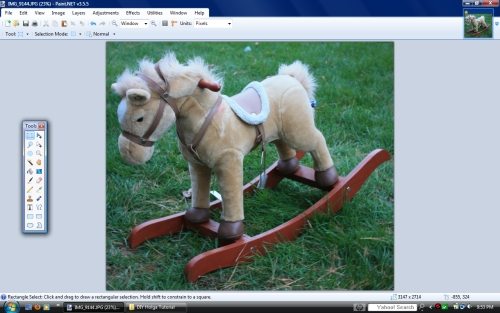
Step 3 – This is what your image should look like now that the image has been cropped.

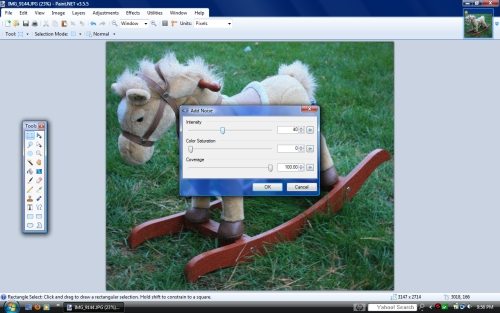
Step 4 – Add noise.  Go to Effects > Noise > Add Noise.  Set the Color Saturation to 0, and the coverage to 100.  The intensity is yours to determine.  Try moving the slider back and forth until you find the amount that works best for your image.


Step 5 – Add the vignette.  Go to Effects > Photo > Vignette… Set the intensity at 1; adjust the radius accordingly.  For the ultimate Holga effect, set the offset just off center, and change the values randomly slightly off center with each and every photo you edit.

This is the final, finished image.  The last [optional] step is to adjust the brightness and contrast, but remember that a Holga camera has a fixed aperture and no light meter, so it is not unusual to get imperfect exposure.  Be sure to save your image, and share it for others to admire.

More examples of Holga Effects I’ve created using the above method…

Strasburg Railroad Water Tower Wide Open Spaces Stop - Look - Listen The Not-So-Great Divide (Holga Edit) Beach
Rocking Horse