Archive for composition

Scenic Outlook – 3 Easy Ways to Not Look Like an Amateur

Amateur (noun) – a person inexperienced or unskilled in a particular activity

I think we can all agree that the definition of amateur doesn’t exactly have the nicest ring to it. A lot of photographers out there do fit this description, which is perfectly fine or everyone with a camera would be doing this for a living. The trick is not letting other people know it. There are difficult methods for your images to look like a pro’s but also very easy ways to NOT look like an amateur. I have seen countless photographs of beautiful sweeping landscapes and majestic sunsets only to be ruined by the simplest (read: careless) mistake. The three things I am about to cover are major pet peeves of mine that will instantly drop an image from the ranks of great to mediocre. My goal is to have you think the same thing by the end of this article. Remember, our work doesn’t have to stand up to the likes of Ansel Adams, but it does have to be better than that guy snapping away with a disposable camera. These tips are easy and you CAN do this.

Straight horizons

Number one. Numero uno. The be all end all. I can probably go on for days how crucially important this is but I will spare you the diatribe. Just repeat after me: I will make sure my horizons are straight. Very good, you are already on the non-amateur path. My advice is simple; take your time composing and framing your shot. There is a simple approach I take every single time I compose a landscape image to make sure my horizon is straight. Get this right in camera and you won’t have to straighten and crop part of your scene later. If you are using a DSLR, place it in live view mode once it is secured to your tripod and enable grid lines if they aren’t already. Take your time adjusting the angle of the camera until the lines show a perfectly straight horizon. Remain in or cancel out of live view and snap your shot.
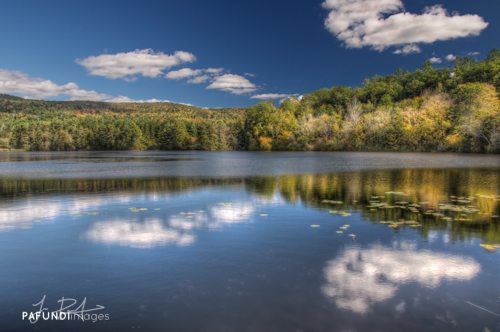
It was imperative that my horizon was straight for this image given that I was playing off of symmetrical reflections.

Dead center is dead boring

Being that we are already on the topic of straight horizons, lets keep the mojo going with another absolutely crucial non-amateurish tip: avoid centering your (now) perfectly straight horizon. Don’t get me wrong, there are times when a centered horizon will work, but for the most part that isn’t the case. When there is equal space above and below a horizon line, your eye wanders looking for a place to focus on in the frame. Our eyes are followers and need to be told visually where to go. As a general rule of thumb, if you want to emphasize a really dramatic sky, lower your horizon. If the foreground is the main point of interest and you are faced with a so-so sky, raise the horizon to the upper third portion of the frame.
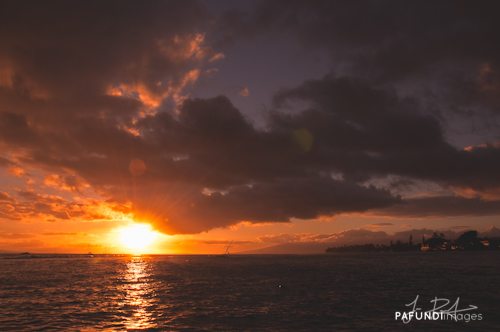
The only reason this image works and has any impact is because the sky is dominating the frame. Your eye is led by the reflection in the water, to the sun, then traverses around the dramatic sky.

Dust it off

Step 3 in the non-amateur program: dirty sensors. It happens to the best of us. Well, actually, it happens to all of us. Sensor dust is part of the game whenever you are changing lenses and for the most part, it’s unavoidable. Dust spots will be the most present in the under exposed areas of your image, but they are easily abolished. The first thing I do when processing a photograph is look for dust spots. Sometimes I will spend 5-10 minutes making sure I took care of every single one because to me, a single blemish can ruin a photograph. Inspect your shot from every viewing angle on your monitor. Some spots are only visible from the sides or straight on. Then use content aware fill or a healing brush to rid your image of those nasty specks.

In order to maintain all the detail in the sky and silhouette the distant boats, I under exposed this shot. With that, dust spots were present throughout.

Congratulations! You have now completed the 3 step program. With some simple care and attention to detail, you can avoid the amateur tag and start taking your work to the next level.


–

Jesse PafundiJesse Pafundi is a photographer hailing from Long Island, New York. A lover of all things photography, he enjoys traveling and capturing the world around him as much as possible. In addition to shooting landscapes, he has a major affection for New York City architecture and urban exploration. Whether it’s HDR, lens filters, or iPhoneography, he enjoys dabbling in and learning as many techniques as he can consume. Jesse believes strongly in the use of social media and blogging as a tool to further his knowledge and share his passion with anyone who wants to listen.

Photo Credit: © Jesse Pafundi

Here’s how you can share your tips, techniques and tutorials on CurrentPhotographer.com


Spelling-Dancing-Cropping – Behind My Eyes

The Letter M

My son was working on his spelling the other night and he was trying to perfectly write his name, ‘Sam’. His ‘S’ and ‘a’ were pretty much on the money, but his ‘m’ was a bit off. The problem was not with legibility, it was clearly an ‘m’, but instead of rounding the humps, he treated them as if they were points, or direct lines, so it looked like a miniature upper case ‘M’ instead of a rounded lower case ‘m’.

From a communication standpoint, there was no problem, his name was clear and easy to read. But when writing the ‘m’, I could imagine his mind saying, “…point, to point, to point,” making straight lines to limit distance and ‘technically’ get the letter correct.

As I thought about how to help him conquer this, the thought of a stiff, straight up dancer moving from point to point on the floor came to mind and it was mentally compared to a dancer with grace, flow and curves (think the good dancers on Dancing With The Stars versus the very bad ones). Even though they both move from one point on the floor to another, the one who is loose and graceful would look so much better and comfortable than the stiff, upright dancer, counting the least number of steps it takes to get there. Read More→

Scenic Outlook – Choosing Your Horizon

When out in the field and faced with a fabulous scene in front of you, there are three choices to consider when it comes to where you should place your horizon; Top, middle, bottom. Positioning the horizon in one of these three places will dramatically effect the perspective of the picture and will help to give your photographs a more dynamic edge. Generally speaking, the casual snapper and beginner photographer will tend to put their horizons more or less dead centre, as this is the way we usually see the world from a standing perspective. However, this tends to give pictures an unnatural balance with the photograph feeling as if it should be viewed as two halves. There will be times though, that placing your horizon in the middle will work a treat.

Lets look at some examples below.

Top:

Read More→

Scenic Outlook – Go Portrait

When it comes to landscape photography it may seem perfectly logical that you should keep your camera in a horizontal/landscape position, usually we are confronted by sweeping vistas and sometimes even the widest of lenses just doesn’t seem to be enough to fit it all in. However, turning your camera to a vertical/portrait position can be equally rewarding and in fact may help to improve your pictures in certain situations.

The strength of any picture will always be partly down to how you choose to compose the frame. I always take a few moments to have a good look at what’s in front of me, deciding what elements are available to help draw the viewers eye through the scene. Take a look at the picture below.

Read More→

Scenic Outlook – Shoot for the Clouds

“What a beautiful day, not a cloud in the sky!” To most people this phrase means good things, but when I have my camera in hand, it’s actually just the opposite.  As landscape photographers, there are many elements of a scene we look for when composing a shot. Typically the first things we analyze when shooting a landscape are the foreground and background elements, but often times we overlook what’s above our heads. It’s easy to dismiss clouds as another piece to your landscape puzzle, but if you pay special attention to the fluffy white stuff, your images can take that next step. I’m going to touch on why you should start paying more attention to clouds and break down some techniques on making them work for you.

Blue is boring
Start thinking of landscape images with three equally weighted segments: foreground, background and sky. Your goal should be to have each segment of the frame adding interest to your image. As your viewer’s eye travels up or down the photograph, don’t let it stop abruptly with a featureless blue sky. Sure, sometimes there’s nothing you can do about it (ie, you’re on vacation), but when shooting near your home, get that camera out when the sky has some character. It’s perfectly fine returning to a favorite spot or capturing the same scene more than once. Adding clouds to a previously similar image can dramatically improve your shot.

I’ve headed back to this same spot at my local beach multiple times. I was rewarded during my last visit with an impressive cloud filled sky which put previous boring sky shots to shame.

Read More→

Compose Then Shoot – Don’t Shoot Then Compose

So many photographers have 20+ megapixels cameras and brag about how they now have more latitude when cropping in on a photograph. This is very true but is it really as great as it sounds?

Personally, I’m of the old school film days and have always tried to get what I wanted in the camera at the time of the shutter release and not after in the darkroom. Of course, things are much easier now within our “digital” darkrooms but still today just like years ago our photographs suffer from cropping.

Let’s look at it this way…

Read More→