Archive for Make Better Photographs – Page 3

Film Is Not Dead – Behind My Eyes

Ilford Delta 400 / Canon Elan ii

Last Friday I posted the above shot on Twitter and Facebook from The Great Smoky Mountain National Park for what is called #FilmFridays on Twitter. Along with the post info, hashtags #filmisnotdead and #believeinfilm were attached. One of my buddies on Facebook commented with an opposing hashtag basically saying that film is dead it just doesn’t know it due to some nostalgic people. I’m sure there was both sarcasm and honesty in his response, and that’s OK, but he may not know what I know (that isn’t much by the way) and likewise, you may not know it either.

What I know is that there is a very active, passionate and growing group of photographers who do believe in film and are doing everything they can to keep it alive. It seems to be working, at least in some areas.

Back in the April/May timeframe of this year, my film itch began to grow again. I’ve shot film on occasion for several years now, but since obtaining my Sony mirrorless digital equipment, it had taken a back seat, so much so that I had given away my 35mm Canon Elan ii to my great niece. That likely would have happened had I still been really active in film just due to the circumstances, but doing so left me with my only film option being a Pentax 645 medium format beast – I love her, but she ain’t the easiest to carry around and, with only 15 shots per roll, can get a bit on the expensive side.

Ilford Delta 400 / PentaX 645

What got my itch started was an expired roll of 35mm Fujifilm Neopan 400 sitting in my fridge. When I saw it, memories of how much I LOVED the contrast and detail of its images rolled through my head and I knew it could not be wasted. Also, I had joined a kickstarter project for Cinestill 800T film for 120 medium format photography – Cinestill is basically a brand of film that has been converted from cinema film and has a beautiful look. I had two rolls but wanted to find out info on how to shoot it – whether it needed to be underexposed, overexposed or shot at box speed.

Fujifilm Neopan 400 / Canon Elan ii

So I started a search on YouTube and Twitter looking for a 35mm camera to shoot the Neopan and information on the Cinestill. What I found was rather inspiring, especially on Twitter. When searching the hashtag #filmisnotdead, the steam was heavy, filled with a large group of diverse film shooters – and I mean film shooters. They take images every day, develop and scan their own images and share what they learn and know through their websites and social networking sites.

Much of the interaction took place with and through a site called EMULSIVE (Twitter user @Emulsivefilm). Their posts shared not only film images, but interviews with film photographers, reviews of film, equipment, developing techniques and general overall news about the film community. Their About Page states they are a reasonable advocate of film photography. The interaction with and through this site was fantastic, objective and, most of all for me, exciting. Exciting to know that there is at least one resource out there that can help me in my film endeavors and make me excited about the medium again!

A direct message was sent to EMULSIVE concerning a new 35mm camera – the response was immediate and incredibly helpful! Not only that, without force or coercion, he made me feel like I was part of the group – and I was! Granted, I chose a different camera to purchase than any of the others we talked about (and have since sold it and bought another), but it did help me mold my decision.

Shortly thereafter, he created two new private Facebook groups and invited me to help moderate the action. Since creating these groups, I’ve learned that there is a very vibrant and growing film community. Through the site I’ve been made aware of NEW film stocks being made – that’s right, new ones – that I’m already trying out. Even considering developing my own film down the road – we’ll see.

Cinestill 800T / Pentax 645

OK, so let’s step off of the fanboy steps for a minute. The truth is, many of the great film emulsions have been discontinued, that is true, and the current market is only about 2% of the level it was at its peak in 2003. But there are signs of life, like Kodak’s decision back in January to bring back Ektochrome. Harman Technology (Ilford) is making a large push in their business due to film and companies like Bergger, a French company formed in 1995 who’s sole products are built around film, papers and chemicals for film photography, even putting out new grades of beautiful black and white films. There’s also been a demand for instant film cameras, like the Fujifilm Instax Mini. This January 2017 article in Time (http://time.com/4649188/film-photography-industry-comeback/) highlights how these companies are seeing 5% growth year on year specifically in the film market. They’re even seeing professionals move to film as a competitive advantage over digital photographers. So even though it’s not where it used to be, there are definite signs of new life in film photography.

Why Film?

So, why all this fuss about film? I LOVE my digital camera equipment and LOVE making images with all of it. But there’s almost a no fear attitude with it – take as many images as you want as it doesn’t cost anything. This is great for experimentation and fine tuning a shot, but it can also be a bit detrimental to honing skills. Film is a bit expensive and you know there’s only 36 exposures on this roll or 15 on this one – you don’t want to waste them. That makes me slow down. It makes me think about what shot I REALLY want to take before pressing the shutter.

There’s also something about the process. Loading and unloading film. The film advance. The sound of the shutter. Manual focus. The not knowing what the images will look like until they’re developed. There’s a kind of intimacy with the camera and film that does not exist with my digital gear, although that relationship is still very good.

My Pentax 645 medium format film camera with 75mm f2.8 lens

In the end, though, it’s the look. I LOVE the look of film, especially when it comes to images with people in them. The colors are unique, the tones belong to the film. Even though some companies have been able to get presets close, it’s still not the same. And when it comes to black and white, there’s no comparison – film just wins out in my book. There’s a timeless feel to black and white film, especially my favorite, Fuji Neopan 400. Unfortunately, it’s no longer made, but I’m excited about finding a new favorite!

The “New-To-Me” Canon AE-1 Program 35mm with 50MM f1.8 lens

Who’s It For?

Is film for everyone? Is anything for everyone? No. It’s not even for me most of the time, but when it comes to people and documenting events, I prefer to shoot film. Some things to keep in mind if you’re considering film photography:

  • It can be expensive. Film is not too bad and developing your own images helps reduce the cost of processing, but sending off to a lab can really be expensive if you look at a per image cost.
  • There’s no instant knowledge of whether your images are good or not good. You have to wait until they’re developed to know. Part of that is the fun, but if the film is bad and nothing comes out, there’s no fun in it at all!
  • Camera gear, for the most part, is cheap. You can find an old Canon or Nikon 35mm camera for way less than $100, with a lens or two most of the time. There are still very expensive kits out there, but unless you’ve got money to waste or invest, there is no need to get them. You can even get into medium format kits for less than $500.
  • Developing labs are becoming harder and harder to find – some Walmarts and Walgreens will still take your film, but they send them off to another lab, so you may want to find a lab yourself. I use The Darkroom in California – I’ve had good luck with them, but there are many others out there that are great as well > SLR Lounge put together a nice list of labs here https://www.slrlounge.com/list-mail-order-film-developing-labs/ and from a global view, EMULSIVE has a great resource in this Global Film Lab Map here http://emulsive.org/articles/global-film-lab-map
  • It’s slower and harder than digital, in most cases anyway. Some of the later model cameras have a lot of the same bells and whistles as the the current D-SLRs, like autofocus and exposure metering in EV stops. Some can even use your digital lenses, like Canon and Nikon. But, older models have antiquated metering, if any at all, and focusing is mostly manual. This makes you slow down and not take as many images.
  • Developing labs, as well as yourself if you have a capable scanner, can scan negatives and create high resolution digital files so that your images can be cataloged, backed-up and even post processed digitally.

My intent here is not to scare you off – it’s just to make sure you know what’s involved. I love it and will continue to pay to use film. Someday, I plan on lowering that cost by developing my own and I already have the ability to scan – all I need is chemicals and practice, but it may take a while to get into it. Good news, there’s a great community and resources out there to help me when I get ready to dive in!

Conclusions

Let’s face it, film will likely never reach even a fraction of what it once was – digital is so inexpensive and easy that many people these days don’t even know what film photography is. With that said, there’s a strong community of photographers out there who ONLY use film and will continue to do so until there is no film to use. Granted, some are in it for artsy reasons, but many, and I mean many, shoot film because they love the process of making pictures with it – period! And even though there’s not many companies creating new equipment and films, there are some and that could be a sign that some see what I see, a growing and vibrant community of film photographers! Who knows, based on the Time article, if you’re a wedding or portrait photographer, maybe you can gain an edge over your competition by shooting film!

As I’ve said before, it’s all about producing the image you envision making. Some folks can’t see film ever becoming part of their vision or process, and that’s OK. But many others see film, at least part of the time, as the best way to produce the images that are behind their eyes!
Basic Lighting Setup For Business Portraiture: by Daryl Brown

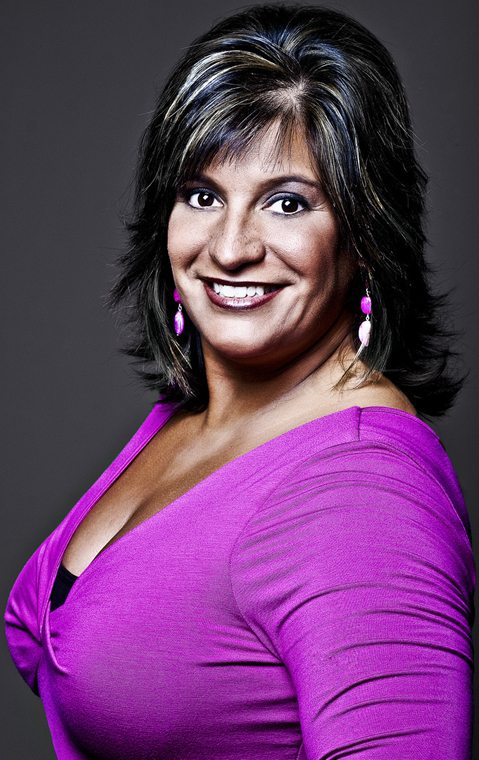
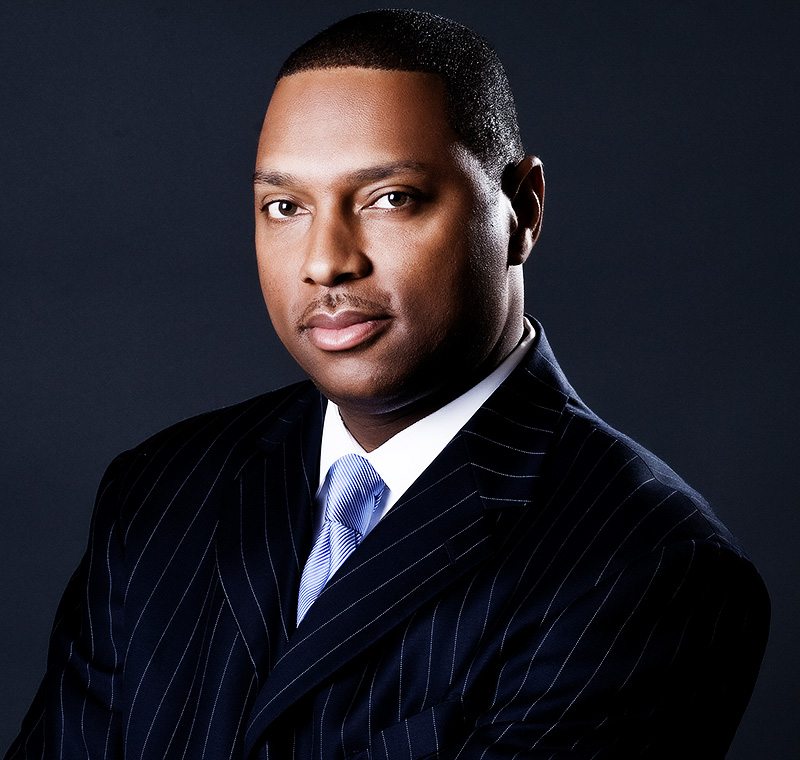
When acquiring a Business Portraiture client it’s always best to know before hand how the client will use the image. Meaning if the client will be using his/her image for web posting or high quality publication it’s best to light for deeper shadows. This is more or less for men especially as deep shadows can indicate Strength and Intelligence (not that women are equally the same) but non the less you’ll see more Business Portraiture for men photographed this way. Now I will say some women like that type of lighting scenario and will occasionally ask for it as in the following images


Now if the client is using the image for lets say newspaper paper pre-production or other venues where the image quality is lower, then you should aim to fill in the shadows. The last thing you want in that scenario is poor reproduction that will render darker areas without details. Even if the imagery will be used for general usage, fill in the shadows as a matter of course.

Business PortraitureBusiness Portraiture
The following are two setups that I use in my Business Portraiture session for both men and women.

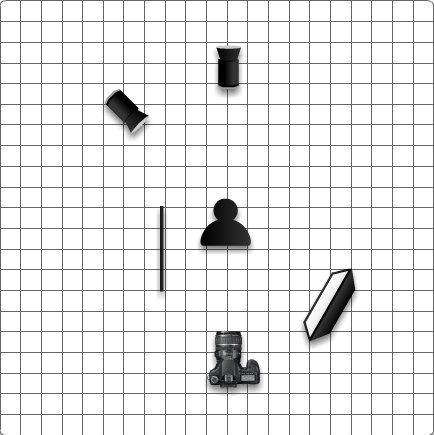
business portrait for men

The above diagram is my typical setup for men and women who want deep shadows for the portraits. This is more for men so I suggest again knowing what your client wants well in advance so that you can prepare appropriately. The setup uses three lights, a key light, a hair/rim light and a background light. The gobo or black subtraction panel is optional but I like it to deepend the shadows depending on where you place the panel. Now you can use whatever light modifier you are most in tuned with. For most of my portraits I generally use a large softbox and occasionally I’ll use a medium soft box or an umbrella. The hair/rim light uses a 30 degree grid as well as the background light (play around and try some with the light off you may like the result).

Business PortraitBusiness Portraiture


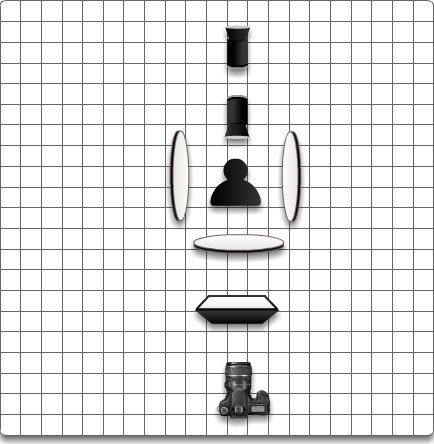
Business Portraiture for women
This diagram is what I use for most of my Female Portraits and it also works well for Business Portraits. The setup is three lights; key, hair, background and three white or silver reflectors. Key light is primarily postioned directly in front 4 feet from the subject and about 4 feet above camera height. The reflectors are generally placed two feet from the subject on either side (you can place them closer or further depending on the look you are going for). The third relfector in front is placed chest high underneathe the subject’s chin to fill in those shadows (you can place the reflector closer or lower to the subjects chin depending on the final look). If you have the budget for it or have the space for it add a second light in place of the third reflector. The results will be just as beautiful, but be sure to meter the light one f-stop below your main/key light. The hair light is placed directly above and slightly behind the subject’s head about 6 feet and angled toward the camera and uses a 30 degree grid. The background light uses a 30 degree grid and is generally placed 2 feet behind the subject and aimed at the middle part of the background (white or studio gray) to give it a gradation. The results are always flattering and complimentary for women subjects.

Business PortraitureCasual Business Portrait

These two are just a handful of setups I use for my Business Portraiture. I encourage you to try the setups and practice the lighting schemes until you produce images you and your clients are happy with. In the end the client is who we want to be happy and return again and again and again.


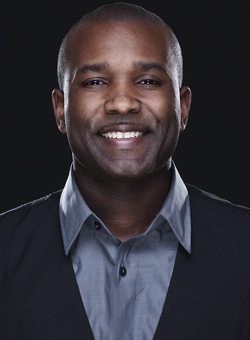
Daryl BrownDaryl Brown is an award winning beauty, fashion, and portrait photographer located in Arlington, VA. Daryl’s career as a photographer has spanned nearly two decades from his start as a news videographer to his work today photographing all types of individuals…from radio and TV personalities to aspiring models to new borns.

Daryl has received the prestigious Edward R. Murrow award and an Emmy award for photojournalism in investigative news.

Daryl is known for his attention to detail from prep to post in all of the images he has produced. His work has appeared in Council Magazine, The Washington Post and an exhibit at Century 21.

Daryl Brown Photography Logo

Company: Daryl Brown Photography
Phone:
571-232-5349
Email: d.brown.photography@gmail.com
Twitter:
@darylbrownphoto
Facebook: https://www.facebook.com/darylbrownphoto/

Photo Credit: © Daryl Brown

Here’s how you can share your tips, techniques and tutorials on CurrentPhotographer.com

–

Three Reasons You’re Not Ready To Shoot A Wedding – And One Way To Fix It: by Angelo Stavrow

boutonniere

Photo Credit: © Angelo Stavrow, Saad Khan and Caitlyn Bom

With the advent of low-cost digital SLRs, the field of photography is being democratized — even the most entry-level version sports image quality and responsiveness that stand head and shoulders above the point-and-shoot cameras that reign supreme in the consumer market, offering the first-time photographer an excellent tool with which to begin learning.

Inevitably, newbies flood photography forums on the Internet, wearing their heart on their sleeve and putting their best work up for critique.  A curious sequence of events then unfold for our newbie: She puts up a few colourful sunsets, maybe a few flowers, a couple of black-and-white portraits; since she love taking photos, her SLR is always with her. She gets to be know as The Gal With The Awesome Camera.  And then, almost out of nowhere, it happens: some friend or acquaintance, having seen her photography, asks her if she’d be interested in shooting their wedding.

This was exactly my situation a few years ago.  A friend of the family, looking for an inexpensive wedding photographer, asked if I’d be willing to take on the job.  They couldn’t offer me much money, but that didn’t matter — I refused the job, because I honestly didn’t feel that I was ready and able to do it.

Little did I know how right I was.

As a relatively-new photographer myself (at least when it comes to shooting professionally, and especially at weddings), I often see the old guard either a) warning new entrants of the pitfalls and perils of weddings, or b) actively discouraging these newcomers from giving it a go.  I don’t much care for the latter behaviour, but I’d like to offer some “newbie-to-newbie“ advice to those who would like to try their hand at the wedding game.

I shot my first wedding in the spring of this year, and even though it’s been years since I was last asked to shoot one, I still wasn’t as prepared as I thought I was.  So, based on that experience, here’s why you’re not ready to shoot a wedding.

1. You Don’t Have Enough Gear

For an amateur, I consider myself well equipped.  I showed up the day of the wedding with my Canon 5D Mark II, a couple of lenses, a couple of flashes, and extra batteries, and thought I’d be fine.  And, for a few hours, I was.  I was snapping away happily, until my go-to lens –a Canon 24-70mm f/2.8L– started throwing sporadic “ERR00” communication errors.

the_happy_couple

Photo Credit: © Angelo Stavrow, Saad Khan and Caitlyn Bom

Great.  So I could either just grin and bear it, fussing with the lens every time it went awry, or put it away for the rest of the night, and deal with switching between primes (I had a 28mm, a 50mm, and an 85mm with me as well).  Both situations meant wasting time, and, worse, potentially missing The Shot.  If I had a second body, I’d have just put away the 24-70 and slapped a prime on each — probably the 50 and the 85 — and been fine.

Then there were the issues with the flashes.  Well, technically, the flashes worked fine, but trying to trigger them reliably via an ST-E2 transmitter when you’ve only got minutes to set up, pose, and tear down was an exercise in frustration.  Proper radio triggers would have had made this far easier.

Despite these problems, I somehow made it through the night without tossing my gear in the trash bin (or hitting the open bar).  I definitely have a much better idea now of what I should have brought, what I didn’t need to bring, and how to work gracefully around the problems that invariably crop up with gear.

2. You Don’t Have Enough Time

I spent about ten hours shooting the wedding and came back with nearly 700 photos.  That’s actually not many, by professional standards — maybe half of what could be expected.  And, hey, I’ve come back from vacations with just as many –if not more– photos, so it’s not like I’ve never had to deal with that many images at once before.

Except for one thing.  Wedding photos have to be delivered to the client within a reasonable amount of time. My vacation photos?  Yeah.  I’m a couple of years behind.

Like many of us, I have a full-time job, and other obligations besides photography.  Frankly, finding the free time to go through and process these photos for the newlywed couple within a few weeks was simply not going to happen, unless I decided to forego things like, well, sleep.  The day of the wedding is only a portion of the entire time you spend on these jobs — you’d better have an efficient workflow to get it done in a reasonable period of time.

3. You Don’t Have Enough Experience

I’ve shot concerts and art show openings (as an amateur) and figured that a wedding wouldn’t be much different.  I mean, heck… it’s basically just event photography, right?

Wrong.  So very, very, wrong.

None of these events will adequately prepare you for the ten to twelve hours you spend on your feet, coupled with barely having time to inhale a granola bar, dealing with friends and family of the newlyweds ruining your shots to get their own photos, guests taking advantage of the open bar (luckily, that wasn’t an issue for my first experience), and trying to get wedding portraits in the middle of one of Ottawa’s most popular museums (where the reception was held) before closing hours.

The Fix: Mentorship

backlit_kiss

Photo Credit: © Angelo Stavrow, Saad Khan and Caitlyn Bom

So, how did I manage to not make a complete arse of myself?

I was offered a great opportunity by a pair of wedding photographers, Caitlyn Bom and Saad Khan: Tag along on a large wedding that they were going to be shooting, as an apprentice.  I wouldn’t be paid, but I’d be there as a third shooter.  They’d seen my work, and felt confident enough about my professionalism, and thus invited me to join them.  It was a win-win situation: I would get to try out wedding photography without the performance anxiety, and they’d get additional coverage of a large event.

So what if I didn’t have enough gear?  If my stuff failed, there were still two other photographers there, with their own equipment, to cover the event.

So what if I didn’t have the time to process all the photos I shot?  They took full control of the deliverables, so all I had to do was provide the images — they’re the pros and thus have their workflow down.

So what if I had no experience?  I had theirs to draw upon.  I learned a lot from the event, sure, but the most valuable lessons came from watching professionals in action: dealing with the clients, dealing with the guests, dealing with the venue management, and dealing with each other.

So, you may not be ready to shoot weddings — but there is a fix.  Talk to pros.  Seek out mentors.  You can learn plenty from a photography website, but nothing beats learning-by-doing.

Many thanks to Saad Khan (Toronto) and Caitlyn Bom (Syracuse, http://caitlynbom.com) for the opportunity to learn.


Update: This article has been very popular and made it’s way into many Facebook posts and forums. There’s a Flickr discussion going on here that’s worth checking out.


Angelo Stavrow HeadshotAngelo Stavrow is a freelance photographer and writer in Montreal, Canada, who takes photos because he’s rubbish with paintbrush and a canvas.  He prefers to enjoy the big picture, rather than examine the individual pixels.

Website: http://angelostavrow.com
Twitter: @angelostavrow

Photo Credit: © 2010 Angelo Stavrow

Here’s how you can share your tips, techniques and tutorials on CurrentPhotographer.com

–  RH7Z7B5VTVRR

Old With New – Behind My Eyes

Most every facet of switching to Sony mirrorless from Canon back in the spring of 2016 has went very well. It was also a switch to full frame from an APS-C crop sensor, which also has shown its benefits! But there was one thing that was sacrificed in order to make this switch possible – I could not replace my Sigma 70-200mm f2.8 lens. Well, I could have replaced it, but the cost was way too prohibitive and I could not justify it, not being a professional photographer. As a result, I settled for two lenses, both Sony native: 16-35mm f4.0 and the 90mm f2.8 macro. Both have performed fantastically, but that reach of the 200mm lens has been missed.

Fast forward to a couple of weeks ago. Satisfying a vintage 35mm film itch that needed scratching, I picked up a Canon AE-1 Program with an FD 50mm f1.8 lens. The camera, even though missing a couple of pieces, is fantastic! It’s totally manual and so much fun, but that’s a story for another day. The real story is in the FD lens.

My concern with buying this combo is that the lens might be damaged or in bad shape, so I did some research and realized that an FD lens could be purchased online for little or nothing – $25 or less in most cases – so I knew I could replace the 50mm without too much heartache if needed. Shortly after doing this research, it hit me – one the beauties of these Sony mirrorless cameras is that there are adapters in the field that allow vintage/off-brand lenses to be used on the bodies. Most of my Canon lenses were either third party or non-L series grade and even with the proper adapters would only work in full manual mode, so I never converted, however, the FD lenses were already full manual, so no loss of function with an adapter.

Now, adapting lenses to the Sony A7 system is not new and novel. Metabones and Fotodiox pretty much followed up the A7 line announcements with fully functional adapters, primarily for Canon lenses, but other lines were there as well, and eventually talked Nikon into coming along. However, in most cases, these adapters were used to make the transition from say Canon gear to Sony, where photographers had already invested thousands of dollars in L-Series lenses but could still have full functionality with them on a new Sony body. Pretty brilliant for sure as Sony lacked high end e-mount glass and folks wouldn’t have to sell equipment first before buying the Sony bodies. In this case, however, the adapter is allowing me to expand my kit and capabilities rather than maintain what already exists.

After some searching, I found a Canon FD 70-210mm f4.0 lens on Ebay that suited my budget perfectly, so it was ordered along with a Fotodiox FD to Sony NEX adapter (link here). It took a little training to understand how they both worked together, but once the set up was correct, BAM! I had a two-way, film and digital, 70-210mm telephoto lens with f4.0 speed, and I was terribly excited!

Canon FD 70-210mm f4.0 lens

Ok, so all of you gear heads won’t kill me, it’s not perfect by any means and I would trade the whole set up for a G Master 70-200mm f2.8 in a second, as long as the $2,000+ price tag did not come with it! But for under $75, I now have a 210mm f4 lens that will work for both portraits and landscapes, which is what I mostly shoot, and will work on both my film and digital cameras! So here are my pros and cons of this set up:

Pros:

  • Cost – < $75 for lens and adapter
  • Size – compared to my Sigma 70-200mm f2.8, this thing is tiny and light
  • Flexibility – with adapter, works for both my film and digital cameras
  • Focus Peaking – This is really more for the Sony, but the focus peaking on the Sony works very well with this lens and even though I’m not a pro at manual focus, I find it quick to lock in
  • Filter Capable – my next get is a 58mm adapter ring so that my Lee Filter System can be added to this lens. I also need to check Sony App adaptation being that it’s totally manual. Will be checking that out!
  • One Focus/Zoom Ring – the same ring on the lens adjusts both focus and zoom. the zoom is push/pull and the focus is left/right. Makes adjustments pretty quick!

Sony A7II with Canon FD 70-210mm f4.0 lens and Fotodiox adapter

Cons:

  • All manual – with autofocus on the new gear so good these days, it almost seems wasteful to be working in full manual, especially with continuous focus on moving subjects.
  • Image Quality – It’s good, but nothing compared to current lens technology.
  • No Aperture EXIF – because it’s all manual, the digital file does not record aperture data, so that is lost. ISO and shutter speed are still there, however
  • No tripod collar – most longer lenses these days come with them because of their size and weight. Both the AE-1 Program and the Sony will be a bit front heavy on the tripod as result.
  • Limited Stabilization – You can tell the Sony what focal length you’re using and it will engage stabilization in the camera, but without the electrical connections, this and other functions will be limited as result.
  • No Lens Correction – Lightroom can’t recognize it and when first trying, did not have a profile for the lens. May find one, but at this time, there isn’t one.

Sony A7II / Canon FD 70-200mm f4 – no edit, cropped

Who’s It For?

With this many cons, who really needs to consider this set up? Anyone who is budget conscience, non-professional and shooting primarily static subjects, like portraits and landscapes. That is unless you’re a wiz at manual focus, which I am not. Sports and wildlife photographers probably need to just pass on by this article, along with wedding shooters. These folks likely need all of the technology they can muster. With that said, if you have a Sony and can’t afford the Sony lenses, this could be for you.

In Conclusion

As much as I love gear, I am no gear nut. Had I not won my Sony A7II (yes, I won it – it was free)  the Canon 60D would likely still be in my bag and working just as well as it always did. In the end, it’s the picture that matters and the rest are just tools used to produce the image you envision. If you need a $2,000+ lens to do that, so be it. In the same manner, if you can achieve it with a $25 vintage lens, great! Both are acceptable options to produce the image that’s Behind Your Eyes!

Have Camera, Will Travel – Bucket List: Red Rock vs. Valley of Fire: by Andrea Gonzales

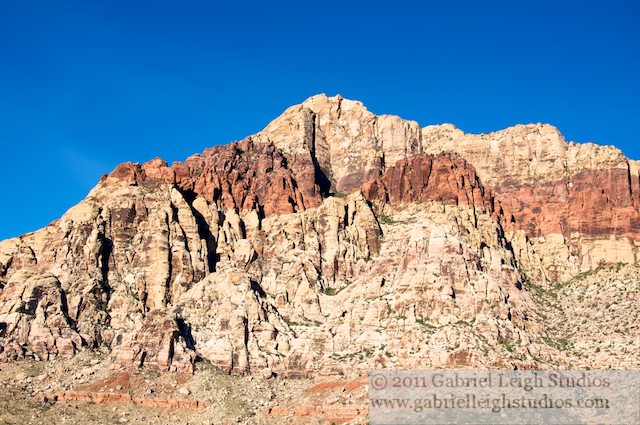
I had the opportunity to visit Las Vegas for the first time. I had heard of Red Rock Conservation Area, just outside of Las Vegas, from friends who had visited in the past and knew that it was a priority to visit. During my pre-trip research I also read about Valley of Fire State Park. Red Rock is less than an hour’s drive west of Las Vegas and Valley of Fire is about an hour’s drive northeast of Las Vegas. Both places intrigued me, so I planned a big day trip to visit both.

One comment on TripAdvisor really caught my attention. The reviewer said that if you were going to visit both Red Rock and Valley of Fire that you should go to Red Rock first. The reviewer felt that Red Rock would be disappointing if you saw Valley of Fire first. So I planned my trip based on this recommendation and headed to Red Rock at sunrise.

There are a lot of options for visiting Red Rock, but since my trip was short and I was planning to see Red Rock and Valley of Fire in the same day I opted for the simple 13 mile scenic loop drive through the park. There are multiple points on this loop to park and get out of the car. Unfortunately I didn’t have time to venture much past the parking areas at these stops. In hindsight I should have given myself an entire day to explore the park, but driving the loop was a nice sampler to start with.

The first thing I noticed was how quiet it was. I used to consider where I live to be relatively quiet, but its amazing how much noise is in the background of every day life – traffic passing by, the hum of my computer, the air conditioner or refrigerator running. Even the background buzz of electrical wires outside. But at Red Rock it was soooo quiet. I literally stood there and heard NOTHING. Not even a bird chirp. Not even the wind rustling through the trees.

At the first parking point I looked out at the mountains. I grew up in Florida, so this kind of landscape was completely foreign to me. I couldn’t understand why someone would say Red Rock would be disappointing if I saw Valley of Fire first. It was just so beautiful and unspoiled…there wasn’t even a hint that Sin City was less than an hour away, on the other side of the mountain.

After I finished the driving loop through Red Rock it was time to head to Valley of Fire. I decided to take a small detour to see the Hoover Dam and then drive through Lake Mead Recreational Area. Its amazing to see these places after reading about them in books all through school. The size and scope is just incredible. And the drive around Lake Mead to Valley of Fire feels like a journey to another planet. I seriously felt like I was on Mars.

Before I even arrived at the entrance to Valley of Fire I began to understand the recommendation to see Red Rock first. Red Rock was beautiful and maybe I just didn’t explore it enough, but it was smaller and felt more like I was still close to civilization. Valley of Fire was just…vast…alien. And on top of that, Valley of Fire has petroglyphs! One area, called Mouse’s Tank, has a half-mile trail through a small canyon that is filled with petroglyphs. Some of these pieces of art are so easily accessible you can walk right up and put your hand on them (which I did). It was hard to imagine that another human stood in that same spot as much as 2300 years ago and drew on the rocks. If only I had a time machine!

I visited in early December, which was (to me) ideal. The sky was clear and the temperature during the day was in the 60’s. I wish I had spent a full day at each park, but I’m also glad I got to see both places. I will definitely plan another trip and will take more time to explore these two parks. I think visiting a place like this should be on every photographer’s bucket list – especially if you live on the East Coast. I know its cliche’ but the pictures really don’t do it justice.


Andrea GonzalesGabriel Leigh Studios was established in 2009 as a photography studio specializing in travel and commercial stock photography.

Andrea Gonzales has been in love with photography and travel for as long as she can remember.  After several years of hard work she was able to leave the daily 9-5 grind in July 2010 and now travels as often as possible.

Gabriel Leigh StudiosCompany: Gabriel Leigh Studios
Website: http://www.gabrielleighstudios.com
Facebook:
 https://www.facebook.com/AndreaGonzalesPhotography/


Here’s how you can share your tips, techniques and tutorials on CurrentPhotographer.com

–

Where To Start – Behind My Eyes

Being so obsessed with photography, friends and family tend to think of me as an expert in the field. I’ve got the gear, they love the pictures and I live and breath the medium, so the credentials as far as they know add up. With this perceived status comes the occasional question regarding the craft from folks who are just getting into it and being that I love to geek out talking about photography, the question will be fielded with the utmost respect and interest. Let the perception become reality, even for just a moment!

Last week a friend at church asked a good one; one that tied him up with me for a good 10-20 minutes that he’ll never get back for sure. He had some experience with film in the past but had been away from photography for a while. Earlier this year he purchased his first DSLR (a Canon Rebel I believe) and along with it bought a book on composition. He liked landscapes, portraits and macro. His question: “How do I get started?”

That was a first for me. Some folks say they want to learn more about their camera or ask how to take great pictures, but this question was totally different. How do you start? Where to begin? I don’t think he expected me to ramble on like I did after asking the question, but I was really sort of feeling for the answer – it was not something you chalk up in the front brain shelves like, “get down low” or “add a strong foreground element.” It required me going back to the beginning, filtering things forward and seeing what was left. After thinking about it a few days, I thought it would make for a great topic here at Current Photographer, so here goes. Read More→