Archive for Gear & Software

Black and White Toning in Lightroom – Behind My Eyes

When color does not add to the story, remove it. This is a rule I work with in editing my images and some images, even when seeing them without the camera, you know are going to be black and white. However, just because an image is converted to black and white doesn’t mean color toning can’t be used. Almost every black and white image I make will take on either a warm or cold tone depending on the mood I want the image to take on.
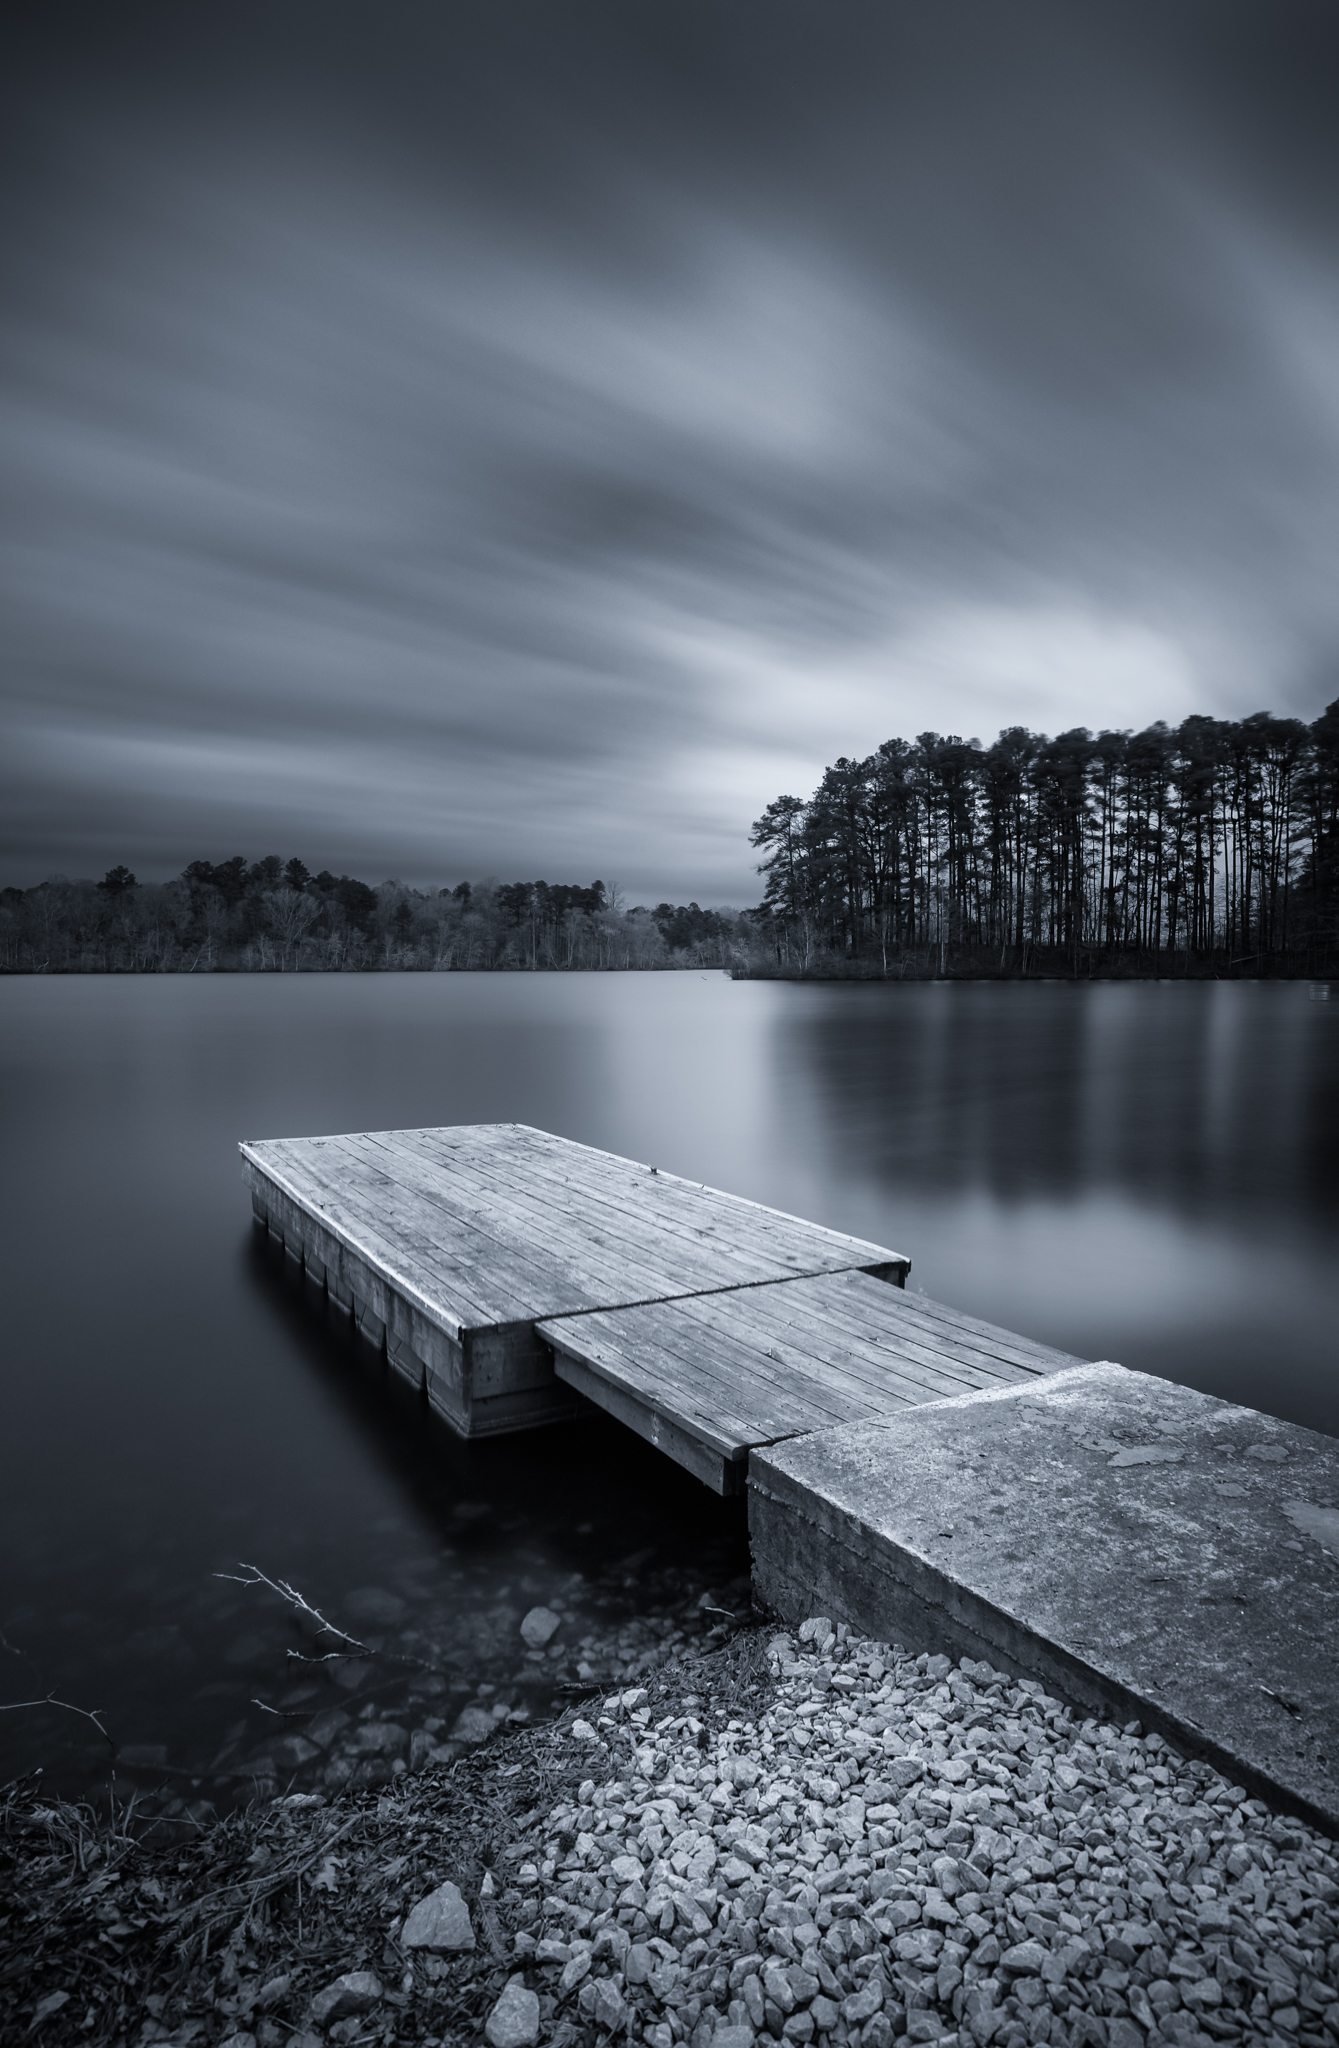
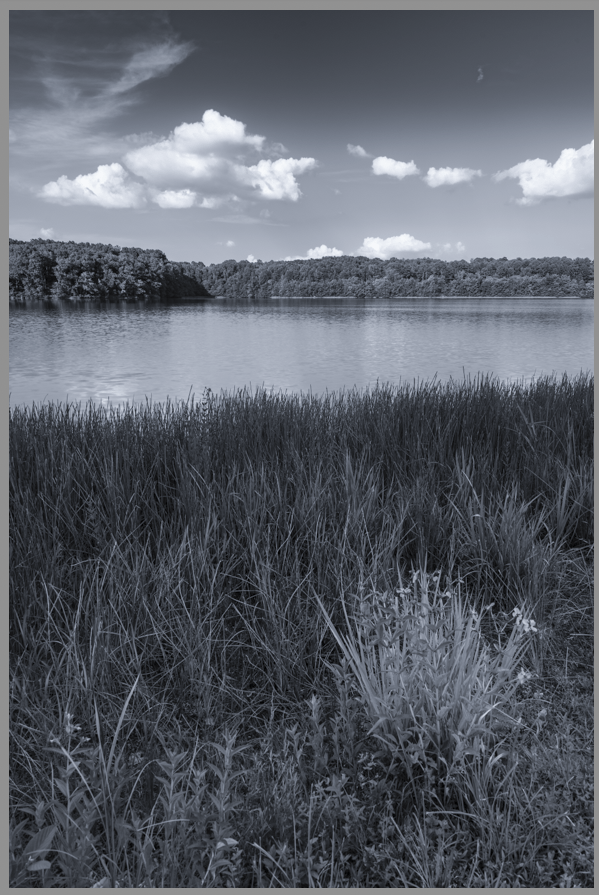
Cold toning of a black and white image

One of the things Lightroom drops the ball on, in my opinion, is black and white conversion. It’s just never produced the image I envisioned when converted there. As result, almost every black and white image I produce has been converted with NIK Silver Efex Pro 2 or using a gradient map in Photoshop. As poor as the black and white conversion in Lightroom is, toning the image after conversion is incredibly easy and efficient in Lightroom, and I use it nearly every time – and that’s where we’re going to go today!

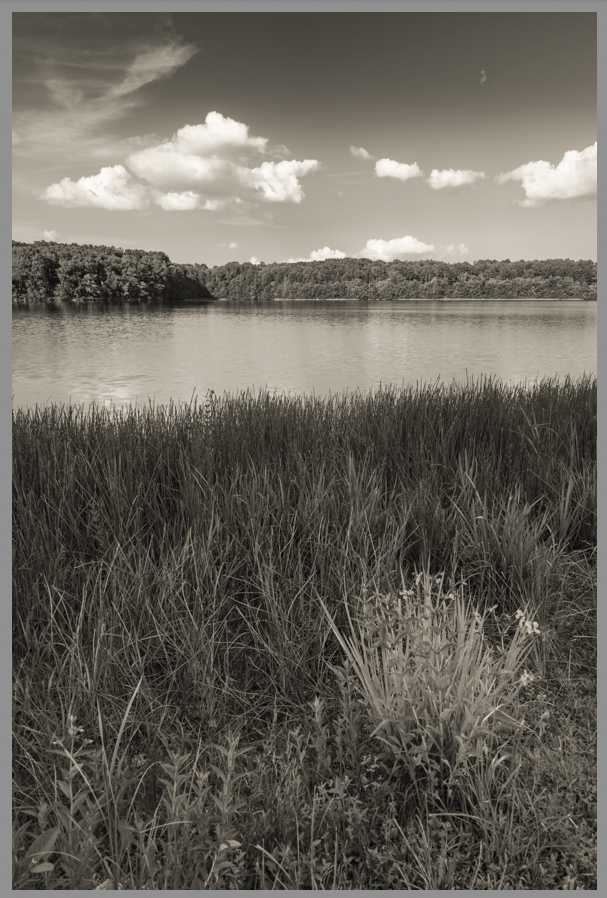
Warm toning of a black and white image

DISCLAIMER

Two things to get out there before we move one. First, I LOVE the VSCO film presets in Lightroom and use them almost exclusively for portraits, color or black and white. It’s really the only time my images are converted to black and white in Lightroom directly. Second, The statements made both previously and later in the article about the Lightroom black and white conversion are based solely on my preference – if you like converting there, go for it! This is not a rule as much as a possible tool set that may help you in toning your images quickly and effectively.

With that said, this method of toning can’t be used in the same manner when conversion is performed in Lightroom, that is unless the image is externally edited afterwards. There are other options prior to exporting and we’ll mention them as we go!

THE TEMPERATURE SLIDER

Ok, so, there’s nothing new about using the temperature slider in Lightroom – it’s a very useful tool in color balance and creative editing, however, it is my GO-TO slider for black and white toning! Let’s look at how it works.

The image below was converted to black and white and edited for selective exposure, contrast and structure in Silver Efex Pro 2, then saved back into Lightroom. It looks good from a tonal balance, light to dark, but let’s say we want to add a cooler tone to the overall. Being that we converted outside of Lightroom, the temperature slider now will apply temperature tones, cold or warm, on top of the image. You can find the temperature slider in the BASIC portion of the Development module.
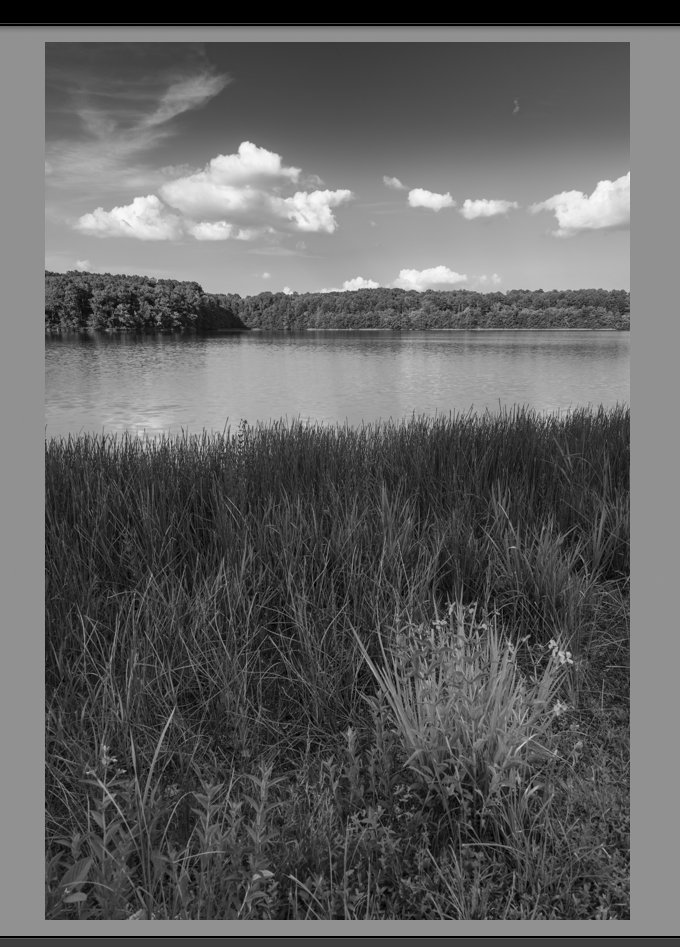
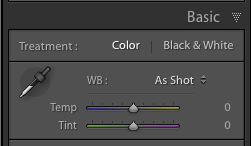
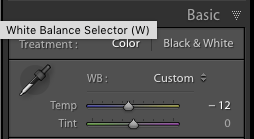
To add a cooler tone to the image, simply drag the slider to the left, towards the blue part of the slider, until you obtain the desired cooler tone. A -12 setting gives a nice cooler tone without changing everything to blue – see the image below.
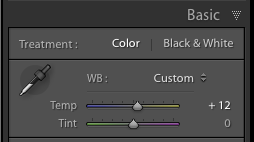
Let’s say you would prefer the warmer tones instead. It’s as simple as dragging the slider to the right, towards the yellow color of the slider. See the opposite effect below. As you can see, the warmer image yields a more sepia-like tone.
 

It’s that simple and pretty much how I tone every black and white image I make! But you might be asking, “What if I want to selectively apply a tone to the image?” Well, that’s pretty easy as well, all you need to do is use the brush tool!

Let’s say we just want to apply a tone to the sky in this image. Click on the brush tool, which is located just above the Basic panel in the Development module – see below.
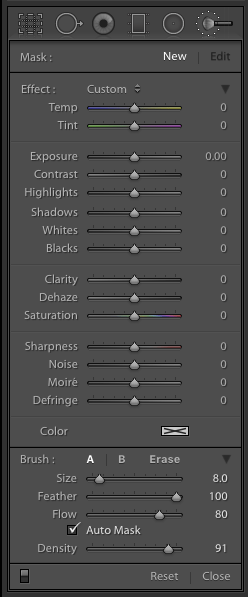
Brush Tool

Once you click the brush tool, the above menu opens up. Be sure to double click on ‘Effect:’ to reset all of the sliders in the tool to zero. Then use the brush and drag over the portion of the image you’re wanting to apply the effect to, in this case, the sky. While using the brush tool, you can see a check box in the bottom left hand corner of the interface that says “Show Selected Mask Overlay’ to see where the brush is applying the mask.
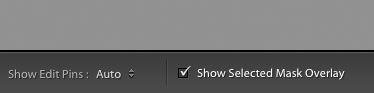
Masked area

If there is part of the mask on an area you don’t want apply, on the brush menu, click ‘Erase’, adjust the brush size and drag over the area you want to remove the mask from. Once done, click the ‘A’ so that you can continue applying the mask.

Once you’ve set the area to mask, simply go back to the temperature slider and drag to the desired temperature just as you did before. Once you’ve got your tone, click close. This can be repeated as many times as you like with selective tones applied all over the image!
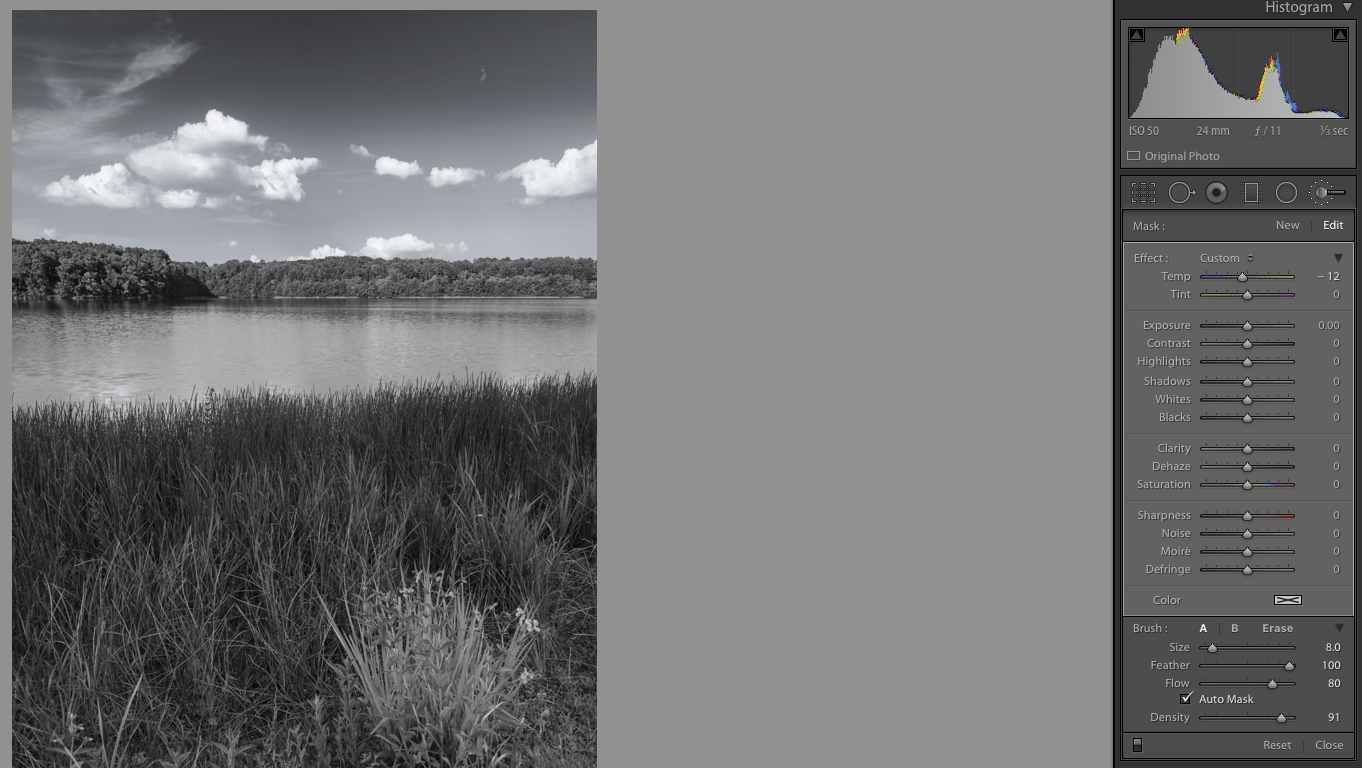
Sky is converted to a cooler tone
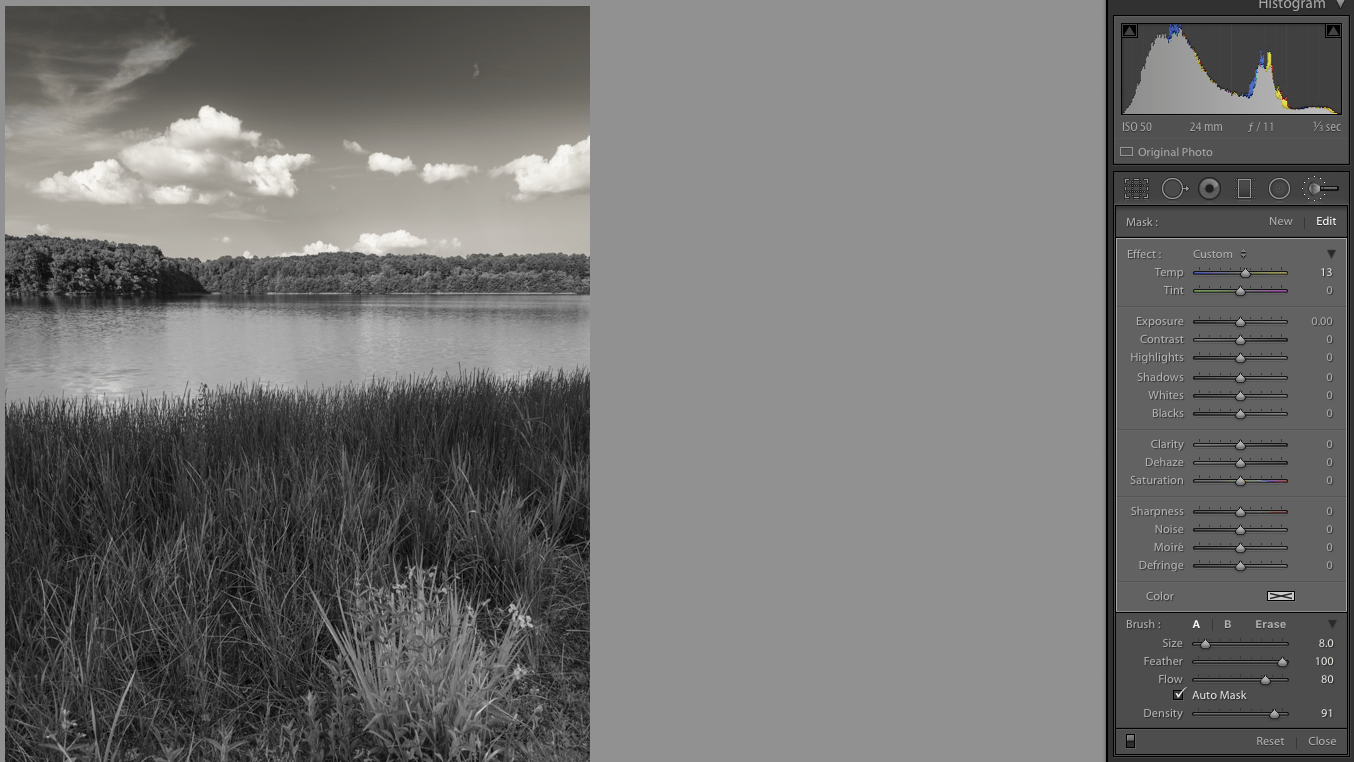
 

Sky converted to a warmer tone

SPLIT TONING

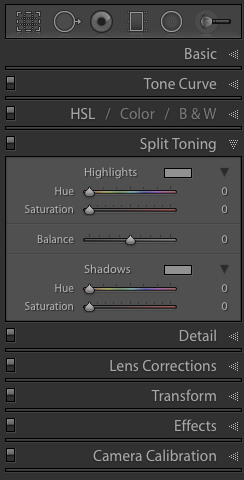
There is another option to applying these tones, and other tones, to your black and white image through the Split-Toning menu in Lightroom. It’s not as selective as you have to apply the tones specifically to highlights and/or shadows and there is no way to brush these tones in, but it can work. It has been used on occasion, but seldom, as I typically prefer simply cooler or warmer tones overall or selectively applied.
TEMPERATURE SLIDER WITH LIGHTROOM B&W CONVERSION

As stated in the disclaimer earlier, if an image is converted to black and white in Lightroom, the temperature slider does not work in the same manner. It has a similar impact as the color B&W adjustments do. The file still knows where the colors are in the image and when converting to black and white, it applies that tone to a similar tone of gray. Let’s say you slide the blue Black & White Mix slider to the right (see pic below), the spots in the image that used to be blue increase in brightness. Sliding it to the left would then darken those tones.
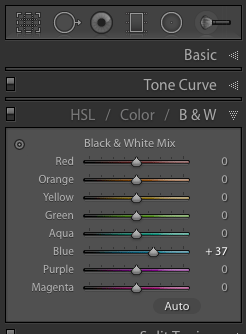
This same thing happens when you slide the temperature slider after black and white conversion in Lightroom. Sliding it to the right, or the warmer color tones, will brighten those undertones of gray. Sliding to the left, or the cooler tones, brightens those tones only. No color tones are applied on top of the black and white conversion, but their gray undertones are adjusted, so you’re not adding a tone as much as adjusting a current one. This is a much different result.

CONCLUSION

No one tool is useful to everyone. Painters like different brushes, paints, canvases, etc. Plumbers use different wrenches, sealants, brands of plumbing fixtures. Each tool fits each artist in a different way, so some work and some don’t. This method of toning a black and white image is one that works for me – it’s quick and impactful, but it does not work if converting to black and white in Lightroom, so it may not be your cup of tea. That’s OK. You may prefer to do your toning in Photoshop, or directly in Silver Efex Pro 2, or (insert plug in here) and that’s OK, too. But you may also find this method as useful as I do, and that’s cool as it makes sharing this info helpful. Just keep in mind, the overall objective is to find the tool, or tools, that works best to produce the image that exists right Behind Your Eyes!
 

Old With New – Behind My Eyes

Most every facet of switching to Sony mirrorless from Canon back in the spring of 2016 has went very well. It was also a switch to full frame from an APS-C crop sensor, which also has shown its benefits! But there was one thing that was sacrificed in order to make this switch possible – I could not replace my Sigma 70-200mm f2.8 lens. Well, I could have replaced it, but the cost was way too prohibitive and I could not justify it, not being a professional photographer. As a result, I settled for two lenses, both Sony native: 16-35mm f4.0 and the 90mm f2.8 macro. Both have performed fantastically, but that reach of the 200mm lens has been missed.

Fast forward to a couple of weeks ago. Satisfying a vintage 35mm film itch that needed scratching, I picked up a Canon AE-1 Program with an FD 50mm f1.8 lens. The camera, even though missing a couple of pieces, is fantastic! It’s totally manual and so much fun, but that’s a story for another day. The real story is in the FD lens.

My concern with buying this combo is that the lens might be damaged or in bad shape, so I did some research and realized that an FD lens could be purchased online for little or nothing – $25 or less in most cases – so I knew I could replace the 50mm without too much heartache if needed. Shortly after doing this research, it hit me – one the beauties of these Sony mirrorless cameras is that there are adapters in the field that allow vintage/off-brand lenses to be used on the bodies. Most of my Canon lenses were either third party or non-L series grade and even with the proper adapters would only work in full manual mode, so I never converted, however, the FD lenses were already full manual, so no loss of function with an adapter.

Now, adapting lenses to the Sony A7 system is not new and novel. Metabones and Fotodiox pretty much followed up the A7 line announcements with fully functional adapters, primarily for Canon lenses, but other lines were there as well, and eventually talked Nikon into coming along. However, in most cases, these adapters were used to make the transition from say Canon gear to Sony, where photographers had already invested thousands of dollars in L-Series lenses but could still have full functionality with them on a new Sony body. Pretty brilliant for sure as Sony lacked high end e-mount glass and folks wouldn’t have to sell equipment first before buying the Sony bodies. In this case, however, the adapter is allowing me to expand my kit and capabilities rather than maintain what already exists.

After some searching, I found a Canon FD 70-210mm f4.0 lens on Ebay that suited my budget perfectly, so it was ordered along with a Fotodiox FD to Sony NEX adapter (link here). It took a little training to understand how they both worked together, but once the set up was correct, BAM! I had a two-way, film and digital, 70-210mm telephoto lens with f4.0 speed, and I was terribly excited!

Canon FD 70-210mm f4.0 lens

Ok, so all of you gear heads won’t kill me, it’s not perfect by any means and I would trade the whole set up for a G Master 70-200mm f2.8 in a second, as long as the $2,000+ price tag did not come with it! But for under $75, I now have a 210mm f4 lens that will work for both portraits and landscapes, which is what I mostly shoot, and will work on both my film and digital cameras! So here are my pros and cons of this set up:

Pros:

  • Cost – < $75 for lens and adapter
  • Size – compared to my Sigma 70-200mm f2.8, this thing is tiny and light
  • Flexibility – with adapter, works for both my film and digital cameras
  • Focus Peaking – This is really more for the Sony, but the focus peaking on the Sony works very well with this lens and even though I’m not a pro at manual focus, I find it quick to lock in
  • Filter Capable – my next get is a 58mm adapter ring so that my Lee Filter System can be added to this lens. I also need to check Sony App adaptation being that it’s totally manual. Will be checking that out!
  • One Focus/Zoom Ring – the same ring on the lens adjusts both focus and zoom. the zoom is push/pull and the focus is left/right. Makes adjustments pretty quick!

Sony A7II with Canon FD 70-210mm f4.0 lens and Fotodiox adapter

Cons:

  • All manual – with autofocus on the new gear so good these days, it almost seems wasteful to be working in full manual, especially with continuous focus on moving subjects.
  • Image Quality – It’s good, but nothing compared to current lens technology.
  • No Aperture EXIF – because it’s all manual, the digital file does not record aperture data, so that is lost. ISO and shutter speed are still there, however
  • No tripod collar – most longer lenses these days come with them because of their size and weight. Both the AE-1 Program and the Sony will be a bit front heavy on the tripod as result.
  • Limited Stabilization – You can tell the Sony what focal length you’re using and it will engage stabilization in the camera, but without the electrical connections, this and other functions will be limited as result.
  • No Lens Correction – Lightroom can’t recognize it and when first trying, did not have a profile for the lens. May find one, but at this time, there isn’t one.

Sony A7II / Canon FD 70-200mm f4 – no edit, cropped

Who’s It For?

With this many cons, who really needs to consider this set up? Anyone who is budget conscience, non-professional and shooting primarily static subjects, like portraits and landscapes. That is unless you’re a wiz at manual focus, which I am not. Sports and wildlife photographers probably need to just pass on by this article, along with wedding shooters. These folks likely need all of the technology they can muster. With that said, if you have a Sony and can’t afford the Sony lenses, this could be for you.

In Conclusion

As much as I love gear, I am no gear nut. Had I not won my Sony A7II (yes, I won it – it was free)  the Canon 60D would likely still be in my bag and working just as well as it always did. In the end, it’s the picture that matters and the rest are just tools used to produce the image you envision. If you need a $2,000+ lens to do that, so be it. In the same manner, if you can achieve it with a $25 vintage lens, great! Both are acceptable options to produce the image that’s Behind Your Eyes!

Magic Lantern – Behind My Eyes

Being a fan of High Dynamic Range (HDR) Photography, I’ve become very intimate with the Auto Exposure Bracketing (AEB) function on my Canon camera. What I’ve come to realize is that obtaining the entire tonal range of an image at 1 EV increments can be difficult if your AEB settings will only allow 3 exposures to be produced. Sometimes -2, 0 and +2 are just not enough. If you have an extra $300+, you could purchase a Promote Control which offers amazing bracketing controls, but it’s hard to justify that kind of purchase for some of us.
Then, there’s Magic Lantern. It’s a third party software for Canon cameras (sorry Nikon) that sits on top of the camera’s firmware and adds awesome flexibility to DSLR video shooting, but also gives up to exposures for HDR bracketing and a cool Autodetect feature that takes some of the guesswork out of bracketing. I’ve been flirting with downloading the product onto my 60D for some time, but finally pulled the trigger a couple of weeks ago. The video below will take you through the options for bracketing on the 60D prior to having Magic Lantern, then will show how things have changed with it. Take a look.

Read More→

A Brush of Warmth – Behind My Eyes

One of the latest additions to the last revisions of Lightroom and Aperture is somewhat of a game changer in my book, and that’s the ability to apply a white balance setting selectively. Being an Aperture user, I have not experienced how the Lightroom option works, but based on the many discussions and posts people made when version 4 came out, I’m guessing it’s quite good.

The latest update to Aperture included a few new options for white balance, such as three types pertaining to how you’d like for the temperature of a picture to be adjusted: Natural Gray (new), Skin Tone (new) and Temperature and Tint (previous standard). The two new additions allow you to use a brush to selectively apply the effect.

For most folks, the big reason for using this new tool is when you have competing light sources within the same picture, like having both incandescent and natural window light in the same image. You can shoot for one and apply the other in post, evening out the image. My first experience, however, was from more of a creative need. Let me show you.

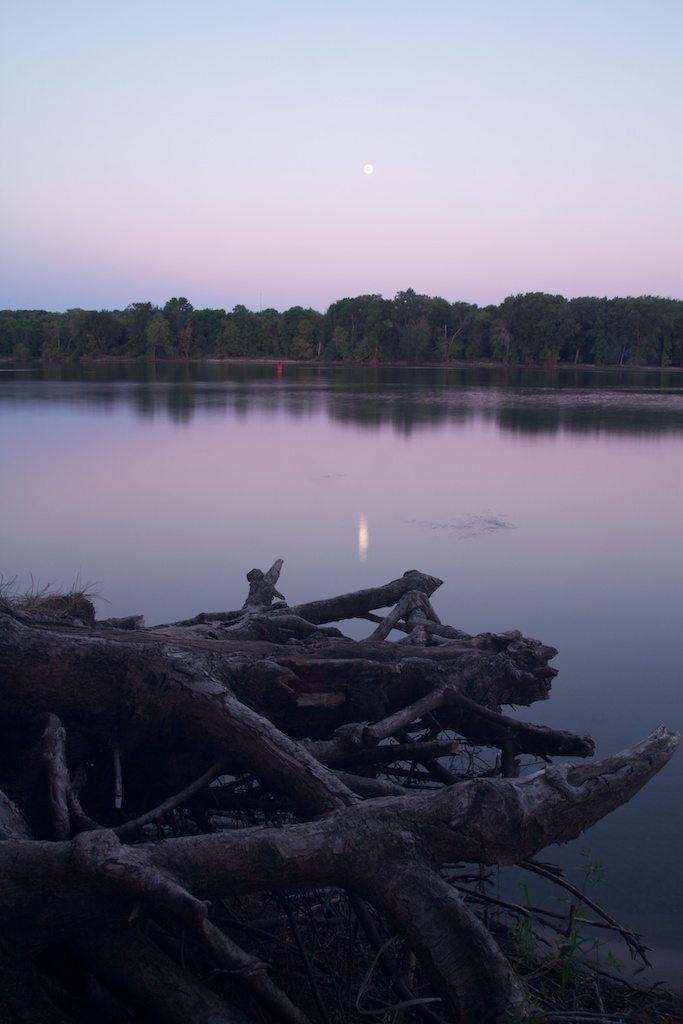
The image below is an 8 second long exposure taken at the Mississippi River in St. Paul Park, MN. That’s the Blue Moon in the sky reflecting off of the river and some rather interesting tree roots sticking out from the bank. There were two things in the image I wanted to make standout, the great blue and magenta tones in the sky (and watert) and the gnarly roots on the bank. I started with the sky colors.

Original Image – f18, ISO100, 8s, 19mm

Read More→

Going Greener – Behind My Eyes

There are numerous tools at our disposal to edit photos and the same effect can be applied with virtually all of these tools. Lightroom, Aperture and Photoshop are some of the more popular ones and the plug ins and presets for each of these programs are great in number. We typically choose these tools for editing based upon how they fit in our workflow and our comfort level for using them.

For me, I use Aperture for managing my library and basic photo editing, then will export images into other tools for specific effect application, with the main program being onOne Software’s Perfect Effects within their Perfect Photo Suite 6. The effects obtained from Perfect Effects can undoubtedly be achieved with other tools, but I go to Perfect Effects because it fits my workflow and comfort level where the other avenues may not.

Below is a video showing how using a couple of presets within Perfect Effects can quickly and easily take a normal image of a flowering plant to one with dark, rich greens and a bit of glow to give a totally different appearance than the original frame. What software would you use to produce this kind of effect? What would you have done to this image? What behind your eyes would drive you in this image?

Getting Ready to Fly… Should You Ship Your Camera Gear Ahead or Check it? by Charlie MacPherson

It’s no secret that travel is becoming increasingly difficult. Airports haven’t been much fun for the last 20 years or so anyway. But with the increased security following 9/11 and the more recent attempted shoe and underwear bombers, air travel has easily become the most unpleasant part of any trip.

But normally, the best photography sites in the country are not in our back yards. That means travel – often, by air.

So that raises a question.

Should you trust thousands of dollars in camera gear to the tender mercies of the TSA and airline baggage handlers? Or should you ship your gear ahead of you?

There are pros and cons to either. But first, some full disclosure. In addition to my work as a photographer, I own a retail shipping store (similar to a UPS Store) called Postal Center USA in Randolph, MA.

Not that I expect photographers to flock to me to ship camera gear, but I think it’s worth being up-front. It also means that I can speak with some real expertise on the matter.

First, if you can safely carry your gear on board the aircraft, that’s the best option. Your gear stays within your control (except during the TSA “experience”). But my advice is to select seats in the back of the aircraft so you can board earlier. And place your gear in an overhead bin *in front* of you so you can see it.

Check with the airline. Ask what type of aircraft will be used and what the maximum dimensions in the overhead bins are. The only caution is that the aircraft type can change at the last minute.

If you suddenly find yourself unable to use the overhead bins for any reason, politely insist that you “gate check” your gear due to fragility and high cost. That means that you hand it to the baggage handler at the gate, and they bring it back to you at the jetway. There’s a lot less handling that way.

But if you’re like me and have too much gear to fit in that overhead bin, consider shipping it with FedEx or UPS. You can do this safely if you follow a few precautions:

1. Be sure your gear is insured. Check with your homeowner’s or renter’s insurance. And a note of caution – if you shoot anything for pay, these policies will not cover you. In any case, contact your insurance broker and ask about an “inland marine policy”, which covers for replacement value – not depreciated value. I buy mine through PPA (www.ppa.com)

2. Record the model and serial numbers of every piece of gear – just in case.

3. Be sure you have a reputable place to receive your gear. A national chain hotel should be OK. I’d be cautious about one that doesn’t have a big company name behind it. A Hampton Inn is fine. Joe’s Bedbugs & Breakfast Motor Lodge? Not so much.

Consider contacting a shipping store to see whether they will receive and store your gear for a small fee.

4. Ship your gear with either FedEx or UPS so that it arrives at least one business day early. Just in case. And track the shipment early in the process for the best chance of catching any problems.

But unless you have big stacks of money to burn, leave yourself enough lead time so that you can ship via ground. Air shipping gets a lot more expensive!

5. Padlock your bags – even a small padlock through the zipper handles is a deterrent.

I find that even without my “storeowner’s discount”, the cost is well worth it.

I don’t pay for the additional checked bags, I don’t have to carry them, and I even ship my clothing so I can breeze through the airport.

One last hint – remember to carry your GPS with you. If you ship it ahead in your luggage and need directions to find it, well…just remember to keep it with you!

Follow these precautions and enjoy your next flight a lot more. Shipping your gear ahead makes the whole airport experience a lot less stressful, and that’s a luxury well worth paying for.


–

Charlie MacPhersonCharles MacPherson is an award-winning wildlife photographer and resident of Scituate, Massachusetts.

He has been behind a camera since 1973 when shortly after picking up his Dad’s “Argus Brick”, he was inspired to buy his first SLR – a Canon TLb.

His decades-long love affair with photography morphed into an obsession with wildlife photography and a specialty in birds.

He conducts photo-tours around the country as well as workshops and classes in the Boston area and writes two weekly blogs: www.TheAmazingImage.com which covers general photography topics and www.TheWildInFocus.com, focused on wildlife photography and is a blogger for B&H Photo.

Company: The Amazing Image
Phone:
781-470-9111
Email: charlie@TheAmazingImage.com
Twitter: @TheAmazingImage
Facebook:
https://www.facebook.com/charlie.macpherson.1

Photo Credit: © Charles MacPherson

Here’s how you can share your tips, techniques and tutorials on CurrentPhotographer.com

–