Archive for Aperture

OSXcellence – Darktable Review

The photo library genre of app is stronger now than it has ever been, with Adobe and Apple adding more and more features to their respective flagship software, Lightroom and Aperture. So all-singing and all-dancing are these heavyweights, that many editing apps have been made redundant, their features being replicated and integrated into these mammoth photo organisers. But with this increase in functionality comes an increase in price; what if you want something that will process your RAW files and allow you to organise your pictures, without having to take out a mortgage to afford it? Perhaps you should look at darktable.

Despite being an open source project, darktable looks the business. The interface is sort of….well, dark really. It also happens to be clear and highly usable. But how darktable looks is very much a by-the-by, because the real interest here is the amazingly powerful array of organisation and editing tools.

Once you’ve imported your images to darktable, you are presented with a bewildering number of organisation options; from keywords, to collections, to image exposure comparison, there shouldn’t be a time when you can’t find the image you’re after. All the standard organisation functions found in more expensive offerings are present and correct, though, like star ratings and colour labelling, and I have to say, all of these functions work incredibly smoothly and rapidly.

Read More→

A Brush of Warmth – Behind My Eyes

One of the latest additions to the last revisions of Lightroom and Aperture is somewhat of a game changer in my book, and that’s the ability to apply a white balance setting selectively. Being an Aperture user, I have not experienced how the Lightroom option works, but based on the many discussions and posts people made when version 4 came out, I’m guessing it’s quite good.

The latest update to Aperture included a few new options for white balance, such as three types pertaining to how you’d like for the temperature of a picture to be adjusted: Natural Gray (new), Skin Tone (new) and Temperature and Tint (previous standard). The two new additions allow you to use a brush to selectively apply the effect.

For most folks, the big reason for using this new tool is when you have competing light sources within the same picture, like having both incandescent and natural window light in the same image. You can shoot for one and apply the other in post, evening out the image. My first experience, however, was from more of a creative need. Let me show you.

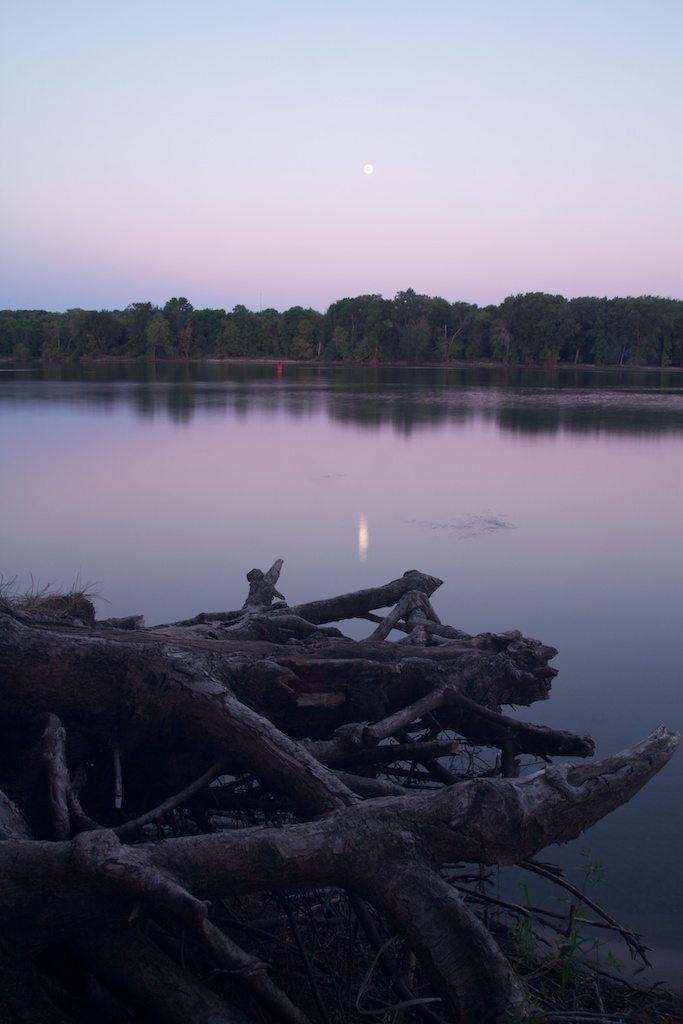
The image below is an 8 second long exposure taken at the Mississippi River in St. Paul Park, MN. That’s the Blue Moon in the sky reflecting off of the river and some rather interesting tree roots sticking out from the bank. There were two things in the image I wanted to make standout, the great blue and magenta tones in the sky (and watert) and the gnarly roots on the bank. I started with the sky colors.

Original Image – f18, ISO100, 8s, 19mm

Read More→

OSXcellence – PhotoSweeper Review

I don’t know about you, but I often come back from photoshoots with a bucketload of pictures, which all need sorting through. And whilst the reams of metadata which Aperture would like you to fill in can be useful for re-finding pictures at a later date, sometimes you just want to sort your pictures in a simple but fast manner. This is the idea of PhotoSweeper – a lightweight image sorter.

The primary function of PhotoSweeper is the weeding-out of unwanted photos. The first step with PhotoSweeper is to select a folder, or library – of the Lightroom, iPhoto or Aperture variety – to sort through. PhotoSweeper rapidly loads previews of your images, and you’re ready to start sifting through the pictures.

The best function in PhotoSweeper is the duplication detection. A number of variables can be adjusted to locate duplicates, such as time between pictures or the size of the bitmaps sample (the area compared for similarities in each picture). In addition, you can define whether to compare in RGB or greyscale, whether to preprocess images with blur, and how sensitive you want the colour-matching to be. How closely images must match is also adjustable. Once the (potential) duplicates are found, you can view the sets of matching images either individually as a side-by-side comparison, or as a list, which includes all of the sets of duplicates. It is a system which allows very rapid ridding of duplicates to the “Box” – PhotoSweeper’s in-app temporary trash. From the “Box,” images may be deleted to the OSX Trash.

In addition to the duplicate search function, PhotoSweeper has a speedy file info function. By clicking on an image, you can view useful EXIF info such as the histogram, focal length and exposure settings. Other more mainstream apps have this feature, but none of them do it as quickly as PhotoSweeper. Read More→

To HDR, or Not To HDR – Behind My Eyes

The brief bio below for yours truly tells of HDR (High Dynamic Range) being my first love of photography. That will never change – the creative and artistic flexibility of the process allows a part of my brain that was fairly dormant for years to pop out now and then and say hello. There are also a few instances where HDR just works better (in my humble opinion) than any other processing method, like extreme contrasts in light and bringing out textures. At one time, every time the camera was pointed at something, brackets were collected and run through the tone mapping process, without much thought or consideration – it’s just what I did.

As time has moved on, I find myself moving out of the auto bracketing mode on the camera more often, and even choosing to process a single image out of a bracket set rather than processing all of them through the HDR software. This is likely a natural progression for HDR photographers. Maybe there’s some boredom involved or wanting to save some time, but there’s also other processes out there that I’m finding interesting and fun that produce some pretty cool results. Let’s take a look at an image and go through how the stuff behind my eyes is processing things these days.

Middle Bracket 0 EV

Take this image above. It’s the middle shot of a bracketed set of 5, ranging from -2 EV to +2 EV at 1 EV increments (this image is 0 EV). It was taken back in February 2010 and is a monument devoted to the Confederate dead buried in the historic Oakland Cemetery in Atlanta, GA. Back in 2010, this set was immediately run through Photomatix and tone mapped. Looking at the stack now, my preferences have changed – here’s why. Read More→

Scenic Outlook – Embrace Manual Mode

Modern cameras are truly wonderful devices, every time a new one comes out it’s seems to be packed with more and more cool stuff to temp you into parting with your cash. Of course many of these features can be quite useful in certain situations but for the most part a good proportion of functions will rarely be used. This is very true for the landscape photographer. Sturdy build, good glass, a decent viewfinder, a reliable light meter and the ability to alter the aperture and shutter speed separately is all it needs to do. The question of resolution/pixel count really comes down to what it is that you’re going to be doing with your images, and if you never print larger than A4, a 6MP DSLR will do the job just fine. 12MP seems to be a good amount for the majority of folks but even the lower end cameras are now offering more resolution than this; cool if you want huge prints or to aggressively crop your images, but most of us just won’t utilize the full resolution of our cameras.

So, your camera will come with a number of exposure modes; Program, Shutter priority, aperture priority, Auto, Manual and in addition to this there will be a selection of scene modes to choose from. I only ever use two of these modes; Aperture priority and Manual. Aperture priority is great in situations where you have to work fast; you get to choose the aperture and thus the depth of field, and the camera selects an appropriate shutter speed to get a good exposure, or at least what it deems to be a good exposure.

Read More→

Nikon's Latest Glass – AF-S NIKKOR 85mm f/1.8G

Nikon LogoJanuary 7, 2012 – PRESS SUMMARY – Nikon Corporation announced the release of the AF-S NIKKOR 85mm f/1.8G, a fast, medium-telephoto fixed focal length lens with a focal length of 85 mm and a maximum aperture of f/1.8 compatible with the Nikon FX-format.

The AF-S NIKKOR 85mm f/1.8G is the new addition to the FX-format lens lineup. It utilizes an all new optical design allowing users to enjoy shooting portraits with pleasing blur characteristics only possible through fixed focal length lenses. Even with a fast maximum aperture of f/1.8, the AF-S NIKKOR 85mm f/1.8G is very lightweight at roughly 350 g, allowing users to easily carry their camera around with this lens mounted. The Silent Wave Motor (SWM) ensures not only quiet autofocus operations, but also makes autofocus shooting possible when the lens is used with entry-level Nikon DX-format digital-SLR cameras such as the D5100 and D3100, which are not equipped with an autofocus drive motor.

Read More→