Archive for Make Better Photographs – Page 38

HDR…Fact or Fiction…A Physicist’s View: by Georgia McCabe

Every day I find numerous articles and testimonials about the possibilities inherent in the exciting field of  HDR photography. Some even claim that you aren’t a true practitioner of HDR art if you don’t shoot multiple exposures.

So, what’s the real deal with HDR photography? I sat  down with Scott Brownstein, to sort through everything.

Scott is a well known photo market and digital technology consultant and pioneer. His clients include large retail and professional photo labs, equipment and consumable manufacturers and software and digital service providers. During his 23 years at Kodak, he was responsible for many advanced digital products including dye sublimation printing, “Create-A-Print” consumer operated kiosks and finally the Kodak PhotoCD system.

In addition, he was also the founder and Chief Technology Officer of FujiFilm e-Systems where he was responsible for the conception and development of advanced digital solutions for the professional and retail markets alike. While at Fuji he was also the creative force behind 1 hour web to retail printing at more than 1000 Ritz camera stores and 1 hour web to retail printing at over 3500 WalMart and Sam’s Club locations. Scott was one of the founders and first presidents of the Digital Imaging Marketing Association (DIMA), a member of board of trustees for its parent Photo Marketing Association and sits on the Board of Directors of PhotoChannel Networks Inc.

He holds 18 U.S. patents ranging from innovative film camera systems to dye-sublimation printing to CD-R. Scott was awarded a BS degree in Physics from the University of Maryland and numerous industry awards and honors, including Germany’s Edward Rhein Prize for Technical Achievement, for the creation of the PhotoCD system. Read More→


Photography 101: Consideration When Purchasing Your First DSLR

Have you been debating on investing in your first DSLR? Maybe you are ready to buy, but you have no idea where to start, or what to spend your mountains of cash on. No worries, this is a big step for many people. With a bit of planning, you can get a great DSLR setup that will help you grow in this wonderful world of photos. Let us look at just how you might want to consider your future shopping endeavor.

Budget setup
The first part to any shopping spree is figuring out a budget. You may think this is as easy as looking at your bank account, jotting down the remaining balance, and running off to the store. Before you speed off to the camera store to spend the remaining balance in your bank account, consider a few things that come with investing in a DSLR. The first thing you want to do is setup a camera budget. This is the amount you will spend on the camera and lens alone. A trick here is to budget a third of the amount for a camera, and the last two thirds on a lens. More on this later.

Outside of the camera budget, setup an accessory budget as well. Remember, the DSLR you are eyeing up may not take the same memory card as your point and shoot camera. Memory cards are relatively cheap in the grand scheme of things, but it is still an additional cost. You may also need to look at getting a sturdier tripod as a DSLR weighs quite a bit more than a point and shoot. Lastly, things like camera books, cleaning cloths, new filters, and even extra batteries need to be considered when deriving a budget.

One last piece of advice on budget setup, leave some wiggle room before you head off to the store. This will allow you to pick up something you may have forgotten to budget, like a new camera bag. The most important part of this budget is to set it up and stick to it. Remember, you will be adding to your gear as time goes on, so it is not necessary to try to grab everything in one trip. Read More→

Easy Do-It-Yourself Holga Effects

In a previous post, I discussed the joys of taking photos using a Holga Camera.  For those of us who have already crossed into the digital divide, there are still ways of making your digital photos appear as if they were taken with a real Holga camera.  While there are countless actions available for Photoshop that will give our photos that ‘holga look’ automatically, the real test of ones ability is to be able to perform these post-production edits ourselves.  One of the main benefits of doing editing manually is that each image will have it’s own unique edits, just like a real Holga camera, instead of a macro, where every image gets the same cookie-cutter treatment.

This tutorial will show you how to render Holga-like effects that are unique to each individual image using free software.

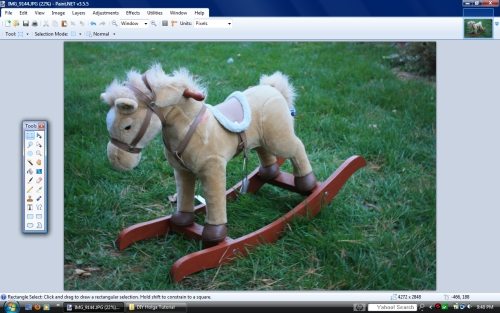
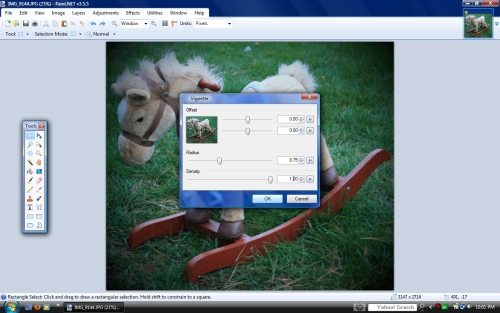
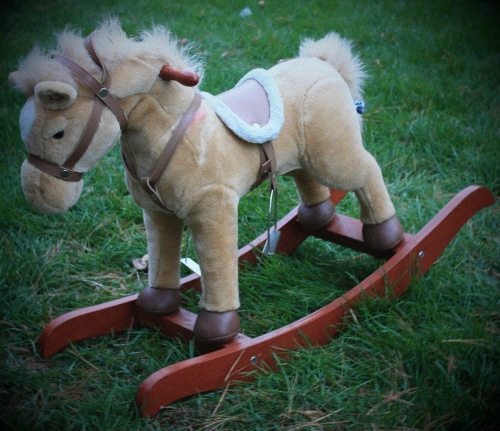
What You Need – You will need to download a copy of Paint.net, which is available for free.  In case you aren’t familiar with Paint.net, it is a free [very basic] clone of Photoshop.  We’ll start with this plain snapshot of a toy rocking horse.  Feel free to download this image if you wish, but please DO NOT post this image, or your final image on the internet (if you used the above photo).  Images you create using this method using photos you took should be posted online, and I encourage you to do so!

Step 1 – We will open the rocking horse photo with Paint.net.  Throughout this tutorial, the images shown are smaller than actual size to save layout space.  Click the images for a larger view (opens in a new window).

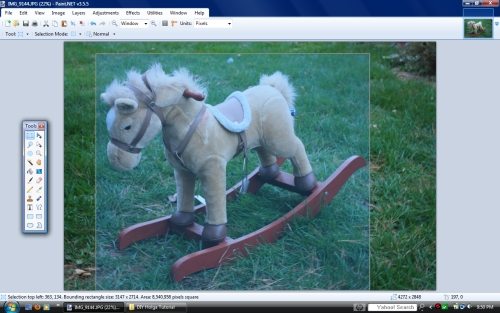
Step 2 – Now that we have the file open with Paint.net, we will first need to crop it as squarely as possible.  To create an exact square crop, hold down the shift key.  I have cropped this image somewhat (i.e. not exactly) squarely, which is more representative of a true image taken with a holga camera.

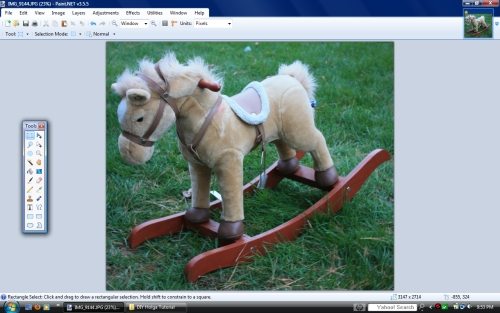
Step 3 – This is what your image should look like now that the image has been cropped.

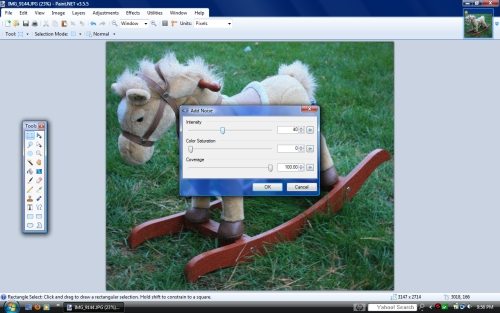
Step 4 – Add noise.  Go to Effects > Noise > Add Noise.  Set the Color Saturation to 0, and the coverage to 100.  The intensity is yours to determine.  Try moving the slider back and forth until you find the amount that works best for your image.


Step 5 – Add the vignette.  Go to Effects > Photo > Vignette… Set the intensity at 1; adjust the radius accordingly.  For the ultimate Holga effect, set the offset just off center, and change the values randomly slightly off center with each and every photo you edit.

This is the final, finished image.  The last [optional] step is to adjust the brightness and contrast, but remember that a Holga camera has a fixed aperture and no light meter, so it is not unusual to get imperfect exposure.  Be sure to save your image, and share it for others to admire.

More examples of Holga Effects I’ve created using the above method…

Strasburg Railroad Water Tower Wide Open Spaces Stop - Look - Listen The Not-So-Great Divide (Holga Edit) Beach
Rocking Horse

Working with Videographers During a Wedding

Many times in our still photography profession we encounter instances where during an event, such as a wedding, we are competing for time and attention with guests, amateur photographers and the videographer. I have been fortunate enough to have worked alongside some great videographers both professional and amateur who work with me so that we can make both of our jobs easier.

Video and still photography are worlds apart in the sense of setup, lighting, and position. I had a comment on a previous post about a still photographer who had a very hard time with a videographer especially during the cake cutting ceremony. The videographers light created unwanted effects on the still photographer’s photos and videographer basically ran away with the positioning.

Here are some suggestions I have to try and make your joint work effort easier.

  1. Talk to the videographer before the event starts. Get a game plan. Make sure you both are on the same page and see how you can work around each other. The last thing you want is him getting in the way of your photos and the last thing he wants is you right in the middle of his video.
  2. Take turns. When I am doing the formals I always make sure that they are getting what they need to and they reciprocate. Usually if you extend the olive branch they are more than willing to work with you. Get your positioning, take your shot and then make sure they have time to get what they need before moving on.
  3. Ask for what you need. If they are doing something that is impeding your performance then simply talk to them about it. If their light is too bright, explain the situation and perhaps take turns or dare I say, recreate the moment again with the couple so that you get a beautiful shot. It’s going to take some fancy footwork on your part but being a wedding photographer means being versatile. We cant control very much in our environment and we have very little time to control what we can. Work with what you can and create what you cant. Read More→

How To: Auto Bracket 9 Exposures on a 3 AEB System

I’ve been asked this question quite a bit. “How can you bracket 9 exposures on your Nikon D5000 when I can only bracket 3 using AEB”? Well there are two solutions, one is the amazing Promote Control, but I don’t have an extra $350 to invest in this must have piece, so I have an alternate solution.

It is recommended to never touch your camera during your brackets as to not induce camera shake. This is true, but with my solution you will be touching the camera slightly to make adjustments so I recommend this.

  1. A Sturdy tripod (not those cheap flimsy ones)  I’ve been happy with my budget 7300 series tripod from Calumet Photo because its made very well without the high price tag.
  2. Make sure you tighten up all of your adjustments on your tripod after composing, so that your camera stays in place
  3. I always use my camera bag as an anchor to weigh down my tripod.
  4. I always use my wireless shutter release remote
  5. Under camera setting menu set your EV increments to 1/2 instead of 1/3 (this will reduce the amount of wheel click you need to make to change the exposure.)
  6. Set you camera to delayed exposure, this allow the shutter to open before the shot is fired (reduces camera shake)

*Now here is how I go about getting 9 exposures out of a 3 Auto Exposure Bracketing System:*

Read More→

Photography 101: ISO With A Side Of Light

We are finally onto the last, and hopefully easiest, part of the exposure triangle. By now, you have played with shutter speeds and fiddled with aperture settings. One last building block is still missing from all of this. That building block is your camera’s ISO setting.

ISO (or International Standards Organization) is how we control cameras sensitivity to light. This is the equivalent of film speed, but without the need to lug around six different rolls of film for shooting in various lighting conditions. I know that in prior articles I have used light and detail as interchangeable terms. For this article, light will stick to meaning brightness.

ISO has a wide range of values depending on your camera, what the manufacturer is capable of producing, and the demand for higher ISO settings. Common ISO numbers range from ISO 100 to ISO 6400, but these are just common settings and not the full gamut of ISO setting available on the market. What does this range have to do with you, and ultimately the exposure triangle? Well, quite a bit actually.

Let us say you set your camera to an ISO of 100. This is common for a fair amount of photographers when shooting in bright light, outdoors, and other brightly lit conditions. An ISO of 100 means your camera sensor is not super sensitive to light. Think of ISO 100 has having sunglasses on you camera sensor. It takes in light, but it is not sucking in copious amounts of light. Setting a low ISO means we can now use larger apertures, or slightly slower shutter speeds as we have the camera sensor set to a low light sensitivity.

An example for using a low ISO is shooting during the middle of the day while the sun is brightly shinning. There is so much light flooding your scene that you will want to take in detail before the light over exposes the scene. Setting an ISO of 100 makes it so the sensor does not become overwhelmed by light before the detail can take hold.

Example photo: This is shot in the late morning hours when the sun was bright. A low ISO allows for more detail to come through before the light causes over exposure:

Shutter: 1/180
Aperture: f/11
ISO: 200
White Balance: Daylight Preset

Read More→