Archive for Make Better Photographs – Page 39

Cityscapes: After Dark

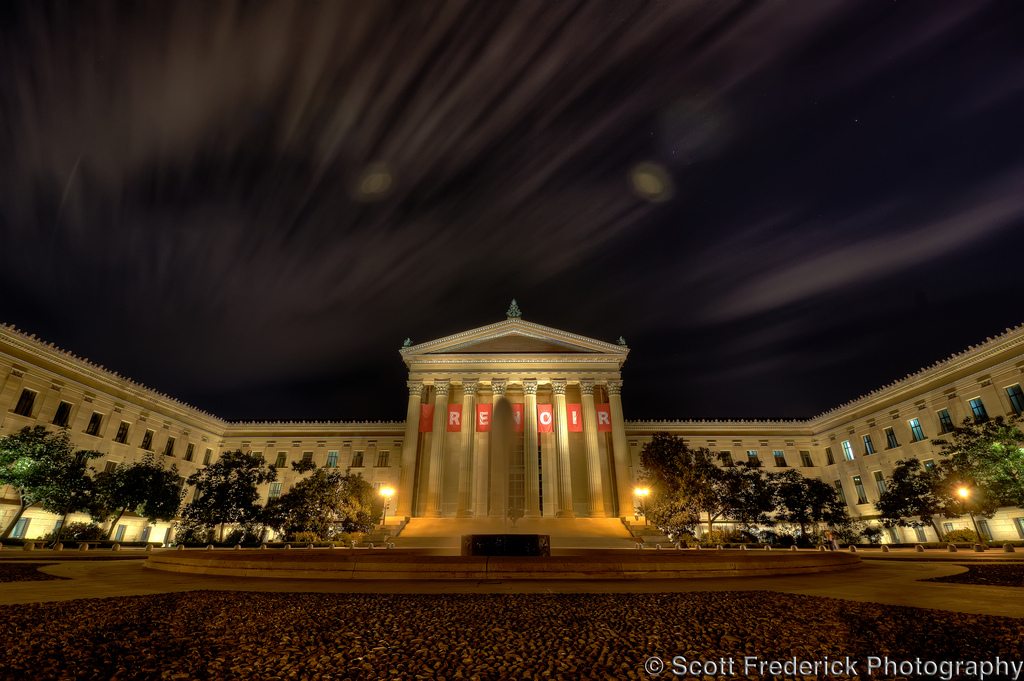
Allow me to introduce myself. I am known as an HDR photographer of cityscapes, landscapes, and urban exploration. About a year ago I decided to take photography very seriously. Some of the questions I had asked myself were, what did I want to photograph? What exactly were my intentions behind the camera? I thought Philadelphia would make a beautiful canvas to start my photography journey, and so it began. Most of the available time I had to shoot was during the evening, so I first set out with a tripod and cable release to capture non HDR long exposures after dark. I think any photographer beginning today with an interest in HDR can benefit from this structured workflow. Long exposures at night can teach you the discipline in which HDR photography revolves around.

philadelphia-museum-of-art

One of the hardest things about shooting after dark, is being able to see thru your viewfinder. These conditions also make it difficult to focus your lens. It’s always best before composing your shot, to zoom in and focus on an area that has available light. I can’t tell you how many times I’ve composed first, to discover that I can’t lock in my focus point. Once you have locked in your focus point, turn off autofocus. You don’t want your camera to refocus before the shutter opens. Read More→

Everything You Ever Wanted To Know About The Holga


The Holga is a medium format 120 film toy camera, made in China, known for its low-fidelity aesthetic. The Holga’s low-cost construction and simple meniscus lens often yields pictures that display vignetting, blur, light leaks, and other distortions. The camera’s limitations have brought it a cult following among some photographers, and Holga photos have won awards and competitions in art and news photography.
–Wikipedia

Back in the days before I had the money to invest in a high-end digital SLR camera, I would spend long nights, sometimes hours at a time in the darkroom, developing that days film. I was addicted to 35 mm film, especially black and white. I clearly remember reading about the Holga on the Internet, and I just had to have one.

About The Holga

For those of you who may not be familiar with the Holga camera, it is marketed as a toy, but for those who have ever taken photographs with one, it is anything but a toy. The Holga camera uses 120 mm film, which is many times larger than the common 35 mm film that is most popular in the United States, and instead of having around 30 exposures per roll with 35 mm film, the Holga’s 120 mm film yields between 12 and 14 exposures per roll.

120 mm film can be hard to obtain, especially for a beginner. Amazon.com has become the quintessential supplier for such film, and for those who develop their own film and prints, Amazon.com has quite arguably the best selection around. Developing 120 film can be expensive if sent to a commercial film processor; I was lucky enough to have access to a home darkroom, however the cost of the chemicals (which require special disposal) and time required to process the negatives and print the photos can be intimidating. On a side note, color film is also available, and can be processed in black and white chemicals, which of course, results in black and white negatives.

When the film is developed, the photographer should expect to see light leaks, soft focus around the edges, and unpredictable and sometimes interesting effects. The entire camera is made of plastic, including the lens. There is no zoom lens, and focusing is done on a haphazard scale that can only be moderately accurate at best if the camera is paired with an experienced user. What is most striking about the Holga is that each one is unique, and no two cameras are alike; almost as if the cameras had their own individual identities, every Holga will have its own signature light leaks and eccentricities.

Specs and Details

It should be noted that the original Holga 120 has no flash, but one can be added since there is a hot shoe; some newer models have build-in flashes. The Holga I had was the original 120, though I was able to modify it to use 35 mm film. Also, there is no automatic film advance, so each time a picture is taken, the photographer must turn a wheel to advance the film. I made several other modifications to the camera, such as adding electrical tape to cut down on some of the light leaks, adding a bolt to the underside so that it could be used with a tripod, and finally, painting it bright yellow. None of these modifications are recommended, however. Thankfully, today there are Holgas made out of a variety of different colors of plastic, and some even manufactured to accept 35 mm film and mount on a tripod.

Examples

The following photos were found in the Flickr Group called Holga, which at the time of this writing, was the largest Flickr group about this subject.

Holga Holga holga_07 06440007

You may also be interested in my article Secrets of Lo-Fi Photography.

You Shoot Seniors?? An Introduction to John Pyle, Senior Portrait Photographer

I don’t shoot weddings. I admire wedding photographers, I love their work, and some of my best friends are wedding photographers. I even like to go to weddings and enjoy the celebration…and some cake. Yes, people are always going to get married.. but high school seniors only graduate once.

Grace is a 2011 Senior

For me seniors are what we enjoy. Mostly because they WANT to be photographed. When I first got my DSLR in early 2000s and started shooting events, weddings, parties etc…I learned very quickly what I did NOT enjoy photographing. My favorite quotes during this time include “oh please don’t take my picture”, “I might break your camera” “can you only photograph me from the waist up?” “can you Photoshop out my wrinkles?”, “can you make me look skinny?,” and “do you HAVE to take MY picture?”. And of course the countless number of hands in front of faces, ducking heads, and people running to hide like I was holding a live cobra in my hand. Read More→

Photography 101: Shutter Speed Fun

Shutter speed might be less complicated than aperture, but the effects of this setting can play a big role in your photographs. The shutter is your cameras barrier to the world. When the shutter is open, the world is flowing onto your camera sensor, or film. Knowing how long to let this detail past your shutter is what makes shutter speed an intricate part of the exposure triangle.

Before we dive into this article, I will only be talking about shutter speed. There are more nuances to this mechanic that play a role in choosing a shutter speed. For now though, we will look at what shutter speed does, and why you would play with this aspect of photography. I also want to note that I use light and detail as interchangeable terms.

There are two main reasons many people will want to play with shutter speeds. The first is to portray motion in a still image, while the second is to control the flow of light. Let’s dive into each of these setups and look at their use and why you might consider one shutter speed over another.

Starting off, the control of motion is quite possibly the most widely used trick for shutter speed manipulation. Shutter speeds come in measurements of time. For example, you might see a photos metadata listing a shutter speed of 1/125. This means the photo was captured at 125th of a second. Shutter speeds can range from hours, to fractions of a second as quickly as 1/8000th of a second. Read More→

The Water Logged Alien Bee Zombie Lights: by Ryan Armbrust

A few days ago, I set off to snap a senior portrait session at a football field. The guy I was shooting is a football player, so it seemed like a fantastic idea. We had keys and permission to use the field. I packed up my trusty Alien Bee 800’s as well as a battery pack to power them, some grids and the rest of my camera gear and headed to the field. When we arrived, I quickly found the shot I wanted. I would place him in front of the score board right at sunset. I set my lights up and popped off a couple test shots. I wanted to get everything in place so I would not be rushed at sunset. I wanted that nice cobalt blue sky that last about 10 minutes. After everything was set up, we headed to the other end zone to grab some natural light shots.

AS SOON AS WE GOT TO THE OTHER END OF THE FIELD, THE SPRINKLERS CAME ON!

Read More→

5 Easy Tips to Improve Your Portraits (and they don’t cost a dime)

Often times a portrait photographer does everything right; perfect lighting, great location, correct exposure and flawless composition. However, the photo still comes out flat. Something isn’t right. Smiles are forced, people are uncomfortable and the emotion is just not there. The fact is, if you’re photographing people don’t forget about the most important part – the people. When was the last time you were in front of the camera? Do you remember how that felt? If not, please ask someone to take your photo and come back to this post after you’re done. The bottom line is that being in front of the camera can be rather difficult and stressful for some people and it’s our job as photographers to make them feel at ease so that they in turn will look better in the image. Here are five tips to improve your attitude (and in turn your portraits):

  1. Don’t put the blame on the subject – remember that your attitude is everything and it’s only your attitude that you can control. Consciously or not, people will sense if you are angry, annoyed or uneasy in any way so check the grump factor at the door. If you’re photographing children or pets your attitude is even more important because both of these will immediately sense your frustration and then you might as well pack up and go home.
  2. Take the time to talk to (and listen to) your subject (yes, even works with pets). Show an honest interest in them. If you have serious disdain for whatever you are photographing please consider another line of work before you take on something that will only lead to disappointment. Read More→