Archive for News and Reviews – Page 3

OSXcellence – Darktable Review

The photo library genre of app is stronger now than it has ever been, with Adobe and Apple adding more and more features to their respective flagship software, Lightroom and Aperture. So all-singing and all-dancing are these heavyweights, that many editing apps have been made redundant, their features being replicated and integrated into these mammoth photo organisers. But with this increase in functionality comes an increase in price; what if you want something that will process your RAW files and allow you to organise your pictures, without having to take out a mortgage to afford it? Perhaps you should look at darktable.

Despite being an open source project, darktable looks the business. The interface is sort of….well, dark really. It also happens to be clear and highly usable. But how darktable looks is very much a by-the-by, because the real interest here is the amazingly powerful array of organisation and editing tools.

Once you’ve imported your images to darktable, you are presented with a bewildering number of organisation options; from keywords, to collections, to image exposure comparison, there shouldn’t be a time when you can’t find the image you’re after. All the standard organisation functions found in more expensive offerings are present and correct, though, like star ratings and colour labelling, and I have to say, all of these functions work incredibly smoothly and rapidly.

Read More→

OSXcellence – LightFrame Review

Great images will always be pleasing on the eye, but the overall impression a viewer will get is dependant on how that image is presented. This includes factors such as whether the image is digital or on paper, editing quality, but also framing. Whilst you can just go out and buy a frame for printed pictures, digital images need the help of some software to make them stand out. LightFrame uses OSX’s in-built textures to superimpose digital frames around your pictures, but is it a presentation improver or degrader?

The first thing I noticed about LightFrame is how dodgy the viewing controls are. I tried to zoom in and out of the picture, but just ended up with a semi-zoomed-in view which was heavily distorted – not a good start. Loading up the tools in LightFrame is easy enough (assuming you guess that the “scenes” button opens up the tool palette), as is the process of using the tools themselves. Alongside the framing options, LightFrame has a number of other features, such as the ability to add a caption or sprite to the image, plus image cropping and resizing.

The textured frames in LightFrame are terrible, looking like something grabbed from a gaudy mid-90s web page. On the plus side, the plain colour frames look okay, and LightFrame’s in-built shadow creator is pretty nifty, allowing you to select the angle of light. In addition, LightFrame can create borderless frames (like the clip ones); that is, it can create the shiny effect of its real-life counterpart.

The rest of the functions in LightFrame work well enough, although the list of apps out there that will perform the exact same functions (many being free, I should add) is the size of several directories. It is also worth noting that many of LightFrame’s rivals work a great deal better. Read More→

Foap IOS App: Sell Stock Photos on Your iPhone

If you are a photographer it is likely that you have at least considered signing on with a microstock agency to sell your stock photos. Some photographers make a very good living selling stock photos. But how many of us make a living selling stock photos from our iPhones? Me either. But is is possible to generate some income from photos taken on your iPhone or other smart phone?

The folks at Foap say they can make that happen. The concept is simple. Download the Foap app and sign up for an account. Then upload your photos through the app. Once your photos are approved they will be added to the Foap website where they may be purchased for $10 per download. You get $5 per purchase and Foap keeps $5. It’s pretty much that simple.

So are you ready to strike it rich by selling photos on your iPhone? My guess is that you will not. But could you generate some extra income for your iPhone photos? Perhaps. My job is not to critique the concept, but to review the application.

Read More→

OSXcellence – PhotoStyler Review

PhotoStyler LogoInstagram has achieved astonishing popularity given its restricion to Android and iOS. At present, however, there is no true Mac equivalent to the easy styling found in Instagram. That’s not to say there aren’t plenty of fine “effects” apps available for OSX (see CameraBag 2 and FX Photo Studio Pro) – it’s just that none of them has the same speed and simplicity as the Facebook-owned mobile photo app. Well, when I say none…PhotoStyler from NeatBerry looks like it’s trying to be next best thing, but does it do the job?

Well the quantity of preset styles in PhotoStyler is not an area of concern. 138 are available, and can be ordered by tags, such as Retro or Lomo; you can also add your own tags, essentially allowing you to create custom groups of styles for easy access. If you want instant styling, you can just choose one of the presets, and you’re ready for upload or saving – conveniently, PhotoStyler includes the ability to upload pictures straight to Flickr or Facebook.

If you want more control, however, PhotoStyler allows you to tweak and tinker with the preset styles, or even create your own. The preset styles in PhotoStyler are actually combinations of “filters.” These are layers which add effects to your image; for example, the “Instant EK6” preset style consists of the polaroid-style frame and “Instant Photo” filter, the “Color of 70s” filter, which replicates the colour-warping which films of this era tended to exhibit, and the “Flare” filter. The result is a very believable film effect, and you can fine tune the look using the in-built filter adjustments, such as brightness and contrast.

PhotoStyler ScreenShot

Read More→

OSXcellence – Hydra Pro Review

As a photographer, my main focus is landscapes, and my style is to try to keep my images realistic. Often, this means just using one well-balanced exposure, but at times, I need to use more than one exposure to capture what my eyes saw. Personally, I prefer to blend multiple images in Photoshop, by hand, but other photographers like the effect that HDR brings. For these folks, Photomatix is currently the king of HDR apps; amongst the challengers for Photomatix’s throne is Hydra – but is it regal material?

Hydra comes in two editions – standard and Pro – and the main differences between the two are the number of images which can be blended at one time (3 and 7 respectively), and the fact that Pro comes with Lightroom and Aperture plug-ins.

Loading images into the standalone app is easy – Hydra provides an image browsing window which allows you to view photos in your iPhoto or Aperture library, or on your hard drive. A quick drag-and-drop, and your images are ready for pre-HDR processing. The HDR-preparation process in Hydra is relatively minimal, largely consisting of EV (exposure value) and temperature adjustment, as well as manual image alignment, a crop function, and ghosting reduction controls. And just for the record, these work perfectly well.

The magic – a.k.a. HDR – happens on the develop menu. If you’re in a hurry, you can select from one of 11 presets, these ranging from “photorealistic” to “cyanotype.” For more control you can head to the adjust menu; here are all the standard image controls, which can be applied to the composite image.

There are two additional features, however, that make Hydra stand out from the crowd. The first is the option of “Snapshots.” During the HDR-adjustment process, you can make up to five different copies of your image, the idea being that you can temporarily save up to five different sets of image adjustment, and then compare them easily to choose the one that looks best. The other killer feature is “Probes.” Probes are basically local adjustments to your image, and they work in a similar way to Lightroom’s local adjustments – place a dot, and choose how large the area around it – the area to be adjusted – should be. Read More→

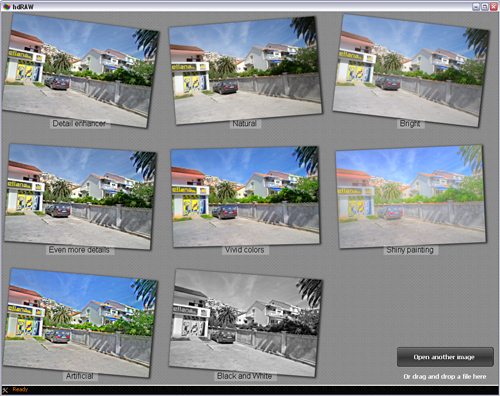
OSXcellence – HDRAW Review

As digital processing techniques go, HDR is a relative new boy – how many of us were using Photomatix 5 or 6 years ago? Now, however, it has spread contagiously amongst photographers, at its best when being harnessed to produce beautiful images, but often being used to produce eye-stingingly garish results. Love it or hate it, though, HDR is here to stay and as a result, there are now numerous apps vying for your tone-mapping attention. One such app is HDRAW, but with its idea of single image HDR creation using a RAW file, is it a realistic contender for the low-contrast crown?

As stated above, the most noticeable feature of HDRAW is its single-image approach to creating an HDR image. This method has both positives and negatives; only having to compute one image file at a time means HDRAW can operate smoothly and quickly – an effect accentuated by HDRAW’s pleasant interface. The downside of HDR using only one image is that you are stretching your picture to its limit, and with this in mind, you won’t want to be using HDRAW for big prints or for stock libraries. I must admit, however, that I was suprised by how much detail HDRAW claimed back from the darkest shadows and lightest highlights.

HDRAW has three methods of achieving high dynamic range, each a different technology, and each producing its own variation. The first is Almalence, which uses the HDR processing method from the company of the same name. Images processed via this method have a smooth colour transition, but look somewhat painterly and unnatural. The second processing option is Reinhard, named after computer brainbox Erik Reinhard, who was one of the original developers of the HDR process. His pet hate is overdone HDR – a subject he speaks and writes about regularly – so as you might imagine, this option in HDRAW is subtle, and favours realism over drawing out the maximum detail from your RAW file. Finally, there is the Fattal option, again named after its inventor, Raanan Fattal, who is another computer-science wizard, and whose paper-writing credentials include “Edge-preserving decompositions for multi-scale tone and detail manipulation” and “Image upsampling via texture hallucination“. It is not surprising, given this light manipulation background, that Fattal’s method is more of an exercise in retrieving ultimate detail from a RAW file, rather than making it look good.

Read More→